
티스토리 뷰
run-cicd 소개
run-cicd는 container image를 build하여, kubernetes상에 workload를 배포하는 CI/CD툴입니다.
linux shell로 만들어져 있어 Jenkins, bamboo, Tekton설치 없이 쉽게 사용할 수 있습니다.
소스: https://github.com/happyspringcloud/run-cicd.git
1. How to install
- CI/CD를 수행할 VM을 로그인 합니다.
- root user가 아닌 다른 OS user로 실행하고자 하는 경우 그 유저로 전환 합니다. : su - {username}
- github.com에서 설치 합니다.
git clone https://github.com/happyspringcloud/run-cicd.git
- Symbolic link를 만들어서 어디서나 실행되게 합니다.
$ sudo ln -s ~/run-cicd/cmd/run-cicd /usr/local/bin/run-cicd
- Shell type 변경: shell은 /bin/sh로 작성되어 있습니다. OS와 버전(특히 ubuntu)에 따라서 run-cicd를 수행하면 에러가 날 수 있습니다. 아래 명령으로 /bin/bash로 바꿔서 수행하시기 바랍니다.
$ ~/run-cicd/cmd/shebang sh bash
2. How to run
- 작업 디렉토리를 만들고 이동 하십시오.
- 소스를 clone하시고 소스 루트 디렉토리로 이동 합니다.
$ cd ~/work $ git clone https://github.com/sc-hklee/webhook.git $ cd webhook/ - run cicd를 수행 합니다.
$ run-cicd
TIP) run-cicd에 파라미터를 주어 한줄로 실행할 수 있습니다.
run-cicd {id for image registry} {password for image registry} . {profile} . {language} {config server ingress host}
ex) run-cicd hklee passw0rd . dev . java config.169.56.70.197.nip.io
Rules for run-cicd
run-cicd를 사용하여 CI/CD하기 위해 따라야할 몇가지 규칙이 있습니다.
1. non-java applicaton과 config server를 사용하지 않는 java application
cicd디렉토리를 만들고, cicd관련, configmap, secret 설정 파일들을 만드십시오.
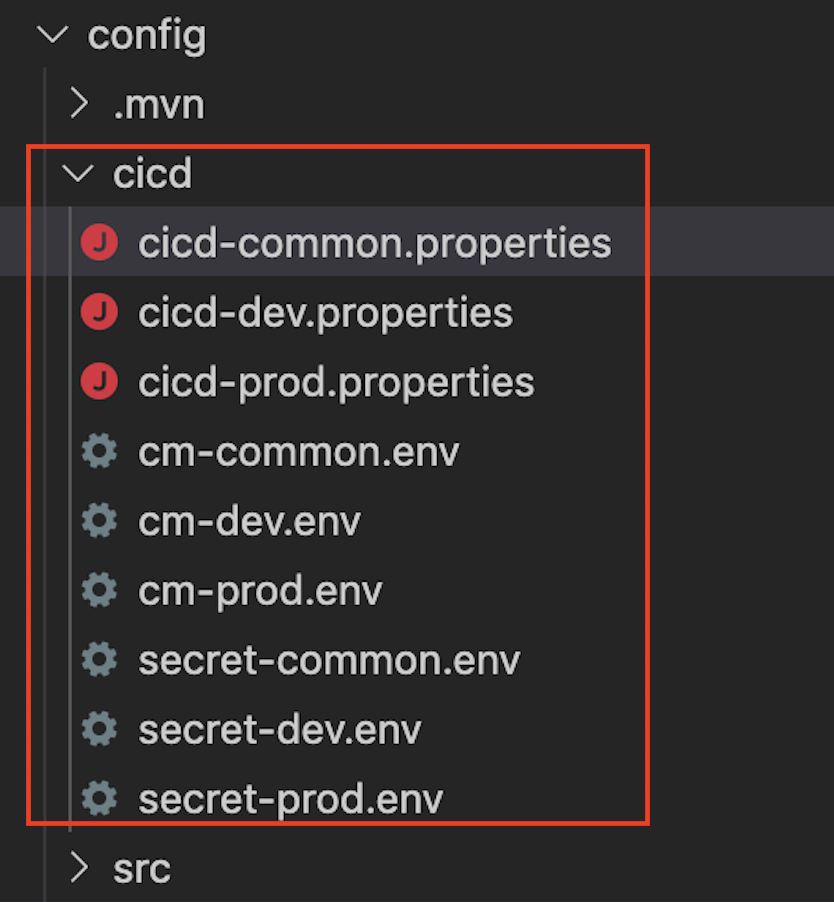
각 파일의 예제는 아래와 같습니다.
cicd-common.properties
 # Container Image info
image_registry=harbor.io
image_project=sc-hklee
image_repository=config
image_tag=0.0.1

# resources
req_cpu=128m
req_mem=128Mi
limit_cpu=1024m
limit_mem=1024Mi

# workload kind and related things
workload_kind=Deployment
min_ready_seconds=10

# readinessProbe
readiness_enabled=true
readiness_path=/actuator/health/readiness
readiness_delay_seconds=5
readiness_period_seconds=5
readiness_timeout_seconds=3
readiness_success_threshold=1
readiness_failure_threshold=5
cicd-dev.properties
# namespace, sa
namespace=hklee
serviceaccount=sa-hklee

# Service info
service_target_port=9001
service_port=9001
service_host=config.169.56.84.41.nip.io
service_replicas=1

image_pull_policy=Always
cicd-prod.properties
# namespace, sa
namespace=hklee
serviceaccount=sa-hklee

# Service info
service_target_port=19001
service_port=19001
service_host=config.10.56.84.41.nip.io
service_replicas=2

image_pull_policy=IfNotPresent
위 3개 파일들의 내용은 필수적으로 있어야 합니다.
각 항목의 key(예: namespace, serviceaccount 등)도 key값만 바꾸고, key의 이름을 변경하시면 안됩니다.
개발과 운영의 config값이 동일하다면 dev와 prod로 나누지 않고, cicd-common.properties에 합치셔도 됩니다.
아래 cm과 secret관련파일들은 application에서 필요 없다면 없어도 됩니다.
또한 key이름도 application에서 정의한 이름으로 하시면 됩니다.
개발과 운영의 config값이 동일하다면 dev, prod로 나누지 않고 cm-common.env와 secret-common.env로 합치셔도 됩니다.
cm-common.env
# git info
git_host=github.com
git_port=443
git_org=sc-hklee
git_repo=configmng.git
git_branch=main
git_id=happycloudpak
cm-dev.env
# message queue info
mq_host=rabbitmq
mq_port=5672
mq_id=guest
cm-prod.env
# message queue info
mq_host=rabbitmq
mq_port=15672
mq_id=hr-guest
secret-common.env
git_pw=Happy@cloud$12345secret-dev.env
mq_pw=guestsecret-prod.env
mq_pw=Snow2Day$@#$
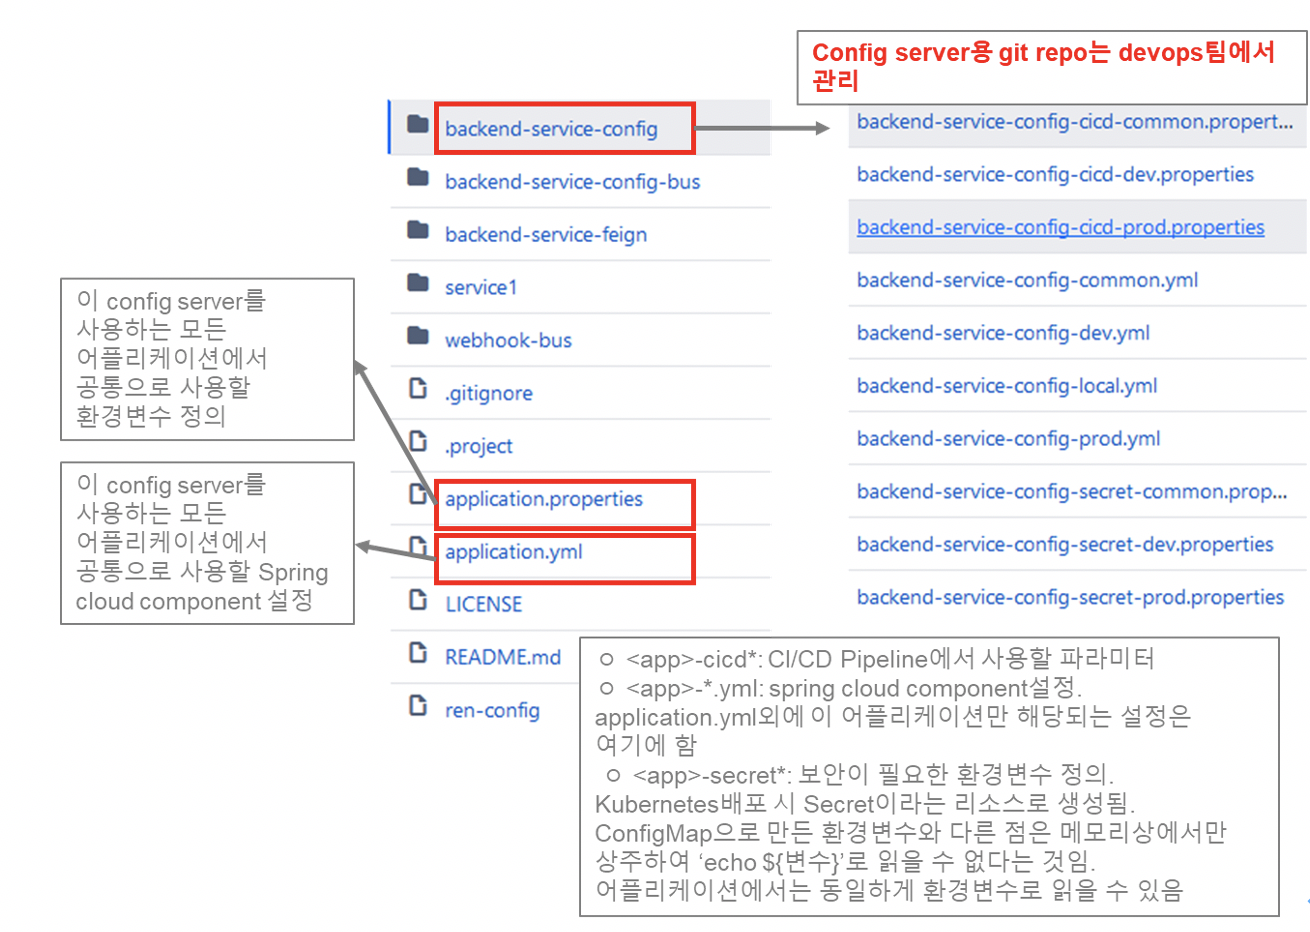
2. config server를 사용하는 java application
config server를 사용할때는 project에는 cm관련 설정만 남기시고, 나머지는 config git repository로 옮기십시오.
config git repository의 구조는 아래와 같습니다.
자세한 설명은 [SC03] Spring Cloud Config란 ? 을 참조하십시오.
run-cicd Shell 이해
1. read-config
config-server를 통해 config정보를 읽어 파일로 만드는 shell입니다.
config server에서 REST API로 download한 json형식 파일을 jq (json parser)로 파싱하여 필요한 파일을 만듭니다.
1) cicd 설정
아래 주소로 configuration읽어 cicd/cicd.properties파일 생성
http://${config server host}/${appname}/cicd-common
http://${config server host}/${appname}/cicd-${profile}
2) 환경변수 설정
아래 주소로 configuration읽어 cicd/cm.properties파일 생성
http://${config server host}/${appname}/cm-common
http://${config server host}/${appname}/cm-${profile}
3) Secret 설정
아래 주소로 configuration읽어 cicd/secret.properties파일 생성
http://${config server host}/${appname}/secret-common
http://${config server host}/${appname}/secret-${profile}
2. build-image
project 소스의 cicd/cicd-common.properties와 cicd/cicd-{profile:dev 또는 prod}.properties 파일이 있으면 그 파일을 이용하고,
없으면 read-config에서 만들어진 cicd.properties파일을 이용하여 image를 build 합니다.
dockerfile은 run-cicd/dockerfile디렉토리에 있으며, 언어에 따라 맞는 dockerfile을 이용하여 image를 build합니다.
3. push-image
build된 이미지를 지정된 image registry로 푸시 합니다.
4. deploy
config server를 이용하는 경우
read-config로 만들어진 cicd[cm, secret].properties 파일을 이용하여 application을 deploy합니다.
단, cicd 관련한 설정은 project 소스에 cicd/cicd-common.properties 파일과 cicd/cicd-{profile}.properties파일이 있으면 그 파일들을 이용 합니다.
config server가 없는 경우
소스의 cicd디렉토리 밑에 있는 파일들을 이용하여 배포 합니다.
cicd디렉토리에 작성한 cicd-common.properties, cicd-{profile}.properties, cm-common.env, cm-{profile}.env, secret-common.env, secret-{profile}.env파일들을 이용 합니다.
아래와 같은 순서로 수행합니다.
1) 동일한 어플리케이션, 동일한 버전이 있으면 삭제함
2) ConfigMap 생성
read-config가 만든 cm.properties가 있으면 그 파일을 이용합니다.
project 소스에 개발자가 작성한 cm-common.env, cm-{profile}.env이 있으면 그 파일을 이용합니다.
"<application name>-cm" 이라는 이름으로 ConfigMap을 생성합니다.
3) Secret 생성
read-config가 만든 secret.properties가 있으면 그 파일을 이용합니다.
project 소스에 개발자가 작성한 secret-common.env, secret-{profile}.env파일이 있으면 그 파일들을 이용합니다.
"<application name>-secret" 이라는 이름으로 Secret을 생성합니다.
4) deploy yaml 생성:
run-cicd/deploy에 있는 yaml 템플릿 파일과 cicd관련 설정을 이용하여 yaml파일을 생성합니다.
5) deploy
deploy yaml파일을 apply하여 어플리케이션과 리소스들을 배포합니다.
For Mac users
Mac에서 run-cicd를 사용하시려면 jq프로그램만 Mac용으로 교체하시면 됩니다.
Shell 내용은 linux와 Mac에서 모두 동작하도록 개발되어 있습니다.
git clone 후 cmd 폴더로 이동 후 아래와 같이 jq-mac을 /usr/local/bin/jq 파일로 복사한 후 cmd폴더에 install하면 됩니다.
❯ cd ~/run-cicd/cmd
❯ ll
...
-rwxr-xr-x  1 happycloudpak  staff   257K  1 15 13:18 jq-mac
...
❯ cp jq-mac /usr/local/bin/jq
❯ install /usr/local/bin/jq ~/run-cicd/cmd/jq
'Open Sources' 카테고리의 다른 글
| visual studio code(vscode) 설치, 구성, 삭제 (0) | 2021.02.07 |
|---|---|
| jMeter를 이용한 Stress Test (0) | 2021.01.26 |
| Spring Tool Suite, Eclipse에서 git commit & push 하기 (0) | 2021.01.14 |
| Ubuntu/CentOS/Mac에 openjdk와 maven 설치 (0) | 2020.12.06 |
| LDAP에 사용자/그룹 추가 하기 (0) | 2020.09.10 |
- Total
- Today
- Yesterday
- AXON
- CQRS
- 스포티파이
- Event Sourcing
- 디토소비
- 호모프롬프트
- 요즘남편 없던아빠
- 마이크로서비스
- spotify
- 도파밍
- 분초사회
- 버라이어티가격
- 돌봄경제
- SAGA
- 스핀프로젝트
- micro service
- 마이크로서비스 패턴
- API Composition
- 리퀴드폴리탄
- 애자일
- agile
- 육각형인간
| 일 | 월 | 화 | 수 | 목 | 금 | 토 |
|---|---|---|---|---|---|---|
| 1 | 2 | 3 | 4 | 5 | 6 | 7 |
| 8 | 9 | 10 | 11 | 12 | 13 | 14 |
| 15 | 16 | 17 | 18 | 19 | 20 | 21 |
| 22 | 23 | 24 | 25 | 26 | 27 | 28 |