티스토리 뷰
jMeter는 Helm차크를 이용하여 Master와 실제로 부하를 줄 복수의 jmeter server들을 설치합니다.
jMeter는 성능테스트할 Target cluster가 아닌 다른 k8s cluster에 설치 합니다.
사전준비
- 성능테스트 용 k8s cluster 구성
- namespace 작성
$ ln -s /usr/bin/kubectl /usr/local/bin/k
$ k create ns stress
$ k config set-context $(k config current-context) --namespace stress
- (중요) root로 실행될 수 있도록 anyuid에 default SA를 추가함
$ oc adm policy add-scc-to-user anyuid -z default
vanilla에서는 kubectl create clusterrolebinding crb-stress-default --clusterrole=cluster-admin --serviceaccount=stress:default
jMeter 서버 설치
- helm repository 추가: helm repo add stable https://charts.helm.sh/stable
- config파일 생성
$ vi jmeter.yaml
master:
  ## The number of pods in the master deployment
  replicaCount: 1
server:
  ## The number of pods in the server deployment
  replicaCount: 2

image:
  pullPolicy: IfNotPresent
  repository: "pedrocesarti/jmeter-docker"
  tag: 3.3
- jMeter 서버 설치 as Pod
$ helm install jmeter -f jmeter.yaml stable/distributed-jmeter
jMeter 클라이언트 설치 및 script 작성
1. 설치
인터넷에서 설치 가이드를 보고 설치합니다.
Mac은 $ brew install jmeter 로 설치합니다.
2. script작성
1) Thread Group 추가


- Action to be taken after a Sampler error: 에러가 발생하면 어떻게 할것인가 지정
. Continue: 해당 user(=thread)로 계속 테스트
. Start Next Thread Loop: 잘 모르겠음
. Stop Thread: 에러가 난 user는 테스트 중단. 이 옵션 선택하면, 에러가 난 사용자는 부하를 더 이상 안주게 됨
. Stop Test, Stop Test Now: 둘 차이는 모르겠으나, 에러가 난 테스트 요청(HttpRequest)은 부하 테스트를 중단
- Number of Threads(user): 테스트 할 사용자 수. jmeter server가 여러대면 총 사용자 수는 jmeter server 수 * users가 됨.
- Ramp-up period: 지정된 사용자가 모두 로딩될 시간. 위 예에서는 100초간 100명이 로딩되므로, 1초에 1명씩 로딩됨.
- Loop Count: 테스트할 횟수. 시간으로 지정하려면 위 그림처럼 'Infinite'를 체크하고, Duration에 수행할 시간을 지정함.
- Loop Count밑의 옵션 3개는 모두 체크하세요.
2) HTTP Request sampler 추가

Name, Server Name or IP, Method, Path를 입력합니다.
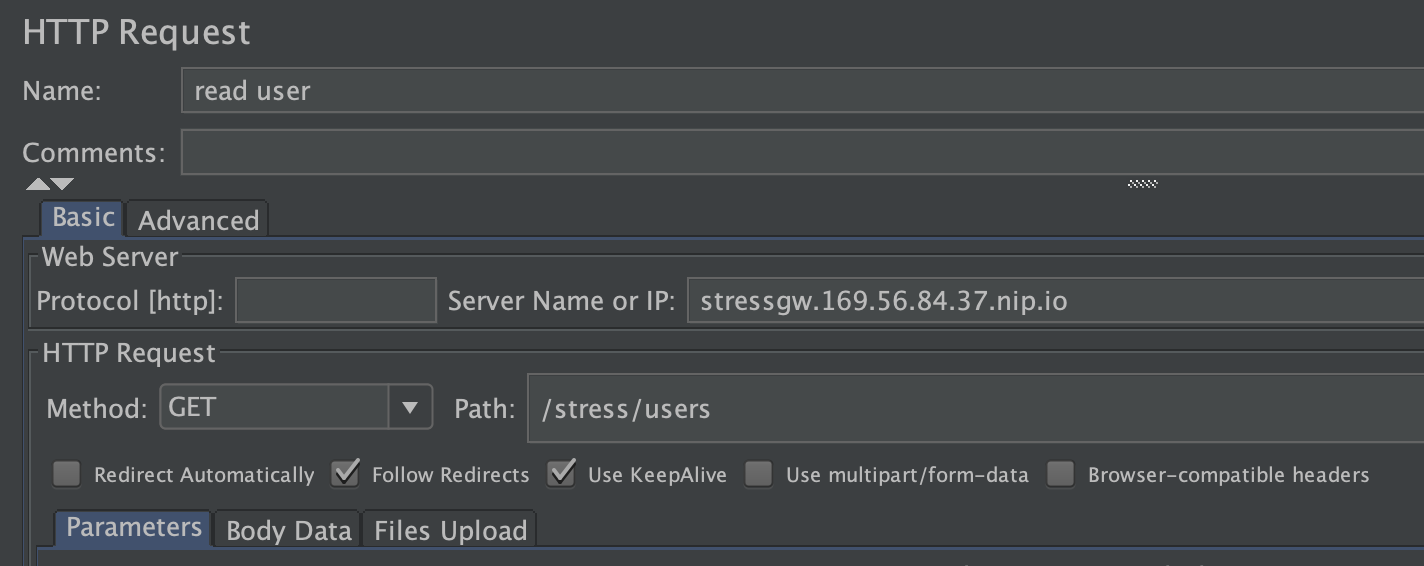
[Advanced]탭을 눌러 Timeout을 지정합니다.
Timeout을 너무 짧게 주면, 부하를 누기도 전에 waiting하다가 실패로 떨어집니다.
그렇게 되면 에러율이 너무 많이 나오게 됩니다. 충분히 늘려 주십시오.

HTTP Header 추가
json type으로 POST하는 경우는 헤더에 Content-Type을 application/json으로 지정해 줘야 합니다.
이런 경우 HTTP Header Manager를 추가하여 지정합니다.
Thread Group > Add > Config Element > HTTP Header Manager 선택

하단에 있는 '[Add]'버튼을 눌러 추가합니다.

자동으로 증가하는 Counter 추가
user id와 같은 항목은 자동으로 1씩 증가시키면서 값을 바꿀 필요가 있습니다.
Thread Group > Add > Config Element > Counter를 선택합니다.
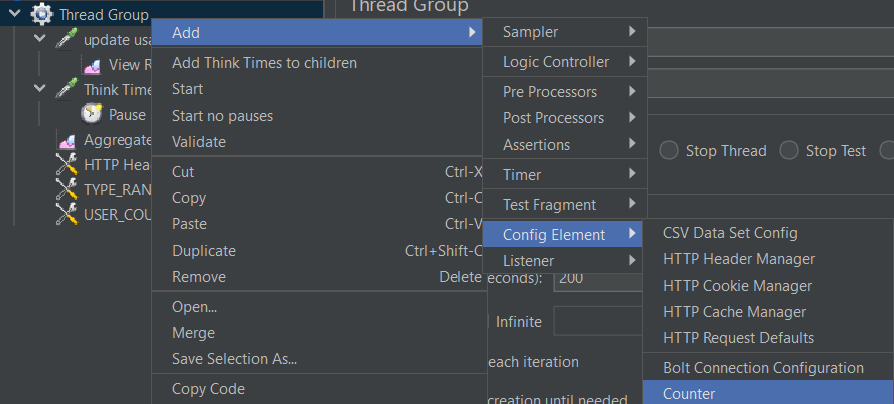
아래 예와 같이 지정합니다. 이 예는 1부터 1000번까지 1씩 증가시킵니다.
그 값은 user뒤에 4자리의 일련번호를 붙여 USER_ID라는 변수에 셋팅합니다.

HTTP Reqeust에서 이 변수를 아래 예와 같이 사용합니다.
{
    "userId": "${USER_ID}",
    "type": "${__V(TYPE_${__Random(1,4)})}",
    "amount": ${__Random(100,10000)}
}
랜덤값 지정
위 HTTP Request 예제의 __Random함수를 이용하여 지정 합니다.
옵션 리스트에서 지정 하기
지정된 옵션 리스트에서 랜덤하게 1개의 값을 지정할 필요가 있습니다.
예를 들어 type이라는 항목에 DATA, VOICE, VIDEO의 리스트에서 한 개 값이 지정되게 해야 되는 경우입니다.
Thread Group > Add > Config Element > User Defined Variables를 생성합니다.

필요한 값을 추가하여 작성합니다.

아래 예와 같이 ${__V(TYPE_${__Random(1,4)})} 의 형태로 사용합니다.
'TYPE_$'와 __Random함수 내의 최대값은 정의한 변수값에 따라 맞춰서 바꿔야 합니다.
{
    "userId": "${USER_ID}",
    "type": "${__V(TYPE_${__Random(1,4)})}",
    "amount": ${__Random(100,10000)}
}
3) Think Time 추가
한 user가 지정된 Http Request를 한 후 동작을 멈출(잠시 생각할) 시간을 지정합니다.
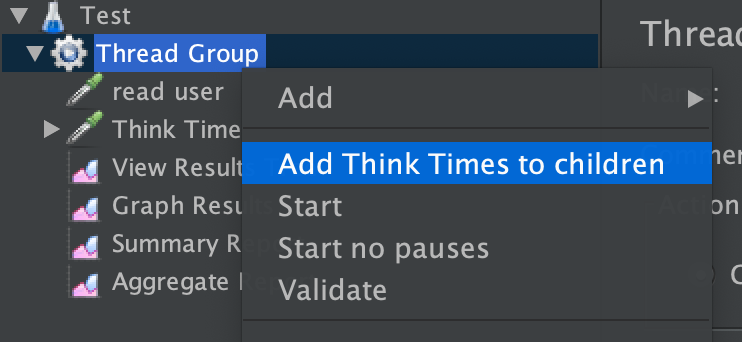
'Pause'로 선택하고, Duration은 0으로 합니다. Think Time은 그 하위에 자동으로 추가된 Pause에서 지정합니다.

하위에 자동 추가된 Pause에 지정합니다. 아래 두 값을 합한 시간만큼이 Think Time입니다.
Think Time은 보통 20초 정도로 합니다.
부하를 더 많이 주려면 Think Time을 줄이거나, users수를 늘립니다.

4) Listener 'Aggregate Report' 추가
Listener는 결과값을 보여줄 컴포넌트입니다.
가장 기본적인 Listener가 'Aggregate Report'입니다.
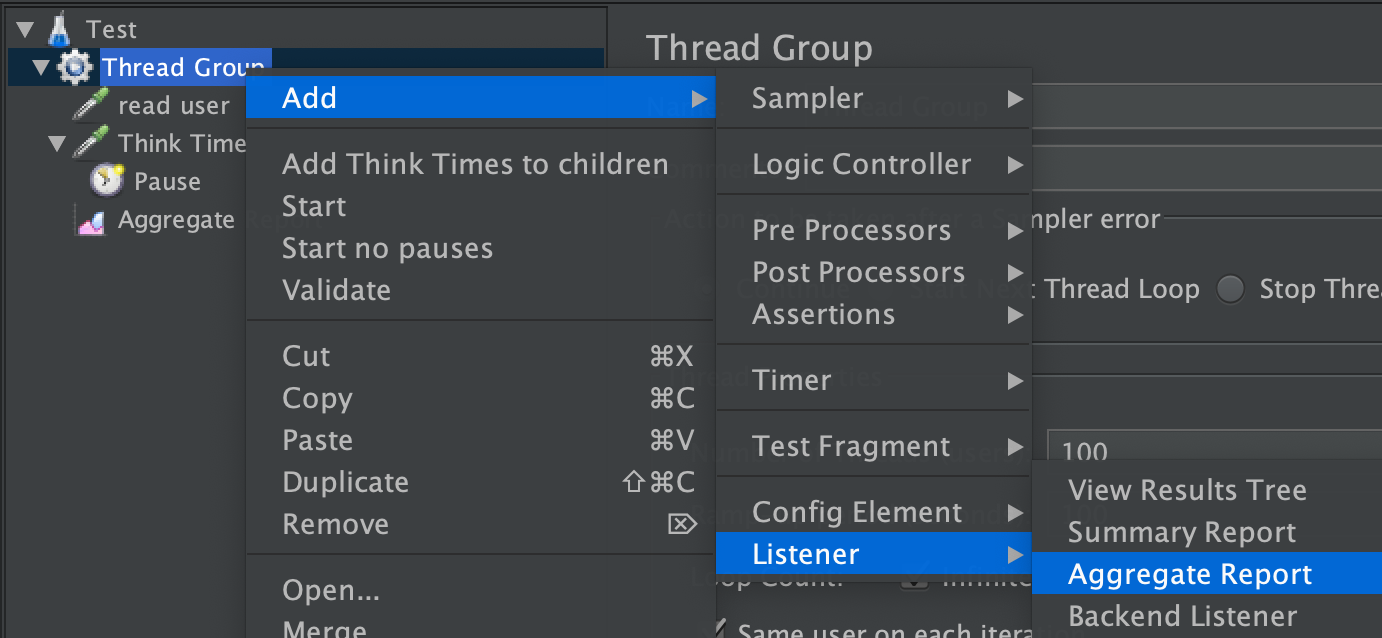
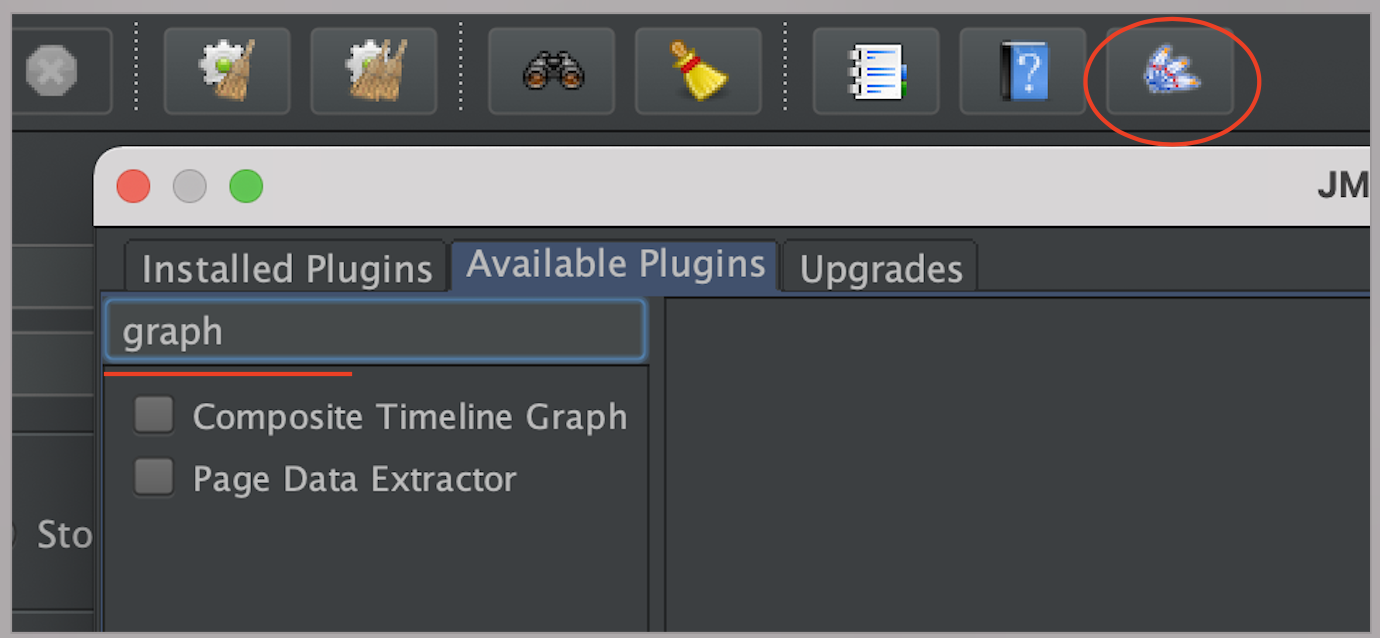
Graph 리스너를 추가하려면 아래와 같이 Plugin을 추가합니다.
제일 오른쪽 아이콘을 클릭하고, Available Plugins에서 'graph'로 검색하여 설치합니다.
jMeter 실행
- script를 저장합니다.

- script파일을 부하 테스트를 할 서버(k8s cluster와 연결된 작업 서버)로 복사합니다.
Mac은 scp명령을 이용하고, Window는 FTP같은 File upload프로그램을 이용합니다.
> scp ./test.jmx root@169.56.84.41:/home/stress/run-st/scripts/test.jmx
- 작업 서버로 접근합니다.
- 실행 shell을 다운로드합니다.
$ cd ~
$ git clone https://github.com/cna-bootcamp/run-st.git
- 실행하기
$ cd ~/run-st
$ run-st {testcase id} {max jvm memory}
ex) run-st test 3g
사용자가 100명 정도 넘으면 JVM Heap Memory를 늘려줘야 합니다.
결과 보기
- 결과파일을 PC에 다운로드
결과 파일은 ~/run-st/results디렉토리에 {testcase id}.jtl로 저장됩니다.
Mac은 PC에서 scp명령으로 다운로드하고, Window은 FTP같은 파일 처리 프로그램을 이용하여 다운로드 합니다.
> scp root@169.56.84.41:/home/stress/run-st/results/test.jtl ./test.jtl- jmeter 클라이언트에서 결과 파일(jmeter.jtl)을 import합니다.
아래 결과는 read user에 대한 결과를 보여줍니다.
90% Line이란 가장 빠른 쪽 5%, 가장 늦은 쪽 5%를 제외한 가운데 90%의 응답속도입니다.
. 총 요청횟수: 510151회
. 평균응답속도: 약 20.3초
. 90% 응답속도: 약 128.5초
. 처리량(Throughput): 초당 383.2회 처리

참고) HPA
Horizontal Pod Autoscaler 리소스를 만드는 명령입니다.
kubectl autoscale (-f FILENAME | TYPE NAME | TYPE/NAME) [--min=MINPODS] --max=MAXPODS [--cpu-percent=CPU]

ex) kubectl autoscale statefulset stresstest --min=1 --max=100 --cpu-percent=50
또는 아래와 같이 yaml파일을 이용하여 지정할 수도 있습니다.
apiVersion: autoscaling/v1
kind: HorizontalPodAutoscaler
# CLI-> kubectl autoscale statefulset stresstest --min=1 --max=100 --cpu-percent=50
metadata:
  annotations:
  name: stresstest
  namespace: stress
spec:
  maxReplicas: 2000
  minReplicas: 1
  scaleTargetRef:
    apiVersion: apps/v1
    kind: Deployment
    name: stresstest
  targetCPUUtilizationPercentage: 70
부하테스트 실전 가이드
아래는 모회사에서 수행한 부하테스트 실전 가이드입니다.
1. 사전준비
- bastion서버: stress테스트용 k8s클러스터와 서비스용 k8s클러스터를 접근할 수 있는 VM
- bastion의 OS id 'stress': stress테스트용 k8s클러스터와 연결된 계정
- bastion의 OS id 'user01': 서비스용 k8s클러스터와 연결된 계정
- 스트레스 테스트 shell 프로그램: bastion접근 -> su - stress -> git clone https://github.com/happykube/run-st.git
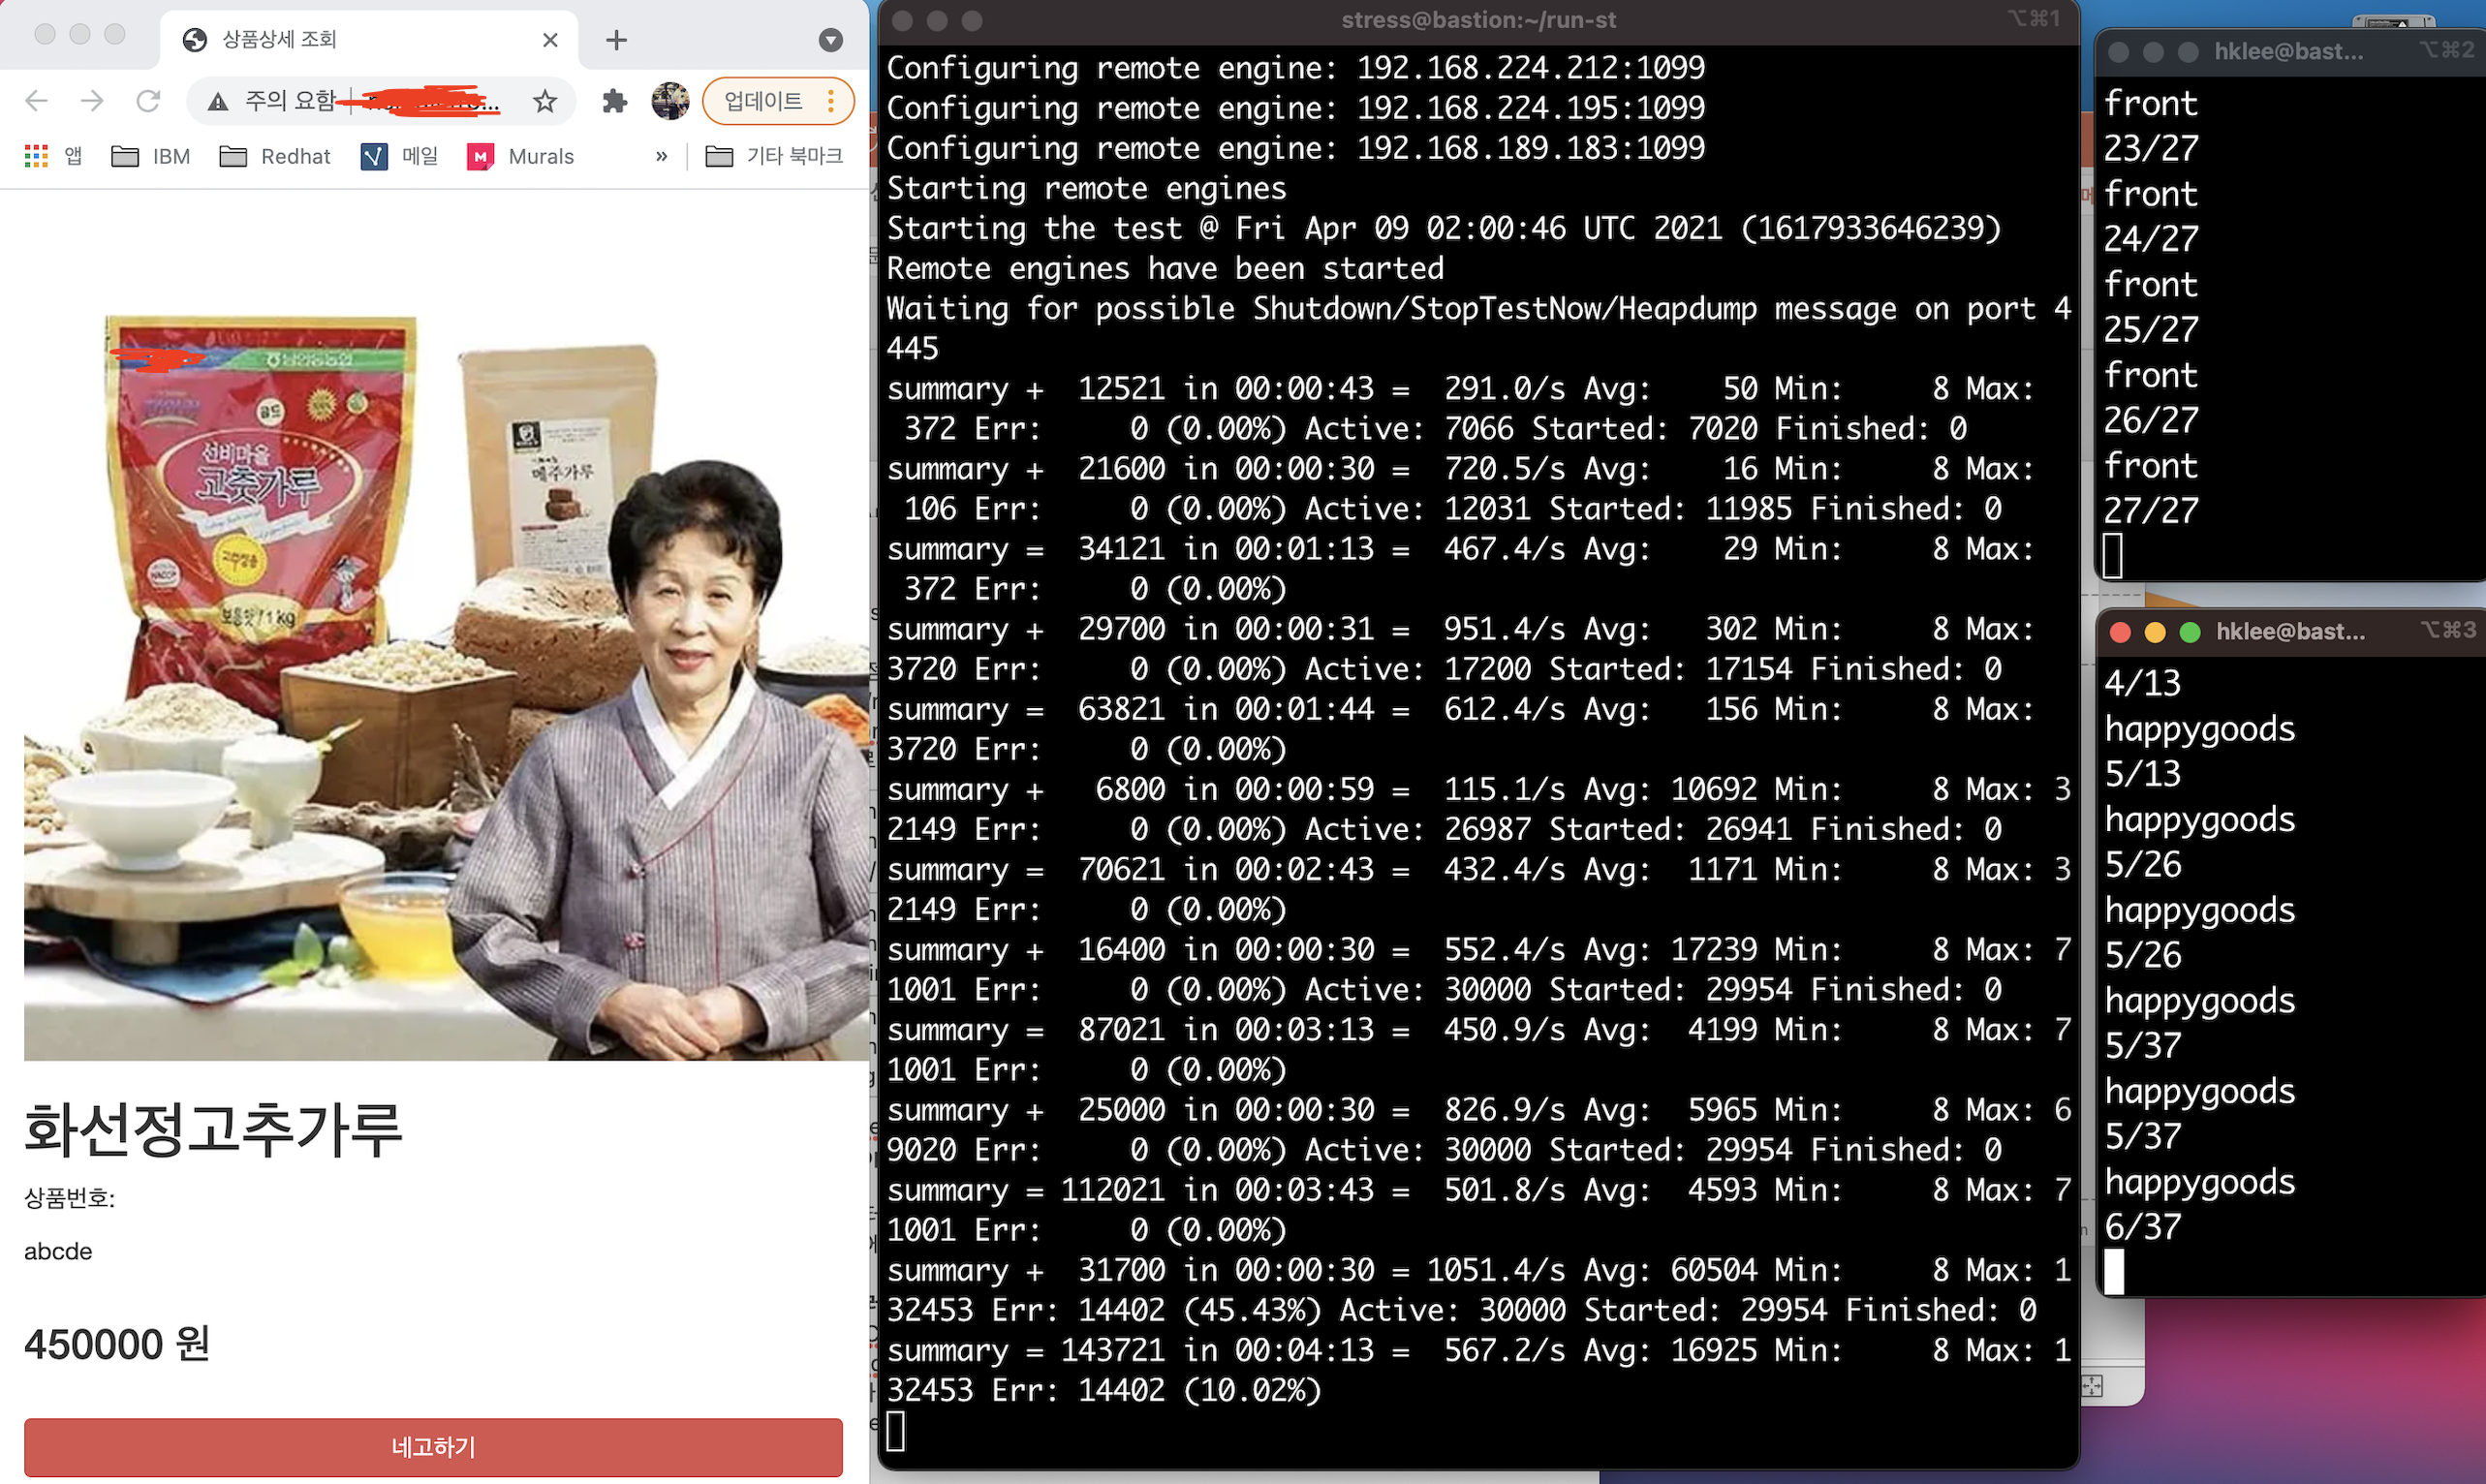
2. 수행 화면 배치: 아래와 같이 3개의 컬럼으로 화면을 배치합니다.
- 1 column: 테스트 대상 페이지를 웹브라우저에서 오픈
- 2 column: bastion접근 -> su - stress -> cd run-st
- 3 column: bastion접근-> su - user01
- front앱 pod 모니터링: k get deploy {front앱의 deployment명} -w | awk '{print $1} {print $2}'
- backend앱 pod 모니터링: k get {deploy 또는 statefulset} {backend앱의 deploy OR statefulset명} -w | awk '{print $1}{print $2}'
3. Pod수 체크 및 HPA생성
아래 수행을 별도 터미널에서 bastion의 user01로 switch한 후 수행합니다.
- front앱, backend앱의 Pod수를 1로 조정
$ k scale deploy {front --replicas=1
$ k scale  {deploy 또는 statefulset} {backend앱의 deploy OR StatefulSet명} --repliacas=1
모두 1이 될때까지 기다립니다.
- HPA를 생성합니다.
$ k autoscale deploy {front앱명} --min=1 --max=200 --cpu-percent=70
$ k autoscale  {deploy 또는 statefulset} {backend앱의 deploy OR StatefulSet명} --min=1 --max=200 --cpu-percent=70
4. 스트레스트 테스트 수행
- jmeter server pod 점검: 별도 터미널에서 bastion의 stress id로 전환하여 수행
20개인지 확인
$ k get po | grep server | wc -l
20개가 아니면 20개로 scaling
$ k scale deploy $(k get deploy | grep server | awk '{print $1}') --replicas=20
- script 점검: 별도 터미널에서 bastion의 stress id로 전환하여 수행
$ cd ~/run-st/scripts
$ vi front.jmx
순서대로 jmeter서버당 사용자, 사용자가 모두 로딩될 시간(초), 총 수행 시간(초)임
<stringProp name="ThreadGroup.num_threads">1500</stringProp>
<stringProp name="ThreadGroup.ramp_time">180</stringProp>
<stringProp name="ThreadGroup.duration">360</stringProp>
* 그 외 jmeter스크립트 작성방법은 이 글 처음을 참조하세요.
- 가운데 터미널에서 run-st front 5g 수행
- 완료 후에 결과는 ~/run-st/results에 front.jtl로 생성됨
* 참고: 스트레스 테스트 중 강제 종료 및 재실행
- CTRL-C로 강제 종료
- 모든 hpa 삭제: k delete hpa --all
- 재시작하기 전에 모든 jmeter pod삭제
$ k delete po --all
- '3. Pod수 체크 및 HPA생성'부터 재실행
아래는 테스트 할 sample application이 마땅치 않은 경우, 사용할 수 있는 guestbook과 wordpress배포 방법입니다.
사전에 아래를 참고하여 nfs dynamic provisioning을 하십시오. 또는 PV를 직접 만드셔도 됩니다.
happycloud-lee.tistory.com/178?category=832243
1. Guestbook 배포
redis배포 YAML 작성
$ vi redis.yaml
apiVersion: apps/v1 # for versions before 1.9.0 use apps/v1beta2

kind: Deployment

metadata:

  name: redis-master

  labels:

    app: redis

spec:

  selector:

    matchLabels:

      app: redis

      role: master

      tier: backend

  replicas: 1

  template:

    metadata:

      labels:

        app: redis

        role: master

        tier: backend

    spec:

      containers:

      - name: master

        image: k8s.gcr.io/redis:e2e  # or just image: redis

        resources:

          requests:

            cpu: 100m

            memory: 100Mi

        ports:

        - containerPort: 6379

---

apiVersion: v1

kind: Service

metadata:

  name: redis-master

  labels:

    app: redis

    role: master

    tier: backend

spec:

  ports:

  - port: 6379

    targetPort: 6379

  selector:

    app: redis

    role: master

    tier: backend

---

apiVersion: apps/v1 # for versions before 1.9.0 use apps/v1beta2

kind: Deployment

metadata:

  name: redis-slave

  labels:

    app: redis

spec:

  selector:

    matchLabels:

      app: redis

      role: slave

      tier: backend

  replicas: 2

  template:

    metadata:

      labels:

        app: redis

        role: slave

        tier: backend

    spec:

      containers:

      - name: slave

        image: gcr.io/google_samples/gb-redisslave:v3

        resources:

          requests:

            cpu: 100m

            memory: 100Mi

        env:

        - name: GET_HOSTS_FROM

          value: dns

          # Using `GET_HOSTS_FROM=dns` requires your cluster to

          # provide a dns service. As of Kubernetes 1.3, DNS is a built-in

          # service launched automatically. However, if the cluster you are using

          # does not have a built-in DNS service, you can instead

          # access an environment variable to find the master

          # service's host. To do so, comment out the 'value: dns' line above, and

          # uncomment the line below:

          # value: env

        ports:

        - containerPort: 6379

---

apiVersion: v1

kind: Service

metadata:

  name: redis-slave

  labels:

    app: redis

    role: slave

    tier: backend

spec:

  ports:

  - port: 6379

  selector:

    app: redis

    role: slave

    tier: backend
guestbook 배포 YAML 작성
$ vi guestbook.yaml
apiVersion: apps/v1 # for versions before 1.9.0 use apps/v1beta2

kind: Deployment

metadata:

  name: frontend

  labels:

    app: guestbook

spec:

  selector:

    matchLabels:

      app: guestbook

      tier: frontend

  replicas: 3

  template:

    metadata:

      labels:

        app: guestbook

        tier: frontend

    spec:

      containers:

      - name: php-redis

        image: gcr.io/google-samples/gb-frontend:v4

        resources:

          requests:

            cpu: 100m

            memory: 100Mi

        env:

        - name: GET_HOSTS_FROM

          value: dns

        - name: ServerName

          value: 192.168.0.189

          # Using `GET_HOSTS_FROM=dns` requires your cluster to

          # provide a dns service. As of Kubernetes 1.3, DNS is a built-in

          # service launched automatically. However, if the cluster you are using

          # does not have a built-in DNS service, you can instead

          # access an environment variable to find the master

          # service's host. To do so, comment out the 'value: dns' line above, and

          # uncomment the line below:

          # value: env

        ports:

        - containerPort: 80

---

apiVersion: v1

kind: Service

metadata:

  name: frontend

  labels:

    app: guestbook

    tier: frontend

spec:

  # comment or delete the following line if you want to use a LoadBalancer

  type: NodePort

  # if your cluster supports it, uncomment the following to automatically create

  # an external load-balanced IP for the frontend service.

  # type: LoadBalancer

  ports:

  - port: 80

  selector:

    app: guestbook

    tier: frontend

---
apiVersion: networking.k8s.io/v1
kind: Ingress
metadata:
  name: frontend
  annotations:
    ingress.kubernetes.io/rewrite-target: /
  labels:
    app: guestbook
    tier: frontend
spec:
  rules:
  - host: guestbook.169.56.84.42.nip.io
    http:
      paths:
        - path: /
          pathType: Prefix
          backend:
            service:
              name: frontend
              port:
                number: 80
배포 및 테스트
$ kubectl apply -f redis.yaml
$ kubectl apply -f guestbook.yaml
$ kubectl get ing
ingress 주소로 웹브라우저에서 접근함
2. Wordpress 배포
mysql배포 YAML작성
apiVersion: v1

kind: Service

metadata:

  name: wordpress-mysql

  labels:

    app: wordpress

spec:

  ports:

    - port: 3306

  selector:

    app: wordpress

    tier: mysql

  clusterIP: None

---

apiVersion: v1

kind: PersistentVolumeClaim

metadata:

  name: mysql-pv-claim

  labels:

    app: wordpress

spec:

  accessModes:

    - ReadWriteOnce

  resources:

    requests:

      storage: 20Gi
  storageClassName: nfs-standard
---

apiVersion: apps/v1 # for versions before 1.9.0 use apps/v1beta2

kind: Deployment

metadata:

  name: wordpress-mysql

  labels:

    app: wordpress

spec:

  selector:

    matchLabels:

      app: wordpress

      tier: mysql

  strategy:

    type: Recreate

  template:

    metadata:

      labels:

        app: wordpress

        tier: mysql

    spec:

      containers:

      - image: mysql:5.6

        name: mysql

        env:

        - name: MYSQL_ROOT_PASSWORD

          valueFrom:

            secretKeyRef:

              name: mysql-pass

              key: password

        ports:

        - containerPort: 3306

          name: mysql

        volumeMounts:

        - name: mysql-persistent-storage

          mountPath: /var/lib/mysql

      volumes:

      - name: mysql-persistent-storage

        persistentVolumeClaim:

          claimName: mysql-pv-claim
wordpress 배포 YAML 작성
apiVersion: v1

kind: Service

metadata:

  name: wordpress

  labels:

    app: wordpress

spec:

  ports:

    - port: 80

  selector:

    app: wordpress

    tier: frontend

  type: ClusterIP

---

apiVersion: v1

kind: PersistentVolumeClaim

metadata:

  name: wp-pv-claim

  labels:

    app: wordpress

spec:

  accessModes:

    - ReadWriteOnce

  resources:

    requests:

      storage: 20Gi
  storageClassName: nfs-standard

---

apiVersion: apps/v1 # for versions before 1.9.0 use apps/v1beta2

kind: Deployment

metadata:

  name: wordpress

  labels:

    app: wordpress

spec:

  selector:

    matchLabels:

      app: wordpress

      tier: frontend

  strategy:

    type: Recreate

  template:

    metadata:

      labels:

        app: wordpress

        tier: frontend

    spec:

      containers:

      - image: wordpress:4.8-apache

        name: wordpress

        env:

        - name: WORDPRESS_DB_HOST

          value: wordpress-mysql

        - name: WORDPRESS_DB_PASSWORD

          valueFrom:

            secretKeyRef:

              name: mysql-pass

              key: password

        ports:

        - containerPort: 80

          name: wordpress

        volumeMounts:

        - name: wordpress-persistent-storage

          mountPath: /var/www/html

      volumes:

      - name: wordpress-persistent-storage

        persistentVolumeClaim:

          claimName: wp-pv-claim

---
apiVersion: networking.k8s.io/v1
kind: Ingress
metadata:
  name: frontend
  annotations:
    ingress.kubernetes.io/rewrite-target: /
  labels:
    app: guestbook
    tier: frontend
spec:
  rules:
  - host: wordpress.169.56.84.42.nip.io
    http:
      paths:
        - path: /
          pathType: Prefix
          backend:
            service:
              name: frontend
              port:
                number: 80
Secret 작성 YAML 작성
$ vi kustomization.yaml
secretGenerator:
- name: mysql-pass
  literals:
  - password=passw0rd
generatorOptions:
  disableNameSuffixHash: true
배포 및 테스트
- Secret 생성 using kustomization.yaml
$ kubectl apply -k .
- mysql, wordpress 배포
$ kubectl apply -f mysql.yaml
$ kubectl apply -f wordpress.yaml
- 테스트
$ kubectl get ing
웹브라우저에서 ingress주소로 접근
'Open Sources' 카테고리의 다른 글
| Java 소스로부터 클래스다이어그램 만들기-ObjectAid (0) | 2021.03.30 |
|---|---|
| visual studio code(vscode) 설치, 구성, 삭제 (0) | 2021.02.07 |
| run-cicd: Linux Shell로 만든 가벼운 CI/CD tool (0) | 2021.01.15 |
| Spring Tool Suite, Eclipse에서 git commit & push 하기 (0) | 2021.01.14 |
| Ubuntu/CentOS/Mac에 openjdk와 maven 설치 (0) | 2020.12.06 |
- Total
- Today
- Yesterday
- agile
- 스핀프로젝트
- 애자일
- 호모프롬프트
- 리퀴드폴리탄
- API Composition
- 돌봄경제
- 도파밍
- 마이크로서비스 패턴
- 디토소비
- CQRS
- spotify
- SAGA
- 육각형인간
- 요즘남편 없던아빠
- 버라이어티가격
- micro service
- Event Sourcing
- 스포티파이
- 분초사회
- AXON
- 마이크로서비스
| 일 | 월 | 화 | 수 | 목 | 금 | 토 |
|---|---|---|---|---|---|---|
| 1 | 2 | 3 | 4 | 5 | 6 | 7 |
| 8 | 9 | 10 | 11 | 12 | 13 | 14 |
| 15 | 16 | 17 | 18 | 19 | 20 | 21 |
| 22 | 23 | 24 | 25 | 26 | 27 | 28 |
