
티스토리 뷰
Ribbon 이해
WHY ?
어떤 어플리케이션이 다른 어플리케이션을 호출할 때 대상 어플리케이션 인스턴스가 하나밖에 없다면 어떻게 될까요 ?
그 대상앱 인스턴스가 죽거나 HTTP hang이 걸리면 서비스에 장애가 발생합니다.
그래서 보통 어플리케이션 인스턴스는 1개가 아니라 최소 2개 이상을 띄웁니다.
그리고, 그 인스턴스들을 연결해 주는 Load balancer를 이용하여 연결하게 됩니다.
Web 서버 이중화

Ribbon은 Load balancing을 요청 어플리케이션 단에서 수행해주는 Client-side Load balancer입니다.
Ribbon과 같은 L/B가 필요한 이유는 부하 분산을 적절하게 하여 서비스의 가용성을 최대화하기 위함입니다.
API Gateway도 Ribbon을 통해 Backend service를 로드밸런싱합니다.
또한, Ribbon을 사용하면 API Gateway없이 대상 어플리케이션을 직접 로드밸런싱하여 연결할 수도 있습니다.
HOW ?
Spring cloud framework을 이용하면 보통 Load balancer는 API Gateway내에 embed됩니다.
API Gateway를 거치지 않고 직접 API 제공 어플리케이션을 호출하는 경우는 요청 어플리케이션에 embed됩니다.
아래는 zuul에서 ribbon을 이용한 L/B 예제입니다.
MSA Architecture example

참고) Ribbon이라는 이름은 서비스간을 띠로 연결한다는 의미에서 붙여진것 같습니다.
Ribbon vs k8s service리소스
kubernetes의 service는 Service discovery이자 Load balancer입니다.
사실 Ribbon을 사용하지 않고 API 제공 어플리케이션의 k8s service명으로 연결해도 잘 됩니다.
예를 들면 zuul에서 아래와 같이 설정하면 됩니다.
요청 Pod에서 API 제공 Pod를 'order'라는 k8s service로 연결한다는 설정이고, 잘 동작합니다.
zuul:
...
  routes:
    order:
      path: /order/**
      url: http://order:8080
그렇다면 Ribbon이 왜 필요할까요 ?
첫째, Pod가 아닌 non-container로 실행된 어플리케이션 사이의 L/B를 위해 필요합니다.
둘째, Ribbon이 제공하는 보다 정교한 Pod간 L/B설정을 이용하기 위해 필요합니다. 대표적으로 Ribbon은 라운드로빈 방식, 최소 에러 우선, 최소 응답시간 우선 정책을 선택하여 적용할 수 있습니다.
대상앱의 L/B를 물리적인 L/B(L4 또는 L7)를 이용할 수도 있습니다.
그러나 대상앱의 IP가 변할 수 있기 때문에 보통 L4/L7은 API Gateway를 연결할 때 사용합니다. 물론, API Gateway를 Pod로 실행한다면 L4/L7없이 k8s ingress를 이용해도 됩니다.
Ribbon 설정 with config file
1. zuul서버의 Ribbon설정
config file로 다양한 zuul 옵션 설정을 할 수 있습니다.
설정은 [{service}.]ribbon.*과 같이 service별로 할 수 있고, service를 생략하여 전체 서비스에 모두 적용할 수도 있습니다.
configmng에서 아래와 같이 ribbon 설정을 추가 또는 수정합니다.
application.yaml
application.yaml은 configmng를 사용하는 모든 마이크로서비스에 적용됩니다.
ribbon:
  eureka:
    enabled: true
  MaxAutoRetries: 1                 #동일 서비스 연결시도 횟수: (지정수+1)만큼 재시도
  MaxAutoRetriesNextServer: 1       #다음 서비스 연결 시도 횟수:(지정수+1)만큼 다음 서비스를 찾으려 재시도
  OkToRetryOnAllOperations: true    #HTTP Method 수행 실패시 Retry 사용 여부:
  ConnectTimeout: 3000             # 서비스별 지정
  ReadTimeout: 3000                # 서비스별 지정
  RetryableStatusCodes: 503, 408, 500, 404
  NFLoadBalancerRuleClassName: com.netflix.loadbalancer.RoundRobinRule
- eureka.enabled: eureka를 사용하여 연결할 backend service를 찾음. 이 값을 false로 하면 ribbon.listOfServers에 콤마로 구분하여 backend service의 주소를 지정해야 함.
- MaxAutoRetries: 연결 실패 시 재시도할 횟수로서 1번 이상으로 지정함. 실제 시도하는 횟수는 (지정수+1)번임.
- MaxAutoRetriesNextServer: 연결 실패 시 몇개의 다른 backend service 인스턴스에 대해 연결 시도를 할것인가 ? 제일 처음 시도한 서비스 인스턴스 수를 빼고 지정하면 되므로 (총 인스턴스수-1)로 지정함. 이 값은 서비스마다 다르므로 여기서는 default값만 지정하고, 각 서비스마다 재지정함.
- OkToRetryOnAllOperations: HTTP 메소드(PUT, DELETE, POST등) 수행 실패 시 retry를 할것인가? 단, 메소드가 'GET'인 경우는 값에 상관 없이 재시도함.
- ConnectTimeout, ReadTimeout: Timeout설정으로 miliseconds로 지정함.
- RetryableStatusCodes: Retry를 수행할 status code목록
- NFLoadBalancerRuleClassName: Load balancing정책. 사실 Default가 RoundRobin이기 때문에 지정을 안해도 됨.
지정할 수 있는 정책에는 com.netflix.loadbalancer.RoundRobinRule, com.netflix.loadbalancer.AvailabilityFilteringRule,
com.netflix.loadbalancer.WeightedResponseTimeRule이 있음. 각 정책에 대한 설명은 조금 뒤에 있음.
MaxAutoRetries, MaxAutoRetriesNextServer에 대한 완벽한 이해
Service1, Service2, Service3는 k8s Pod의 Replica로 생각하면 됩니다. 즉 Pod를 3개 띄운겁니다.
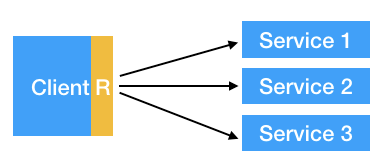
| MaxAutoRetries | MaxAutoRetriesNextServer | 결과 |
| 0 | 1 | Service1 연결 1번 시도 실패 시 Service2 연결 시도. Service2 한번 연결 시도. 실패 시 더 이상 재시도 안함 => 총 2번 시도 |
| 0 | 2 | 각 Service별로 1번 연결시도하고, 총 3개의 Service에 대해 재시도함 => 총 3번 시도 |
| 1 | 2 | 각 Service별로 2번 연결시도하고, 총 3개의 Service에 대해 재시도함=> 총 6번 시도 |
참고: www.programmersought.com/article/16961522618/
※ Auto scaling으로 Pod가 자동 증감될때 동적으로 MaxAutoRetriesNextServer값을 바꿀 수 있을까요 ?
=> 적절한 방법이 없을듯 합니다. 하지만 Best practice는 아래와 같다고 생각합니다.
- 대상 마이크로서비스 인스턴스 이상으로 한다.
- Eureka와 연동하여, 정지된 마이크로서비스 인스턴스는 연결 시도하지 않게 한다.
- ribbon.NIWSServerListFilterClassName와 ribbon.ServerListSubsetFilter.size를 이용한다. 대상 서비스 인스턴스를 상태가 좋은 순서로 나열하고, 위에서부터 지정된 수까지의 서비스인스턴스에 대해서만 연결을 시도한다.
L/B Rule 이해
1) RoundRobinRule
backend-service를 돌아가면서 연결하는 방식입니다.
ribbon:
  ...
  NFLoadBalancerRuleClassName: com.netflix.loadbalancer.RoundRobinRule
2) AvailabilityFilteringRule
가용성이 높은것부터 연결하는 방식입니다.
3번 이상 연결이 실패하면 30초동안 그 서비스 인스턴스로 연결하지 않습니다. 이를 위해 ribbon에 내장된 별도의 circuit breaker모듈을 이용합니다.
ribbon:
  ...
  NFLoadBalancerRuleClassName: com.netflix.loadbalancer.AvailabilityFilteringRule
기준횟수와 연결중단 시간은 아래 property를 셋팅하여 조정가능합니다.
# successive connection failures threshold to put the server in circuit tripped state, default 3
niws.loadbalancer.<clientName>.connectionFailureCountThreshold

# Maximal period that an instance can remain in "unusable" state regardless of the exponential increase, default 30
niws.loadbalancer.<clientName>.circuitTripMaxTimeoutSeconds
3) WeightedResponseTimeRule
응답시간이 빠른 서비스 인스턴스부터 연결하는 방식입니다.
ribbon:
  ...
  NFLoadBalancerRuleClassName: com.netflix.loadbalancer.WeightedResponseTimeRule
zuul-common.yaml
각 backend service연결을 별도의 thread에서 동작하도록 설정합니다.
생성되는 thread의 이름은 service명인데 prefix를 지정할 수 있습니다.
zuul:
  ...
  ribbon-isolation-strategy: thread
  thread-pool:
    use-separate-thread-pool: true
    thread-pool-key-prefix: zuul-
※ Thread 격리에 대한 자세한 사항은 아래 링크를 참조하세요.
github.com/Netflix/Hystrix/wiki/How-it-Works#isolation
L/B rule을 zuul을 이용하는 모든 서비스에 대해 또는 각 서비스별로 재정의할 수 있습니다.
- NIWServerListClassName: com.netflix.niws.loadbalancer.DiscoveryEnabledNIWServerList -> Eureka와 연동 활성화.
DeploymentContextBasedVipAddresses에 Eureka에 등록되는 service id를 지정해야 함
- ServerListRefreshInterval: 60000 -> Eureka에서 ServerList를 갖고올 주기(Default는 30초)
- NIWServerListFilterClassName: com.netflix.loadbalancer.ServerListSubsetFilter -> Eureka에서 갖고온 Service 리스트중 일부 서비스만 L/B에 사용함.
제한할 갯수는 ServerListSubsetFilter.size로 지정함. Service의 우선순위는 L/B rule에 따라 달라짐
(예를 들어 WeightedResponseTimeRule정책이면 응답속도 기준으로 나열하여 지정된 갯수의 Service list를 갖고옴)
ribbon:
  NFLoadBalancerRuleClassName: com.netflix.loadbalancer.AvailabilityFilteringRule
  NIWSServerListClassName: com.netflix.niws.loadbalancer.DiscoveryEnabledNIWSServerList
  ServerListRefreshInterval: 60000
  NIWSServerListFilterClassName: com.netflix.loadbalancer.ServerListSubsetFilter
config:
  ribbon:
    DeploymentContextBasedVipAddresses: config # eureka 등록 이름
webhook:
  ribbon:
    NFLoadBalancerRuleClassName: com.netflix.loadbalancer.WeightedResponseTimeRule
    DeploymentContextBasedVipAddresses: webhook # eureka 등록 이름
zuul-dev.yaml
config와 webhook 모두 개발profile로 배포시에는 인스턴스가 1개이므로 재시도할 다른 인스턴스가 없습니다.
config:
  ribbon:
    MaxAutoRetriesNextServer: 0
    ServerListSubsetFilter:
      size: 1
webhook:
  ribbon:
    MaxAutoRetriesNextServers: 0
    ServerListSubsetFilter:
      size: 1
zuul-prod.yaml
각 서비스의 (replicas수-1)만큼 지정. Scaling을 고려하여, ServerListSubsetFilter수를 적절하게 늘려줌
config:
  ribbon:
    MaxAutoRetriesNextServer: 2
    ServerListSubsetFilter:
      size: 3
webhook:
  ribbon:
    MaxAutoRetriesNextServers: 2
    ServerListSubsetFilter:
      size: 3
2. 직접 마이크로서비스 호출 시 config설정
zuul을 통하지 않고, 직접 다른 마이크로서비스를 ribbon으로 Load balancing할때도 config파일을 이용할 수 있습니다.
이때는 아래와 같이 configmng의 {service}-common.yaml, {service}-{profile}.yaml을 이용하여 설정하면 됩니다.
다만, 이때는 L/B를 위한 프로그램이 약간 필요합니다.
'consumer'라는 이름의 어플리케이션을 개발하여, webhook의 '/greeting' API를 L/B하여 연결하여 보도록 하겠습니다.
1) 프로젝트 생성

2) Main Class 수정
@RibbonClients, @EnableDiscoverClient 어노테이션을 추가합니다.
@SpringBootApplication
@EnableDiscoveryClient
@RibbonClients
public class ConsumerApplication {
	public static void main(String[] args) {
		SpringApplication.run(ConsumerApplication.class, args);
	}

}
3) Spring cloud config 설정
bootstrap.yaml파일을 만듭니다.
server:
  port: ${service_port:8002}
spring:
  application:
    name: consumer
  profiles:
    active: ${profile:local}
    include: common
  cloud:
    config:
      uri: ${config_servers:http://localhost:9001}
      searchPaths: ${spring.application.name}
      default-label: main
4) dependency, finalName 설정
<?xml version="1.0" encoding="UTF-8"?>
<project ...">
	...
	<parent>
		...
		<version>2.3.8.RELEASE</version>
		...
	</parent>
	...
	<properties>
		<java.version>1.8</java.version>
		<spring-cloud.version>Hoxton.SR9</spring-cloud.version>
	</properties>
	<dependencies>
		...
		<!-- mq -->
		<dependency>
			<groupId>org.springframework.cloud</groupId>
			<artifactId>spring-cloud-starter-bus-amqp</artifactId>
		</dependency>

		<!-- swagger 3 -->
		<dependency>
			<groupId>io.springfox</groupId>
			<artifactId>springfox-boot-starter</artifactId>
			<version>3.0.0</version>
		</dependency>

		...

	</dependencies>

    ...

    <build>
		<finalName>consumer</finalName>
		...
	</build>

</project>
5) Application 개발
- swagger config class 추가
title, description, version은 적절히 변경하세요.
RequestHanlderSelectors.basePackage이름도 본인꺼에 맞게 바꾸십시오.
@Configuration
public class SwaggerConfig {
	@Bean
	public Docket api() {
		ApiInfo apiinfo = new ApiInfoBuilder()
				.title("consumer")
				.description("sample application as consumer")
				.version("1.0")
				.build();

		Docket docket = new Docket(DocumentationType.SWAGGER_2)
				.apiInfo(apiinfo)
				.select()
				.apis(RequestHandlerSelectors.basePackage("com.springcloud"))
				.paths(PathSelectors.any())
				.build();

		return docket;
	}
}
- RestTemplateConfig class 추가
'webhookRestTemplate'이라는 이름으로 Spring Bean을 미리 만들어 놓습니다.
Spring Bean은 HTTP나 DB의 connection pool처럼 미리 생성된 class로서, Application시작 시 Spring IoC(Inversion Of Control)컨테이너에 의해 생성되고 관리됩니다.
보다 더 자세한 내용은 'Spring Bean이란'으로 구글링하면 많이 나옵니다.
defaultMaxPerRoute는 기본 connection 갯수이고, maxTotal은 최대 connection수입니다.
@Configuration
public class RestTemplateConfig {
	public RestTemplate getRestTemplate(int defaultMaxPerRoute, int maxTotal) {
		return new RestTemplate() {
			{
				setRequestFactory(new HttpComponentsClientHttpRequestFactory(
						HttpClientBuilder.create().setConnectionManager(new PoolingHttpClientConnectionManager() {
							{
								setDefaultMaxPerRoute(defaultMaxPerRoute);
								setMaxTotal(maxTotal);
							}
						}).build()) {
					{
						setConnectTimeout(2000);
						setReadTimeout(5000);
					}
				});
			}
		};

	/*
	 * 위 수행을 좀 더 쉽게 코딩하면 아래와 같습니다.
	 * 	PoolingHttpClientConnectionManager connManager = new PoolingHttpClientConnectionManager();
		connManager.setDefaultMaxPerRoute(defaultMaxPerRoute);
		connManager.setMaxTotal(maxTotal);

		HttpClient client = HttpClientBuilder.create().setConnectionManager(connManager).build();

		HttpComponentsClientHttpRequestFactory factory = new HttpComponentsClientHttpRequestFactory(client);
		factory.setConnectTimeout(2000);
		factory.setReadTimeout(5000);

		return new RestTemplate(factory);

	 */
	}

	@Bean
	public RestTemplate webhookRestTemplate() {
		return getRestTemplate(20, 30);
	}
}
- Controller class
미리 만들어 놓은 Spring Bean인 'webhookRestTemplate'을 사용하기 위해, @Autowired가 필요합니다.
Eureka에서 리턴 받은 서비스 목록에서 L/B를 수행할 LoadBalancerClient class도 만듭니다.
lbClient로 L/B하여 선택된 backend service인스턴스 주소를 구하고, webhookRestTemplate을 이용하여 결과값을 받아 리턴합니다.
@RestController
//@RequiredArgsConstructor
public class Controller {
	@Autowired
	private RestTemplate webhookRestTemplate;

	@Autowired
	private LoadBalancerClient lbClient;

	@GetMapping("/greeting/{message}")
	@ApiOperation(value = "Test Ribbon")
	public String greeting(@PathVariable String message) {
		String baseUrl = "";
		try {
			final ServiceInstance instance = lbClient.choose("webhook");
			baseUrl = String.format("http://%s:%s/%s", instance.getHost(), instance.getPort(), "greeting/" + message);
			System.out.println("Url: " + baseUrl);
		} catch (Exception e) {
			System.out.println("*** NO webhook service!!!");
			return "NO DATA";
		}
		ResponseEntity<String> response = null;

		try {
			response = webhookRestTemplate.exchange(baseUrl, HttpMethod.GET, getHeaders(), String.class);
		} catch (Exception e) {
			e.printStackTrace();
		}

		return "[" + baseUrl + "] " + response.getBody();

	}

	private static HttpEntity<?> getHeaders() throws IOException {
		HttpHeaders headers = new HttpHeaders();
		headers.set("Accept", MediaType.APPLICATION_JSON_VALUE);
		return new HttpEntity<>(headers);
	}
}
6) configmng에 config 파일 추가
configmng에 'consumer'디렉토리를 만들고 아래 파일 추가합니다. 기존 'webhook'에 있는 파일을 복사하여 만듭니다.
consumer-cicd-common.properties
# Container Image info
image_registry=harbor.io
image_project=sc-hklee
image_repository=consumer
image_tag=0.0.1

# resources
req_cpu=128m
req_mem=128Mi
limit_cpu=1024m
limit_mem=1024Mi
consumer-cicd-dev.properties
# namespace, sa
namespace=hklee
serviceaccount=sa-hklee

# Service info
service_target_port=8002
service_port=8002
service_host=consumer.169.56.84.41.nip.io
service_replicas=1

image_pull_policy=Always
consumer-cicd-prod.properties
# namespace, sa
namespace=hklee
serviceaccount=sa-hklee

# Service info
service_target_port=8002
service_port=8002
service_host=consumer.169.56.84.41.nip.io
service_replicas=2

image_pull_policy=Always
consumer-common.yaml
ribbon:
  ConnectTimeout: 2000
  ReadTimeout: 2000
  NIWSServerListClassName: com.netflix.niws.loadbalancer.DiscoveryEnabledNIWSServerList
  ServerListRefreshInterval: 60000
  NIWSServerListFilterClassName: com.netflix.loadbalancer.ServerListSubsetFilter
consumer-dev.yaml
webook:
  ribbon:
    MaxAutoRetriesNextServer: 0
    ServerListSubsetFilter:
      size: 1
consumer-prod.yaml
webook:
  ribbon:
    MaxAutoRetriesNextServer: 2
    ServerListSubsetFilter:
      size: 3
secret관련 파일 3개의 내용은 webhook과 동일합니다.
configmng git repository에 푸시합니다.
7) Local 테스트
Local에서 config, eureka, webhook을 먼저 실행합니다. 그리고, consumer를 실행합니다.
아래와 같이 웹브라우저에서 테스트하면 됩니다.

8) 환경변수 파일 생성
환경변수파일은 안 만들어도 됩니다.
9) git repository 생성 및 Push
repository를 만들고, push합니다.
10) 빌드&배포
[root@nfs ~]# su - hklee
마지막 로그인: 목  1월 28 00:23:21 CST 2021 일시 pts/1
[hklee@nfs ~]$ cd work
[hklee@nfs work]$ git clone https://github.com/sc-hklee/consumer.git
[hklee@nfs work]$ cd consumer/
[hklee@nfs consumer]$ run-cicd hklee passw0rd . dev . java config
11) 배포확인
webhook의 Pod수를 확인하고, 1개면 3개로 늘려줍니다.
k scale statefulset webhook --replicas=3
configmng의 zuul/zuul-common.yaml에 consumer에 대한 routing설정을 합니다.
zuul서버에는 config bus를 이용하여 동적으로 반영되니, zuul을 다시 배포할 필요 없습니다.

모든 Pod가 실행되는걸 기다렸다가 zuul을 통해 consumer로 연결되고, consumer에서 ribbon을 이용하여 webhook으로 연결되는지 확인합니다.
아래처럼 L/B된 주소가 바뀌면 정상적으로 수행되는것입니다.


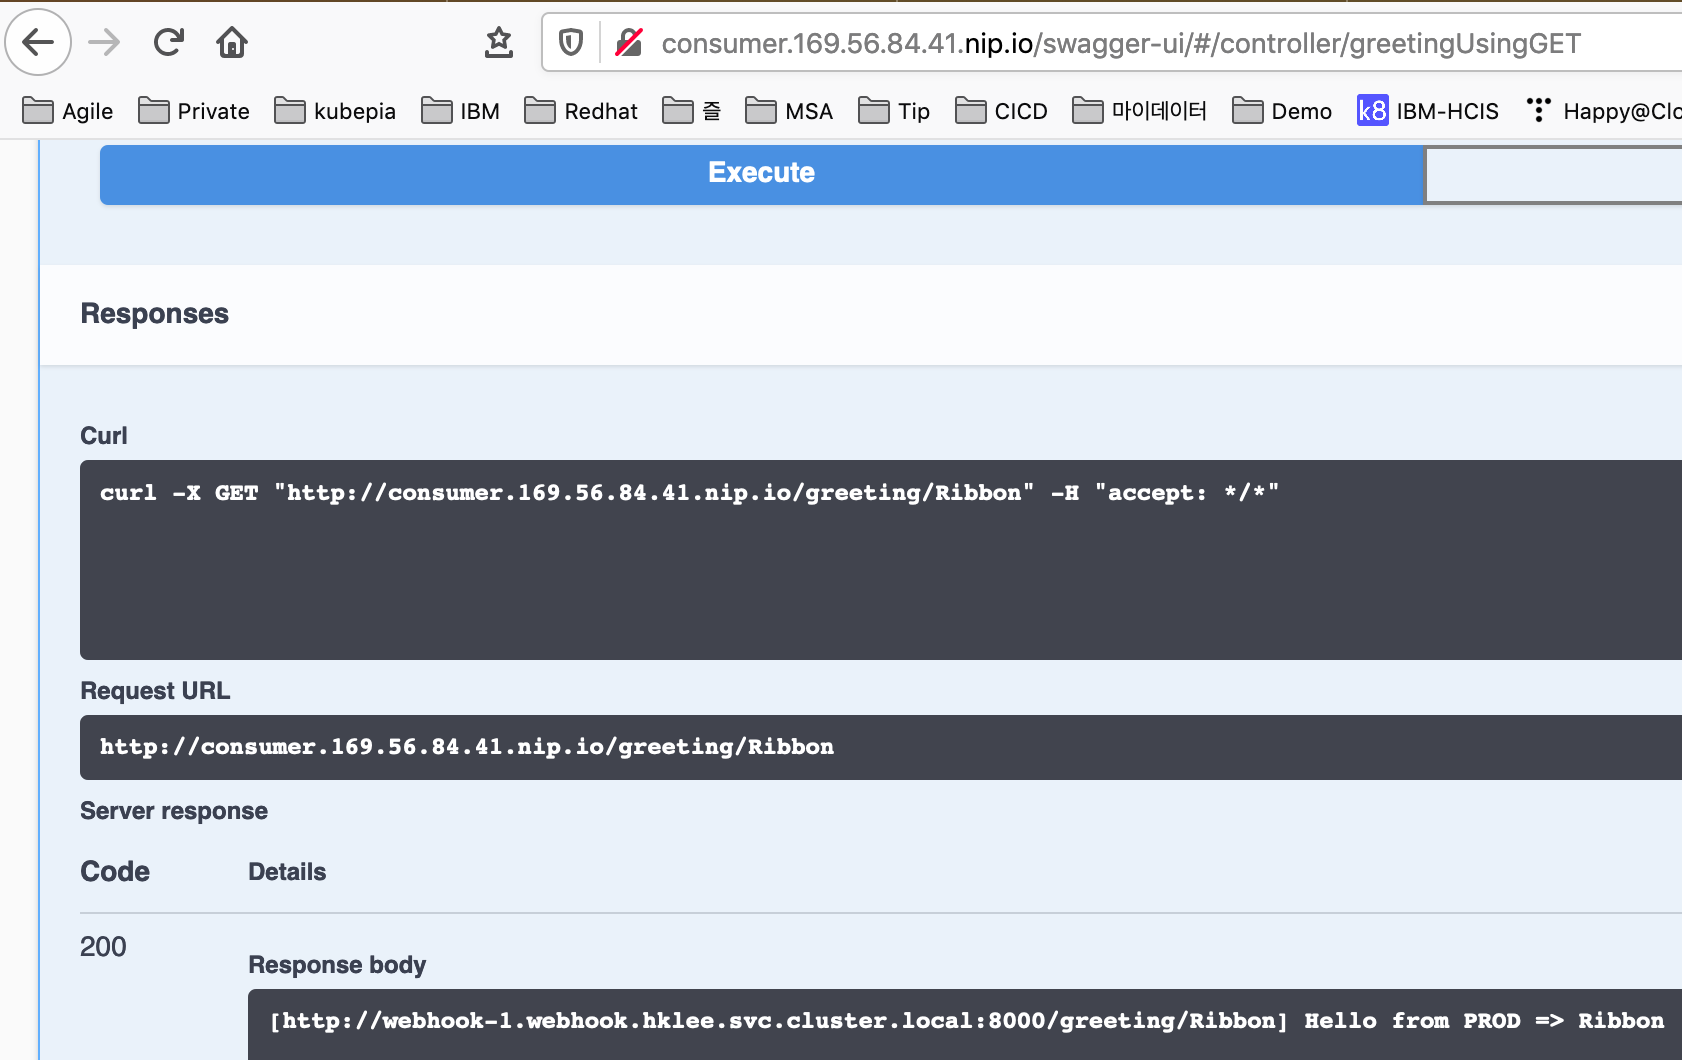
Swagger설정을 했으므로, 아래와 같이 swagger 페이지에서 테스트해도 됩니다.
Ribbon 설정 Customizing
Ribbon설정 커스터마이징을 프로그램적으로도 할 수 있습니다.
@RibbonClinet에 설정의 재정의할 class를 지정하고, 그 class에서 설정을 재정의하는 방식입니다.
위와같이 설정만으로도 충분하기 때문에 굳이 프로그램을 이용할 필요는 없을듯 합니다.
6. Client Side Load Balancer: Ribbon
Ribbon is a client-side load balancer that gives you a lot of control over the behavior of HTTP and TCP clients. Feign already uses Ribbon, so, if you use @FeignClient, this section also applies. A central concept in Ribbon is that of the named client. Eac
cloud.spring.io
consumer의 'webhook'을 위한 ribbon설정을 프로그램적으로 바꿔 보겠습니다.
Main class인 ConsumerApplication.java를 수정합니다.
아래와 같이 webhook RibbonClient를 정의하고, config정의 class는 WebhookRibbonConfiguration라고 추가합니다.
@SpringBootApplication
@EnableDiscoveryClient
@RibbonClients({
	@RibbonClient(name = "webhook", configuration = WebhookRibbonConfiguration.class)
})

@RibbonClients
public class ConsumerApplication {
	public static void main(String[] args) {
		SpringApplication.run(ConsumerApplication.class, args);
	}

}
WebhookRibbonConfiguration class를 추가합니다.
PingUrl은 spring actuator에서 기본으로 제공하는 health check 주소를 이용했습니다.
Default로는 Ping체크를 하지 않습니다.
L/B규칙도 바꿀 수가 있습니다.
public class WebhookRibbonConfiguration {
	@Autowired
	IClientConfig ribbonClientConfig;

	@Bean
	public IPing ribbonPing(IClientConfig config) {
		return new PingUrl(false, "/actuator/health");	//insecure, ping url
	}

	@Bean
	public IRule ribbonRule(IClientConfig config) {
		return new AvailabilityFilteringRule();
		//return new RoundRobinRule();
		//return new WeightedResponseTimeRule();
	}

}
git에 push하고, 다시 배포한 후 테스트 하십시오.
'Micro Service > mSVC개발' 카테고리의 다른 글
| [SC10] Spring Cloud Sleuth와 Zipkin 이란 ? (0) | 2021.02.14 |
|---|---|
| [SC09] Spring Cloud Hystrix 란 ? (0) | 2021.02.14 |
| [SC07] Spring Cloud Zuul 이란 ? (0) | 2021.02.14 |
| [SC06] Spring Cloud Config Monitor 란 ? (0) | 2021.02.14 |
| [SC05] Spring Cloud Bus 란 ? (0) | 2021.02.14 |
- Total
- Today
- Yesterday
- spotify
- #MAS
- CQRS
- Event Sourcing
- 플러그인
- 스핀프로젝트
- 돌봄경제
- 육각형인간
- 버라이어티가격
- 요즘남편 없던아빠
- AI
- 디토소비
- agile
- 도파밍
- agentic ai
- SAGA
- 스포티파이
- 애자일
- 마이크로서비스 패턴
- 마이크로서비스
- 리퀴드폴리탄
- 호모프롬프트
- AXON
- 분초사회
- API Composition
- micro service
| 일 | 월 | 화 | 수 | 목 | 금 | 토 |
|---|---|---|---|---|---|---|
| 1 | 2 | 3 | 4 | |||
| 5 | 6 | 7 | 8 | 9 | 10 | 11 |
| 12 | 13 | 14 | 15 | 16 | 17 | 18 |
| 19 | 20 | 21 | 22 | 23 | 24 | 25 |
| 26 | 27 | 28 | 29 | 30 | 31 |