티스토리 뷰
이번 장은 Circuit breaker인 Hystrix에 대해서 다룹니다.
목차는 아래와 같습니다.
1. Hystrix 이해
2. Hystrix 실습
3. Hystrix Dashboard & Turbine
4. Zuul에 Hystrix 적용
자세하게 설명하다보니 내용이 좀 많습니다.
1. Hystrix 이해
WHY ?
모든 전기를 사용하는 곳에는 누전차단기가 있습니다.
누전차단기는 전기 사용 중 누전, 과전류, 합선으로 전기사고가 발생하기 전에 전기를 미리 차단하는 역할을 합니다.
누전차단기와 같이 전류를 차단하는 장치를 통틀어 우리는 Circuit breaker(전류차단기)라고 부릅니다.
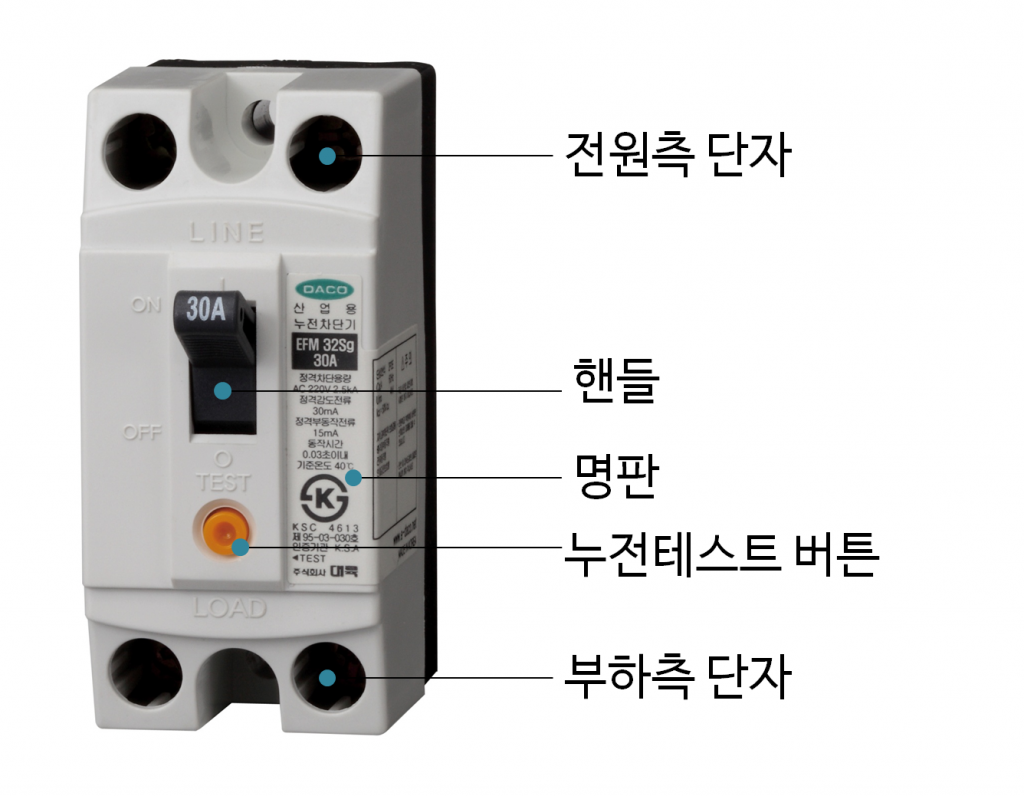
전기제품 사이로 전류가 흐르듯이, 우리가 만드는 마이크로서비스 사이에도 트래픽이 흐릅니다.
어떤 마이크로서비스가 메모리가 새거나(누전) 트래픽이 갑자기 몰려(과부하) 매우 느려지거나 정지되었다고 생각해 봅시다.
그 마이크로서비스를 호출하는 마이크로서비스 역시 계속 느려질겁니다.
결국에는 도미노처럼 장애가 전 서비스에 번져 전체 서비스가 중단될 수도 있습니다.
Hystrix는 마이크로서비스의 전류차단기(Circuit Breaker) 역할을 하는 오픈소스입니다.
누전차단기가 전기사고가 발생하기 전에 전기를 미리 차단하는것과 동일하게, 문제가 있는 마이크로서비스로의 트래픽을 차단하여 전체서비스가 느려지거나 중단되는것을 미리 방지하기 위해 필요합니다.
HOW ?
Consumer마이크로서비스와 Producer마이크로서비스 사이에 Circuit Breaker를 통해 통신하도록 하면 됩니다.
실제 개발할때는 Consumer마이크로서비스에 Hystrix client를 추가합니다.
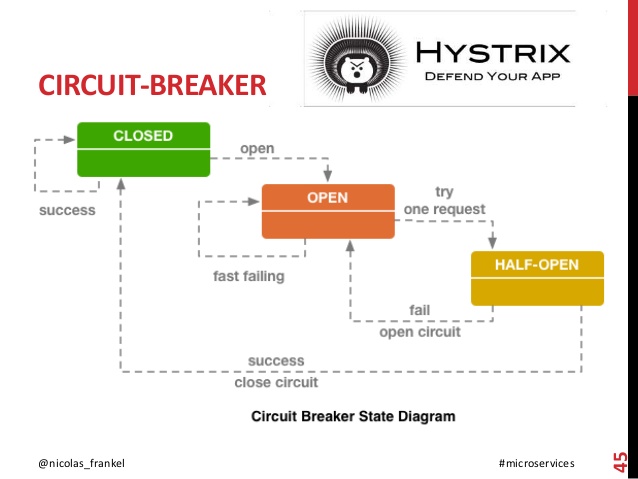
Hystrix는 Producer가 일정횟수 이상 비정상적인 응답을 주면 Circuit Breaker를 Close상태에서 Open상태로 Trip(이동)합니다.

Hystrix의 동작원리를 좀 더 자세하게 표현하면 아래와 같습니다.
- 정상적 응답이 오면 Circuit breaker는 계속 'CLOSED'상태임
- 일정횟수 이상 비정상적 응답이 오면 Circuit Breaker는 'OPEN'상태가 됨.
더 이상 Producer마이크로서비스를 호출하지 않고, 빠른 실패(Fast failing)를 위한 Fallback method를 호출함.
Fallback method는 에러메시지나 캐싱된 결과를 리턴함.
- Circuit breaker는 OPEN된 상태에서 일정시간이 지나면 Producer마이크로서비스를 1번 호출함.
정상적 결과가 오면, Circuit Breaker의 상태를 'CLOSED'로 바꾸고, Producer마이크로서비스를 호출하기 시작함.
비정상적 결과가 오면, OPEN된 상태에서 일정시간이 경과했는지 계산하는 타이머를 0으로 초기화함.
참고) Hystrix는 고슴도치라는 뜻입니다. 그래서 로고도 가시가 뻗어 있는 고슴도치입니다.
고슴도치가 가시를 이용해 몸을 보호하듯이, Hystrix를 이용해 마이크로서비스를 장애로부터 보호한다는 의미인듯 합니다.
2. Hystrix 적용 실습
실습을 위해 HystrixConsumer와 HystrixProducer어플리케이션을 제작합니다.
아래 그림에서 HystrixConsumer는 'Rest API'이고, HystrixProducer는 'Contents API'입니다.
Client는 rest의 swagger페이지를 이용하겠습니다.
swagger에서 '/test/delay' API를 실행하면, Circuit breaker를 통해 HystrixProducer의 '/api/coffees'가 호출되는 구조입니다.
PORT번호는 기존 sample과 충돌을 방지하기 위해 HystrixConsumer는 8003, HystrixProducer는 8013을 사용합니다.

HystrixProducer 어플리케이션 제작
1) 프로젝트 생성

2) Main Class 수정
@SpringBootApplication
@EnableDiscoveryClient
public class HystrixProducerApplication {

	public static void main(String[] args) {
		SpringApplication.run(HystrixProducerApplication.class, args);
	}

}
3) Spring cloud config 설정
bootstrap.yaml
server:
  port: ${service_port:8013}
spring:
  application:
    name: hystrix-producer
  profiles:
    active: ${profile:local}
    include: common
  cloud:
    config:
      uri: ${config_servers:http://localhost:9001}
      searchPaths: ${spring.application.name}
      default-label: main
4) dependency, finalName 설정
<?xml version="1.0" encoding="UTF-8"?>
<project ...">
	...
	<parent>
		...
		<version>2.3.8.RELEASE</version>
		...
	</parent>
	...
	<properties>
		<java.version>1.8</java.version>
		<spring-cloud.version>Hoxton.SR9</spring-cloud.version>
	</properties>
	<dependencies>
		...
		<!-- mq -->
		<dependency>
			<groupId>org.springframework.cloud</groupId>
			<artifactId>spring-cloud-starter-bus-amqp</artifactId>
		</dependency>

		<!-- swagger 3 -->
		<dependency>
			<groupId>io.springfox</groupId>
			<artifactId>springfox-boot-starter</artifactId>
			<version>3.0.0</version>
		</dependency>

		...

	</dependencies>

    ...

    <build>
		<finalName>hystrix-producer</finalName>
		...
	</build>

</project>
5) Application 개발
- SwaggerConfig.java
@Configuration
public class SwaggerConfig {
	@Bean
	public Docket api() {
		ApiInfo apiinfo = new ApiInfoBuilder()
				.title("Hystrix Producer")
				.description("Producer application to test Hystrix")
				.version("1.0")
				.build();

		Docket docket = new Docket(DocumentationType.SWAGGER_2)
				.apiInfo(apiinfo)
				.select()
				.apis(RequestHandlerSelectors.basePackage("com.springcloud"))
				.paths(PathSelectors.any())
				.build();

		return docket;
	}
}
- Controller.java
@RestController
@RequestMapping("/api")
public class Controller {
	@GetMapping("/coffees/{param}")
	public List<String> getConffees(@PathVariable String param) {
		if(!"pass".equalsIgnoreCase(param)) {
			try {
				Thread.sleep(1000);
			} catch(Exception e) {}
		}

		return Arrays.asList("Americano", "Latte", "Mocha");
	}
}
6) Local 테스트
Local에서 실행 후 웹브라우저에서 http://localhost:8013/swagger-ui/ 로 접근하여 테스트 합니다.
'/api/coffees/{param}'이라는 API가 생성되고, {param}에 'pass'라고 넘기면 결과가 바로 리턴되지만, 그 외의 값은 약간의 시간 지연(1000ms)이 발생하는것을 확인합니다.
7) configmng에 config 파일 추가
configmng에 'hystrix-producer'라는 디렉토리를 만들고, 필요한 config파일들을 만듭니다.
hystrix-producer-cicd-common.properties
# Container Image info
image_registry=harbor.io
image_project=sc-hklee
image_repository=hystrix-producer
image_tag=0.0.1

# resources
req_cpu=128m
req_mem=128Mi
limit_cpu=1024m
limit_mem=1024Mi
hystrix-producer-cicd-dev.properties
# namespace, sa
namespace=hklee
serviceaccount=sa-hklee

# Service info
service_target_port=8013
service_port=8013
service_host=hystrix-producer.169.56.84.41.nip.io
service_replicas=1

image_pull_policy=Always
hystrix-producer-cicd-prod.properties
# namespace, sa
namespace=hklee
serviceaccount=sa-hklee

# Service info
service_target_port=8013
service_port=8013
service_host=hystrix-producer.169.56.84.41.nip.io
service_replicas=2

image_pull_policy=Always
hystrix-producer-secret-dev.properties, hystrix-producer-secret-prod.properties
mq_pw=guest
참고) hystrix-producer-secret-common.properties, hystrix-producer-common.yaml, hystrix-producer-dev.yaml, hystrix-producer-prod.yaml파일들은 내용이 없으므로 안 만들어도 됩니다.
8) 환경변수 파일 생성
추가할 환경변수가 없으므로 안 만듭니다.
9) git repository 생성 및 Push
git에 repository를 만들고, push합니다.
10) 빌드&배포
run-cicd를 이용하여 빌드 및 배포합니다.
[root@nfs ~]# su - hklee
...
[hklee@nfs ~]$ cd work
[hklee@nfs work]$ git clone https://github.com/sc-hklee/hystrix-producer.git
[hklee@nfs work]$ cd hystrix-producer/
[hklee@nfs consumer]$ run-cicd hklee passw0rd . dev . java config
http://<hystrix-producer ingress host>/swagger-ui/ 로 접근하여 테스트합니다.
HystrixConsumer 어플리케이션 제작
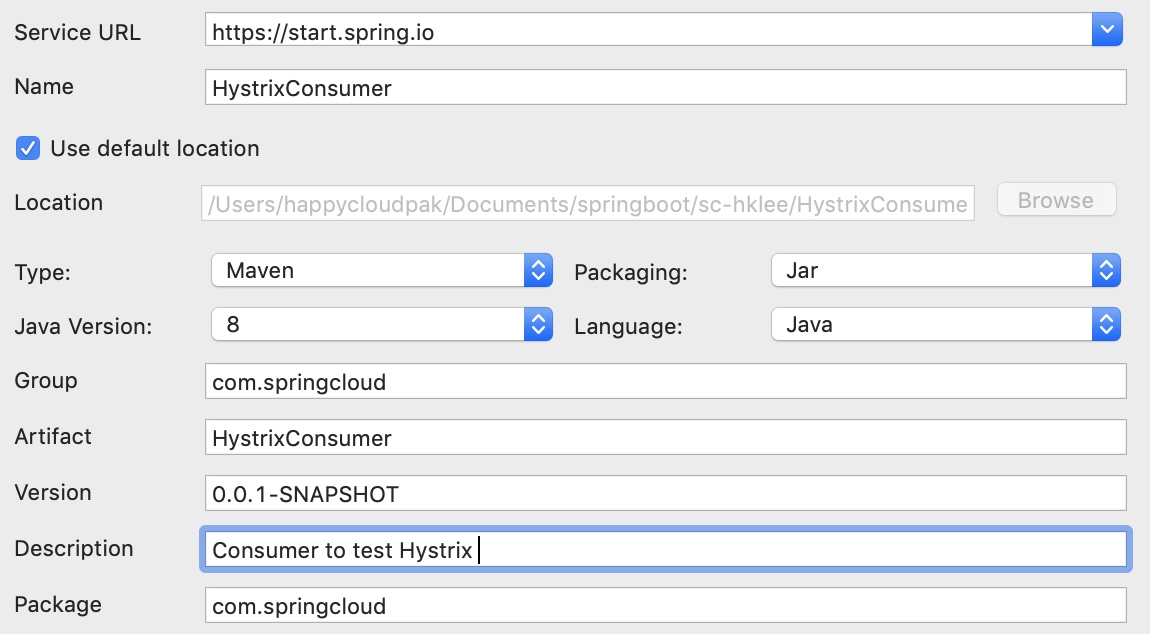
1) 프로젝트 생성

2) Main Class 수정
@SpringBootApplication
@EnableDiscoveryClient
@EnableCircuitBreaker
public class HystrixConsumerApplication {

	public static void main(String[] args) {
		SpringApplication.run(HystrixConsumerApplication.class, args);
	}

}
3) Spring cloud config 설정
bootstrap.yaml
server:
  port: ${service_port:8003}
spring:
  application:
    name: hystrix-consumer
  profiles:
    active: ${profile:local}
    include: common
  cloud:
    config:
      uri: ${config_servers:http://localhost:9001}
      searchPaths: ${spring.application.name}
      default-label: main
4) dependency, finalName 설정
pom.xml
<?xml version="1.0" encoding="UTF-8"?>
<project ...">
	...
	<parent>
		...
		<version>2.3.8.RELEASE</version>
		...
	</parent>
	...
	<properties>
		<java.version>1.8</java.version>
		<spring-cloud.version>Hoxton.SR9</spring-cloud.version>
	</properties>
	<dependencies>
		...
		<!-- mq -->
		<dependency>
			<groupId>org.springframework.cloud</groupId>
			<artifactId>spring-cloud-starter-bus-amqp</artifactId>
		</dependency>

		<!-- swagger 3 -->
		<dependency>
			<groupId>io.springfox</groupId>
			<artifactId>springfox-boot-starter</artifactId>
			<version>3.0.0</version>
		</dependency>

		...

	</dependencies>

    ...

    <build>
		<finalName>hystrix-consumer</finalName>
		...
	</build>

</project>
5) Application 개발
- SwaggerConfig.java
@Configuration
public class SwaggerConfig {
	@Bean
	public Docket api() {
		ApiInfo apiinfo = new ApiInfoBuilder()
				.title("Hystrix Consumer")
				.description("Consumer application to test Hystrix")
				.version("1.0")
				.build();

		Docket docket = new Docket(DocumentationType.SWAGGER_2)
				.apiInfo(apiinfo)
				.select()
				.apis(RequestHandlerSelectors.basePackage("com.springcloud"))
				.paths(PathSelectors.any())
				.build();

		return docket;
	}
}
- RestTemplateConfig.java: HttpClient를 SpringBean으로 등록
'coffeeRestTemplate'이라는 이름으로 HttpClient역할을 하는 Spring Bean을 미리 만들어 놓습니다.
Spring Bean은 HTTP나 DB의 connection pool처럼 미리 생성된 class로서, Application시작 시 Spring IoC(Inversion Of Control)컨테이너에 의해 생성되고 관리됩니다.
보다 더 자세한 내용은 'Spring Bean이란'으로 구글링하면 많이 나옵니다.
defaultMaxPerRoute는 기본 connection 갯수이고, maxTotal은 최대 connection수입니다.
@Configuration
public class RestTemplateConfig {
	public RestTemplate getRestTemplate(int defaultMaxPerRoute, int maxTotal) {
		PoolingHttpClientConnectionManager connManager = new PoolingHttpClientConnectionManager();
		connManager.setDefaultMaxPerRoute(defaultMaxPerRoute);
		connManager.setMaxTotal(maxTotal);

		HttpClient client = HttpClientBuilder.create().setConnectionManager(connManager).build();

		HttpComponentsClientHttpRequestFactory factory = new HttpComponentsClientHttpRequestFactory(client);
		factory.setConnectTimeout(3000);
		factory.setReadTimeout(3000);

		return new RestTemplate(factory);

	}

	@Bean
	public RestTemplate coffeeRestTemplate() {
		return getRestTemplate(20, 50);
	}
}
HystrixConsumer는 OOD의 Domain Model 아키텍처를 적용해 보겠습니다.
Domain Model 아키텍처는 Class들의 Layer를 Presentation, Service, Domain, Data로 나누어 설계하는것입니다.
자세한 내용은 아래 글의 '2) Layered 아키텍처'를 참조하십시오.=> DDD 핵심만 빠르게 이해하기
- CoffeeDomain.java: 비즈니스로직을 구현합니다. 여기서는 HttpClient로 HystrixProducer를 호출하여 Coffee종류목록을 리턴합니다.
@Service
@RefreshScope
public class CoffeeDomain {
	@Autowired
	private RestTemplate coffeeRestTemplate;

	@Value("${hystrix_producer_host:http://localhost:8013}")
	private String hystrixProducerHost;

	@HystrixCommand(fallbackMethod="getCoffeeFallback")
	public List<String> getCoffees(String param) {
		String url = hystrixProducerHost+"/api/coffees/"+param;
		System.out.println("call url=>"+url);

		return coffeeRestTemplate
				.exchange(url, HttpMethod.GET, null, new ParameterizedTypeReference<List <String>>() {})
				.getBody();

	}

	public List<String> getCoffeeFallback(String param, Throwable t) {
		System.err.println("###### ERROR =>"+t.toString());
		return Collections.emptyList();
	}
}
Spring bean으로 등록하기 위해 @Service 어노테이션을 붙입니다. @Component를 이용해도 되나 Service 또는 Data Layer의 class라는 의미를 명확하게 하기 위해 @Service 어노테이션을 사용합니다.
@Autowired 어노테이션을 사용하여 Spring bean으로 등록된 coffeeRestTemplate의 인스턴스를 구합니다.
@Value 어노테이션을 사용하여 환경변수 'hystrix_producer_host'의 값을 읽어, hystrixProducerHost변수를 만듭니다.
@HystrixCommand 주석을 붙이면, 해당 메소드는 Hystrix client를 통해 통신하게 됩니다. Circuit breaker가 오픈되었을때 대신 수행할 FallbackMethod까지 지정합니다.
- CafeService.java: Domain Object들을 연결 또는 통제합니다. 여기서는 coffeeDomain객체를 호출하여 Coffee목록을 리턴합니다.
@Service
public class CafeService {
	@Autowired
	private CoffeeDomain coffeeDomain;

	public List<String> getCoffees(String param) {
		return coffeeDomain.getCoffees(param);
	}

}
@Autowired 어노테이션을 이용하여 미리 등록된 coffeeDomain객체를 구합니다.
- CafeController.java: Web브라우저의 요청을 받아, cafeService를 호출하여 Coffee목록을 리턴합니다.
@RestController
public class CafeController {
	@Autowired
	private CafeService cafeService;

	@GetMapping("/delay/{param}")
	@ApiOperation(value="지연이 있는 서비스")
	public List<String> getCoffees(@PathVariable String param) {
		return cafeService.getCoffees(param);
	}
}
Spring bean으로 등록하기 위해 @RestController 어노테이션을 붙입니다. @Component를 이용해도 되나 Presentation Layer의 class라는 의미를 명확하게 하기 위해 @RestController 어노테이션을 사용합니다.
@Autowired 어노테이션을 사용하여 미리 Spring bean으로 생성된 cafeService를 구합니다.
6) configmng에 config 파일 추가
hystrix-consumer-cicd-common.properties
# Container Image info
image_registry=harbor.io
image_project=sc-hklee
image_repository=hystrix-consumer
image_tag=0.0.1

# resources
req_cpu=128m
req_mem=128Mi
limit_cpu=1024m
limit_mem=1024Mi
hystrix-consumer-cicd-dev.properties
# namespace, sa
namespace=hklee
serviceaccount=sa-hklee

# Service info
service_target_port=8003
service_port=8003
service_host=hystrix-consumer.169.56.84.41.nip.io
service_replicas=1

image_pull_policy=Always
hystrix-consumer-cicd-prod.properties
# namespace, sa
namespace=hklee
serviceaccount=sa-hklee

# Service info
service_target_port=8003
service_port=8003
service_host=hystrix-consumer.169.56.84.41.nip.io
service_replicas=2

image_pull_policy=Always
hystrix-consumer-common.yaml
hystrix:
  threadpool:
    default:
      coreSize: 100               # thread core size: start
      maximumSize: 500            # thread core size: maximum
      keepAliveTimeMinutes: 1
      allowMaximumSizeToDivergeCoreSize: true

  command:
  # 3번째 이후의 요청 중 5초 동안 평가 시 응답시간이 200ms 초과한 요청수가 50%를 넘으면 circuit breaker가 오되며 5초간 지속된다.
    default:
      execution:
        isolation:
          thread:
            timeoutInMiliseconds: 200  # hystrix가 적용된 메소드는 이 시간안에 응답이 없으면, fallback method를 호출(default: 1000ms)
      metrics:
        rollingStats:
          timeInMilliseconds: 50000    # 성공/실패 통계 집계 시간(default: 10000ms)
      circuitBreaker:
        enabled: true
        requestVolumeThreshold: 3      # circuit breaker 오픈 여부를 판단할 최소 request 수(default: 20)
        errorThresholdPercentage: 50   # circuit breaker 오픈 여부를 판단할 실패 횟수(default: 50%)
        sleepWindowInMiliseconds: 5000 # circuit breaker 지속 시간(default: 5000ms)
각 항목에 대한 설명은 주석을 참고하세요.
hystrix-consumer-secret-common.properties
mq_pw=guest
7) Local 테스트
bootstrap-local.yaml 파일을 아래와 같이 만듭니다.
hystrix:
  command:
    default:
      execution:
        isolation:
          thread:
            timeoutInMiliseconds: 100  # hystrix가 적용된 메소드는 이 시간안에 응답이 없으면, fallback method를 호출(default: 1000ms)
      circuitBreaker:
        requestVolumeThreshold: 3      # circuit breaker 오픈 여부를 판단할 최소 request 수(default: 20)
        errorThresholdPercentage: 50   # circuit breaker 오픈 여부를 판단할 실패 횟수(default: 50%)
parameter를 'pass'로 호출하면 coffee목록이 정상적으로 리턴되고, 'pass1'로 해서 호출하면 빈 목록이 리턴될것입니다.
timeoutInMiliseconds에 지정된 시간 내 응답이 안 오면 circuit breaker 오픈 여부와 상관 없이 fallback method가 호출되기 때문입니다.
'pass1'으로 5초 내에 3번 이상 호출해 보십시오.
그럼 아래와 같이 콘솔에 'Hystrix circuit short-circuited and is OPEN'이라는 메소드와 함께 약간의 delay없이 즉시 결과가 리턴될 것입니다. Circuit breaker가 오픈되어 더 이상 hystrix-producer의 API를 호출하지 않고, fallback Method가 수행되었기 때문입니다.
###### ERROR =>com.netflix.hystrix.exception.HystrixTimeoutException
###### ERROR =>java.lang.RuntimeException: Hystrix circuit short-circuited and is OPEN
2021-02-01 17:56:09.910  WARN 59302 --- [uWtD5amNHceCg-5] o.s.a.r.l.SimpleMessageListenerContainer : Consumer raised exception, processing can restart if the connection factory supports it. Exception summary: org.springframework.amqp.AmqpConnectException: java.net.ConnectException: Connection refused
2021-02-01 17:56:09.910  INFO 59302 --- [uWtD5amNHceCg-5] o.s.a.r.l.SimpleMessageListenerContainer : Restarting Consumer@d3bdfc3: tags=[[]], channel=null, acknowledgeMode=AUTO local queue size=0
2021-02-01 17:56:09.912  INFO 59302 --- [uWtD5amNHceCg-6] o.s.a.r.c.CachingConnectionFactory       : Attempting to connect to: [localhost:5672]
###### ERROR =>java.lang.RuntimeException: Hystrix circuit short-circuited and is OPEN
8) 환경변수 파일 생성
Project src 최상위에 cicd디렉토리를 만들고, cm-common.env파일을 생성한 후 아래 값을 셋팅하십시오.
hystrix_producer_host=http://hystrix-producer:8013
9) git repository 생성 및 Push
hystrix-consumer라는 이름으로 repository만들고, 푸시합니다.
10) 빌드&배포
[root@nfs ~]# su - hklee
...
[hklee@nfs ~]$ cd work
[hklee@nfs work]$ git clone https://github.com/sc-hklee/hystrix-consumer.git
[hklee@nfs work]$ cd hystrix-consumer/
[hklee@nfs consumer]$ run-cicd hklee passw0rd . dev . java config
배포 후 Pod의 로그를 보면서 swagger 페이지에서 테스트합니다.
위 Local테스트와 유사하게 circuit breaker가 오픈되면 fallback method가 즉시 수행되는것을 확인합니다.
3. Hystrix dashboard & Turbine
circuit breaker의 상태를 모니터링할 수 있는 대시보드를 만들어 보겠습니다.
dashboard를 제공하는 라이브러리는 Hystrix dashboard입니다.
Hystrix dashboard에서 모니터링할 대상 앱의 주소를 입력하여 실시간으로 Circuit breaker의 상태를 볼 수 있습니다.
한 페이지에서 여러 어플리케이션의 Circuit breaker 상태를 모니터링하려면 Turbine이라는 라이브러리를 사용하면 됩니다.
각각 어떻게 만드는지 실습해 보겠습니다.
Hystrix dashboard 개발
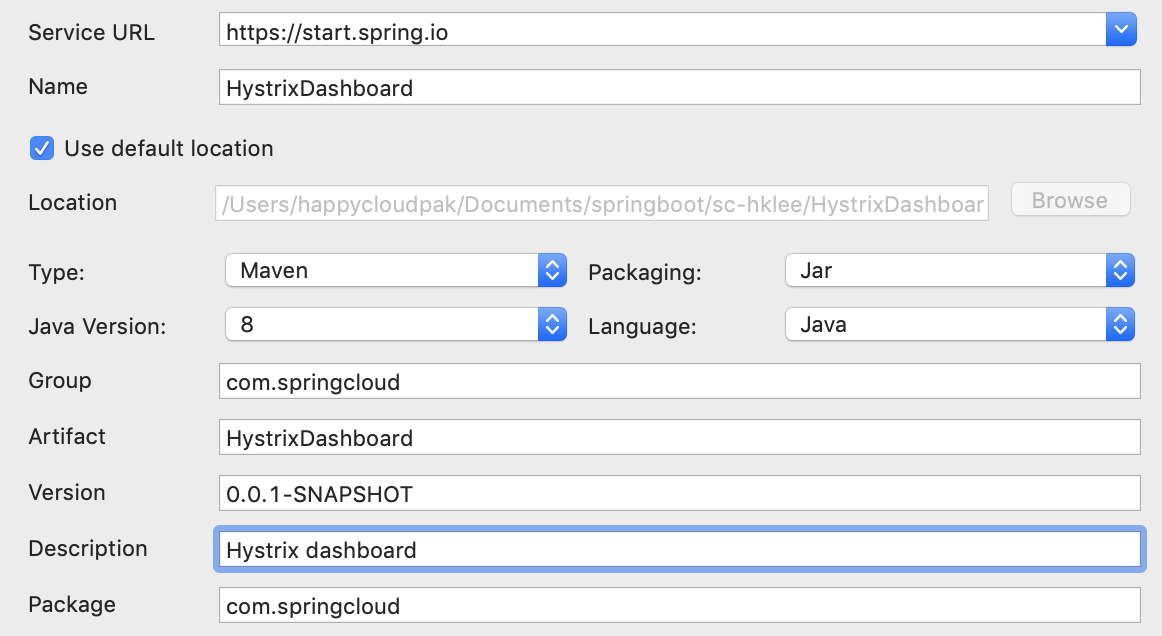
1) 프로젝트 생성

2) Main Class 수정
@SpringBootApplication
@EnableHystrixDashboard
public class HystrixDashboardApplication {

	public static void main(String[] args) {
		SpringApplication.run(HystrixDashboardApplication.class, args);
	}

}
3) Spring cloud config 설정
bootstrap.yaml
server:
  port: 8014
spring:
  application:
    name: hystrix-dashboard
  profiles:
    active: ${profile:local}
    include: common
  cloud:
    config:
      uri: ${config_servers:http://localhost:9001}
      searchPaths: ${spring.application.name}
      default-label: main
4) dependency, finalName 설정
<?xml version="1.0" encoding="UTF-8"?>
<project ...">
	...
	<parent>
		...
		<version>2.3.8.RELEASE</version>
		...
	</parent>
	...
	<properties>
		<java.version>1.8</java.version>
		<spring-cloud.version>Hoxton.SR9</spring-cloud.version>
	</properties>
	<dependencies>
		...
		<!-- mq -->
		<dependency>
			<groupId>org.springframework.cloud</groupId>
			<artifactId>spring-cloud-starter-bus-amqp</artifactId>
		</dependency>


		...

	</dependencies>

    ...

    <build>
		<finalName>hystrix-dashboard</finalName>
		...
	</build>

</project>
5) Application 개발
추가 개발 없음
6) Local 테스트
Local에서 HystrixDashboard를 실행한 후, 웹브라우저에서 http://localhost:8014/hystrix를 오픈합니다.
모니터링할 대상 어플리케이션의 주소를 입력합니다. 그리고, [Monitor Stream]을 클릭합니다.
http://localhost:8003/actuator/hystrix.stream
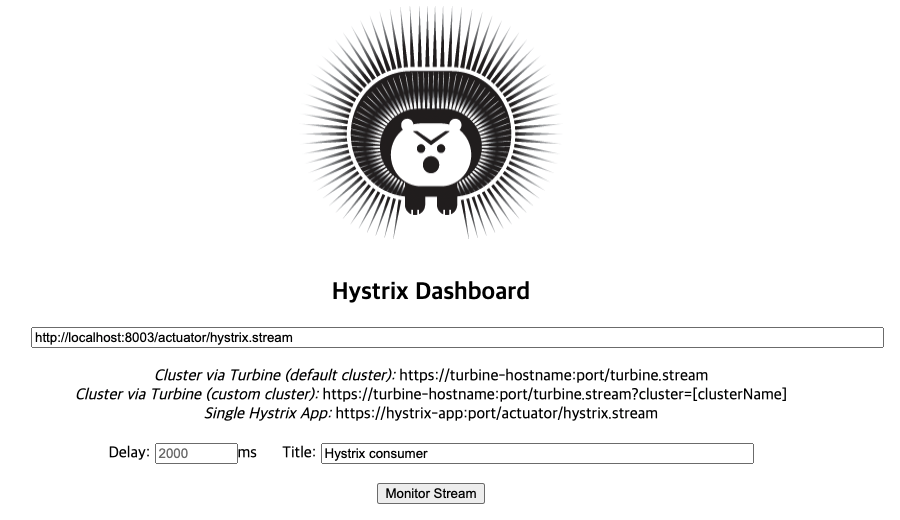
처음엔 위쪽 부분이 'Loading'으로 나올겁니다.
다른 탭에서 http://localhost:8003/swagger-ui/을 열고, 아무 값이나 파라미터로 넣고 1~2번 실행합니다.
그럼 아래와 같이 dashboard가 나옵니다.

swagger페이지에서 파라미터를 'pass0'으로 주고, 3번 이상 시도한 후 Circuit breaker가 'OPEN'되는지 확인합니다.
조금 후 파라미터를 'pass'로 주고, 1번 시도한 후 circuit breaker가 'CLOSED'되는지 확인합니다.
7) 환경변수 파일 생성
생성할 필요 없습니다.
8) git repository 생성 및 Push
'hystrix-dashboard'라는 이름으로 만들고, push합니다.
9) configmng에 config 파일 추가
hystrix-dashboard-cicd-common.properties
# Container Image info
image_registry=harbor.io
image_project=sc-hklee
image_repository=hystrix-dashboard
image_tag=0.0.1

# resources
req_cpu=128m
req_mem=128Mi
limit_cpu=1024m
limit_mem=1024Mi
hystrix-dashboard-cicd-dev.properties
# namespace, sa
namespace=hklee
serviceaccount=sa-hklee

# Service info
service_target_port=8014
service_port=8014
service_host=hystrix-dashboard.169.56.84.41.nip.io
service_replicas=1

image_pull_policy=Always
hystrix-dashboard-cicd-prod.properties
# namespace, sa
namespace=hklee
serviceaccount=sa-hklee

# Service info
service_target_port=8014
service_port=8014
service_host=hystrix-dashboard.169.56.84.41.nip.io
service_replicas=2

image_pull_policy=Always
hystrix-dashboard-common.yaml
모니터링할 어플리케이션의 Host를 입력합니다. PORT는 입력하지 않습니다.
hystrix dashboard와 hystrix-consumer는 모두 Pod로 배포되므로, Service명만 입력하면 됩니다.
hystrix:
  dashboard:
    proxy-stream-allow-list: "localhost,hystrix-consumer"
hystrix-dashboard-secret-common.properties
mq_pw=guest
10) 빌드&배포
[root@nfs ~]# su - hklee
...
[hklee@nfs ~]$ cd work
[hklee@nfs work]$ git clone https://github.com/sc-hklee/hystrix-dashboard.git
[hklee@nfs work]$ cd hystrix-dashboard/
[hklee@nfs consumer]$ run-cicd hklee passw0rd . dev . java config
아래와 같이 http://<hystrix-dashboard ingress host>/hystrix를 오픈합니다.
모니터링할 hystrix-consumer의 주소를 http://<hystrix consumer service명>:<PORT명>/actuator/hystrix.stream을 입력합니다.
그리고 [Monitor stream]을 클릭합니다.

swagger페이지에서 'pass1'으로 파라미터를 주고, 3번 이상 실행하고, circuit breaker가 오픈되는지 확인합니다.

Turbine
actuator 'hystrix.stream'을 이용하여 한번에 하나의 어플리케이션은 모니터링할 수 있지만,
복잡한 실제 운영환경에서는 여러 어플리케이션을 한꺼번에 모니터링할 수 있는 방법이 필요합니다.
Turbine은 여러 어플리케이션의 hystrix.stream정보를 수집하는 서버입니다.
수집된 상태정보는 Hystrix dashboard를 통하여 볼 수 있습니다.

1) 프로젝트 생성


2) Main Class 수정
@SpringBootApplication
@EnableDiscoveryClient
@EnableTurbine
public class TurbineApplication {

	public static void main(String[] args) {
		SpringApplication.run(TurbineApplication.class, args);
	}

}
3) Spring cloud config 설정
bootstrap.yaml
server:
  port: 8015
spring:
  application:
    name: turbine
  profiles:
    active: ${profile:local}
    include: common
  cloud:
    config:
      uri: ${config_servers:http://localhost:9001}
      searchPaths: ${spring.application.name}
      default-label: main
4) dependency, finalName 설정
<?xml version="1.0" encoding="UTF-8"?>
<project ...">
	...
	<parent>
		...
		<version>2.3.8.RELEASE</version>
		...
	</parent>
	...
	<properties>
		<java.version>1.8</java.version>
		<spring-cloud.version>Hoxton.SR9</spring-cloud.version>
	</properties>
	<dependencies>
		...
		<!-- mq -->
		<dependency>
			<groupId>org.springframework.cloud</groupId>
			<artifactId>spring-cloud-starter-bus-amqp</artifactId>
		</dependency>


		...

	</dependencies>

    ...

    <build>
		<finalName>turbine</finalName>
		...
	</build>

</project>
5) Application 개발
없음
6) Consumer 어플리케이션 수정
Turbine을 테스트 하려면 Hystrix Command를 이용하는 어플리케이션이 하나 더 필요합니다.
Ribbon 실습에서 만든 'consumer'앱을 수정하도록 하겠습니다.
pom.xml에 hystrix 라이브러리 추가
		<!-- hystrix -->
		<dependency>
			<groupId>org.springframework.cloud</groupId>
			<artifactId>spring-cloud-starter-netflix-hystrix</artifactId>
		</dependency>
Main class에 @EnableCircuitBreaker 추가
@SpringBootApplication
@EnableDiscoveryClient
/*
@RibbonClients({
	@RibbonClient(name = "webhook", configuration = WebhookRibbonConfiguration.class)
	//@RibbonClient(name = "webhook")
})
*/
@RibbonClients
@EnableCircuitBreaker
public class ConsumerApplication {
	public static void main(String[] args) {
		SpringApplication.run(ConsumerApplication.class, args);
	}

}
Controller.java에 HystrixCommand를 사용하는 API '/hystrix/{param}' 추가
@RestController
//@RequiredArgsConstructor
public class Controller {
	...

	@GetMapping("/hystrix/{param}")
	@ApiOperation(value = "test hystrix")
	@HystrixCommand(fallbackMethod = "testHystrixFallback")
	public List<String> testHystrix(@PathVariable String param) {
		String baseUrl = "";
		try {
			final ServiceInstance instance = lbClient.choose("hystrix-consumer");
			baseUrl = String.format("http://%s:%s/%s", instance.getHost(), instance.getPort(), "delay/" + param);
			System.out.println("Url: " + baseUrl);
		} catch (Exception e) {
			System.out.println("*** NO hystrix consumer service!!!");
			return Collections.emptyList();
		}
		ResponseEntity<List <String>> response = null;

		try {
			response = webhookRestTemplate
					.exchange(baseUrl, HttpMethod.GET, null, new ParameterizedTypeReference<List <String>>() {});
		} catch (Exception e) {
			e.printStackTrace();
		}

		return response.getBody();
	}

	public List<String> testHystrixFallback(String param, Throwable t) {
		System.err.println("###### ERROR =>"+t.toString());
		return Collections.emptyList();
	}
}
※ hystrix 옵션 설정은 기본 설정을 사용합니다.
7) Local 테스트
bootstrap-local.yaml
eureka:
  client:
    serviceUrl:
      defaultZone: http://localhost:8761/eureka
turbine:
  cluster-name-expression: new String('default')
  app-config: "hystrix-consumer,consumer"
hystrix dashboard를 웹브라우저에 열고, turbine서버의 주소를 입력합니다.
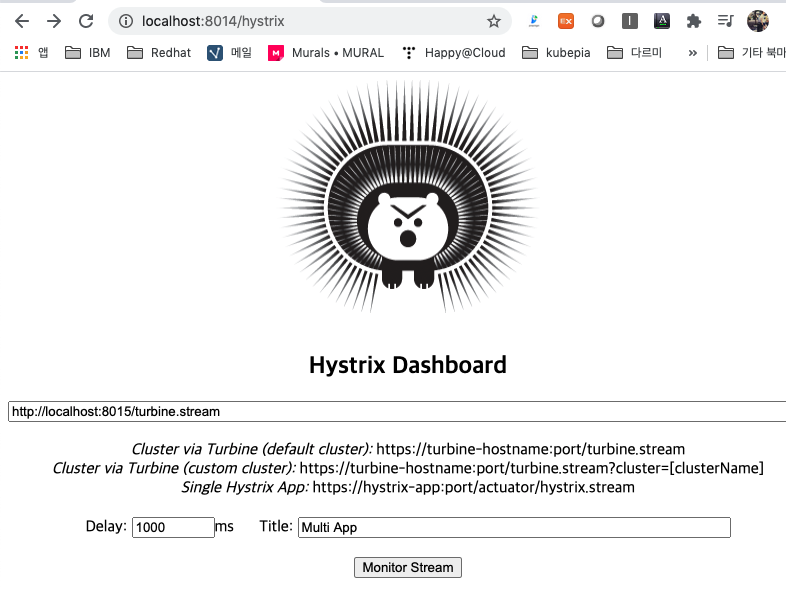
아래와 같이 consumer와 hystrix-consumer의 Circuit breaker상태를 한꺼번에 볼 수 있습니다.

http://localhost:8002/swagger-ui/와 http://localhost:8003/swagger-ui/를 다른 탭에 열어 Circuit breaker를 테스트 하십시오.
7) 환경변수 파일 생성
필요 없습니다.
8) git repository 생성 및 Push
turbine이라는 이름으로 repository를 만들고, push하십시오.
9) configmng에 config 파일 추가
turbine-cicd-common.properties
# Container Image info
image_registry=harbor.io
image_project=sc-hklee
image_repository=turbine
image_tag=0.0.1

# resources
req_cpu=64m
req_mem=64Mi
limit_cpu=1024m
limit_mem=1024Mi
turbine-cicd-dev.properties
# namespace, sa
namespace=hklee
serviceaccount=sa-hklee

# Service info
service_target_port=8015
service_port=8015
service_host=turbine.169.56.84.41.nip.io
service_replicas=1

image_pull_policy=Always
turbine-cicd-prod.properties
# namespace, sa
namespace=hklee
serviceaccount=sa-hklee

# Service info
service_target_port=8015
service_port=8015
service_host=turbine.169.56.84.41.nip.io
service_replicas=2

image_pull_policy=Always
turbine-common.yaml
turbine:
  cluster-name-expression: new String('default')
  app-config: "hystrix-consumer,consumer"
turbine-secret-common.properties
mq_pw=guest10) 빌드&배포
[root@nfs ~]# su - hklee
...
[hklee@nfs ~]$ cd work
[hklee@nfs work]$ git clone https://github.com/sc-hklee/turbine.git
[hklee@nfs work]$ cd turbine
[hklee@nfs consumer]$ run-cicd hklee passw0rd . dev . java config
아래와 같이 turbine주소를 입력하여 대시보드를 실행합니다.

하지만, "Unable to connect to Command Metric Stream."에러가 나오면서 정상 동작하지 않습니다.
Hystrix dashboard의 hystrix.dashboard.proxy-stream-allow-list에 turbine주소가 없기 때문입니다.
configmng의 hystrix-dashboard-common.yaml을 아래와 같이 수정합니다.

configmng를 git push하면, 자동으로 HystrixDashboard에 변경된 설정이 반영됩니다.
조금 후에 dashboard페이지를 refresh하면 아래와 같이 정상적으로 표시됩니다.
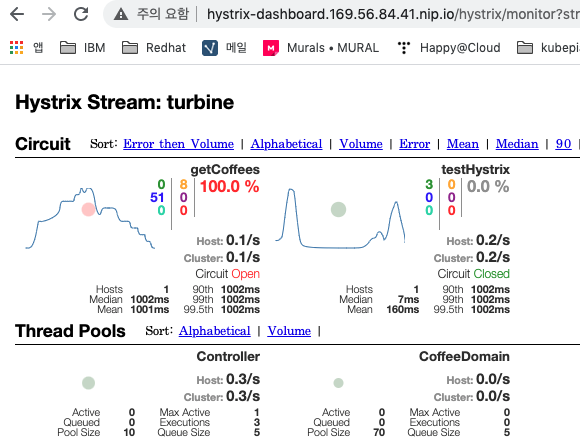
4. Zuul에 Hystrix 적용
Zuul도 backend service의 장애에 대한 대처가 필요합니다. 아래 2가지 방법을 모두 사용합니다.
첫번째 방법은 각 backend service마다 Thread를 분리하여 격리시키는 방법입니다.
이 방법은 Ribbon실습에서 zuul-common.yaml설정으로 적용이 되어 있습니다.
두번째 방법은 Hystrix를 적용하는것입니다.
1) Hystrix 설정
configmng의 zuul-common.yaml에 아래 설정을 추가합니다.
hystrix:
  threadpool:
    default:
      coreSize: 100               # thread core size: start
      maximumSize: 500            # thread core size: maximum
      keepAliveTimeMinutes: 1
      allowMaximumSizeToDivergeCoreSize: true
    consumer:
      coreSize: 10
      maximumSize: 100
  command:
    default:
      execution:
        isolation:
          strategy: THREAD
          #thread:
          #  timeoutInMiliseconds: 500  $ribbon과 같이 사용시 동작 안함(ribbon.ConnecTimeout과 ReadTimeout사용해야 함)
      metrics:
        rollingStats:
          timeInMilliseconds: 10000
      circuitBreaker:
        enabled: true
        requestVolumeThreshold: 1
        errorThresholdPercentage: 50
        sleepWindowInMiliseconds: 5000
위 주석을 단 hystrix.command.default.execution.isolation.thread.timeoutInMiliseconds는 ribbon과 같이 사용할 때는 동작하지 않습니다.
대신에 zuul-common.yaml에 ribbon의 timeout설정을 아래와 같이 추가합니다.
테스트를 위해 timeout을 1초로 합니다.
consumer:
  ribbon:
    ConnectTimeout: 1000
    ReadTimeout: 1000
configmng를 git push 합니다.
2) Fallback method 추가
먼저, fallback method의 응답을 통합하여 리턴할 GatewayClientReponse를 작성합니다.
class GatewayClientResponse implements ClientHttpResponse {

    private HttpStatus httpStatus;
    private String message;

    public GatewayClientResponse(HttpStatus httpStatus, String message) {
        this.httpStatus = httpStatus;
        this.message = message;
    }

    @Override
    public HttpStatus getStatusCode() throws IOException {
        return httpStatus;
    }

    @Override
    public int getRawStatusCode() throws IOException {
        return httpStatus.value();
    }

    @Override
    public String getStatusText() throws IOException {
        return httpStatus.getReasonPhrase();
    }

    @Override
    public void close() {

    }

    @Override
    public InputStream getBody() throws IOException {
        return new ByteArrayInputStream(message.getBytes());
    }

    @Override
    public HttpHeaders getHeaders() {
        HttpHeaders headers = new HttpHeaders();
        headers.setContentType(MediaType.APPLICATION_JSON);
        return headers;
    }
}
Fallback Method를 작성합니다.
getRoute()에서 어플리케이션명을 리턴하여, 특정 어플리케이션 전용의 Fallback method를 만들수 있습니다.
아래 예는 범용적으로 사용하기 위해 getRoute()에서 '*'를 리턴하였습니다.
package com.springcloud;

import java.net.SocketTimeoutException;

import org.springframework.cloud.netflix.zuul.filters.route.FallbackProvider;
import org.springframework.context.annotation.Configuration;
import org.springframework.http.HttpStatus;
import org.springframework.http.client.ClientHttpResponse;

import com.netflix.hystrix.exception.HystrixTimeoutException;

@Configuration
public class FallbackConfiguration implements FallbackProvider {

	private static final String DELAY_RESPONSE = "is very slow.";
	private static final String NOT_AVAILABLE = "is not available.";

	/**
	 * The route this fallback will be used for.
	 *
	 * @return The route the fallback will be used for.
	 */
	@Override // fallback을 등록할 route return
	public String getRoute() {
		//return "consumer";
		return "*";
	}

	/**
	 * Provides a fallback response based on the cause of the failed execution.
	 *
	 * @param route The route the fallback is for
	 * @param cause cause of the main method failure, may be <code>null</code>
	 * @return the fallback response
	 */
	@Override // fallback 발생 시 호출되는 method
	public ClientHttpResponse fallbackResponse(String route, Throwable cause) {
		System.out.println("##### zuul to "+route+": "+cause.toString());
		if (cause instanceof SocketTimeoutException) {
			return new GatewayClientResponse(HttpStatus.GATEWAY_TIMEOUT, route+" "+DELAY_RESPONSE);
		} else {
			return new GatewayClientResponse(HttpStatus.INTERNAL_SERVER_ERROR, route+" "+NOT_AVAILABLE);
		}
	}
}
zuul repository에 git push하고, 재 배포 합니다.
3) consumer앱 수정
consumer앱에 '/delay/{param}' API를 추가합니다.
@RestController
@RefreshScope
public class Controller {
	...

	@Value("${sleeptime:1000}")
	private long sleepTime;

	...

	@GetMapping("/delay/{param}")
	@ApiOperation(value = "test hystrix2")

	public String testHystrix2(@PathVariable String param) {
		if(!"pass".equals(param)) {
			try {
				Thread.sleep(sleepTime);
			} catch(Exception e) {}
		}
		return "I'm Working";
	}
}
consumer repository에 git push하고, 재 배포 합니다.
configmng의 consumer-common.yaml에 sleeptime변수를 추가합니다.
그리고, configmng repository에 git push합니다.
ribbon:
  ConnectTimeout: 2000
  ReadTimeout: 2000
  NIWSServerListClassName: com.netflix.niws.loadbalancer.DiscoveryEnabledNIWSServerList
  ServerListRefreshInterval: 60000
  NIWSServerListFilterClassName: com.netflix.loadbalancer.ServerListSubsetFilter

sleeptime: 1500
4) 테스트
- zuul서버 콘솔을 띄웁니다.
k logs -f zuul-0- hystrix dashboard를 이용하여 zuul의 circuit breaker 상태 페이지를 띄웁니다.
hystrix-dashboard.169.56.84.41.nip.io/hystrix
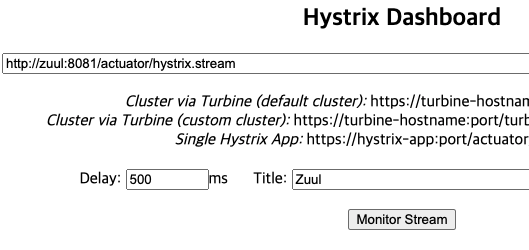
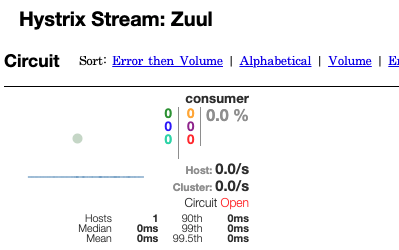
- Circuit breaker를 OPEN상태로 만듭니다.
위 zuul-common.yaml의 설정대로라면, 10초 동안 1초를 초과한 응답이 50%이면 OPEN됩니다.
정상) zuul.169.56.84.41.nip.io/consumer/delay/pass

느린응답) zuul.169.56.84.41.nip.io/consumer/delay/pass1
Fallback이 동작하여 fallback에 지정한 message가 표시됩니다.

1번 이상 느린 응답이 오면 아래와 같이 circuit breaker가 열립니다. 콘솔과 hystrix dashboard에서 확인할 수 있습니다.

'Micro Service > mSVC개발' 카테고리의 다른 글
| [SC11] Spring Boot Actuator 이란 ? (0) | 2021.02.14 |
|---|---|
| [SC10] Spring Cloud Sleuth와 Zipkin 이란 ? (0) | 2021.02.14 |
| [SC08] Spring Cloud Ribbon 이란 ? (0) | 2021.02.14 |
| [SC07] Spring Cloud Zuul 이란 ? (0) | 2021.02.14 |
| [SC06] Spring Cloud Config Monitor 란 ? (0) | 2021.02.14 |
- Total
- Today
- Yesterday
- agile
- 요즘남편 없던아빠
- 육각형인간
- 도파밍
- SAGA
- micro service
- 마이크로서비스 패턴
- #MAS
- Event Sourcing
- AI
- 분초사회
- 마이크로서비스
- 애자일
- 스핀프로젝트
- AXON
- agentic ai
- 호모프롬프트
- API Composition
- 돌봄경제
- 디토소비
- 플러그인
- spotify
- 리퀴드폴리탄
- 스포티파이
- CQRS
- 버라이어티가격
| 일 | 월 | 화 | 수 | 목 | 금 | 토 |
|---|---|---|---|---|---|---|
| 1 | 2 | 3 | 4 | 5 | 6 | 7 |
| 8 | 9 | 10 | 11 | 12 | 13 | 14 |
| 15 | 16 | 17 | 18 | 19 | 20 | 21 |
| 22 | 23 | 24 | 25 | 26 | 27 | 28 |
