티스토리 뷰
1. Spring Boot Actuator 이해
1) WHY?
각 마이크로서비스는 고유의 목적을 가지고 개발되고 운영됩니다.
하지만 모든 마이크로서비스에는 공통으로 요구되는 기능이 있습니다.
예를 들어 Health Check와 상태정보(Metrics) 제공같은 기능들이 그것입니다.
이러한 공통 기능들을 각각 만드는 것은 매우 비효율적입니다.
Spring Boot Actuator가 필요한 이유는 어플리케이션을 관리하고 제반 정보를 제공하는 공통 기능을 쉽게 적용하기 위해서입니다.
참고) Actuator 어원
An actuator is a manufacturing term that refers to a mechanical device
for moving or controlling something.
Actuators can generate a large amount of motion from a small change.

Actuator는 무언가를 옮기거나 통제하기 위한 물리 장치를 의미하는 제조 용어입니다.
Actuator는 작은 변화로 큰 움직임을 발생시킬 수 있습니다.
actuator는 '무언가를 작동시키는 것'이라는 뜻입니다.
다양한 metric을 요청하는 end point들, config를 재 로딩 요청하는 '/actuator/refresh',
circuit breaker 상태를 요청하는 '/actuator/hystrix.stream' 등 애플리케이션에게 무언가를 요청하여 동작하게끔 한다는
의미로 붙여진 것 같습니다.
Actuator는 Spring Cloud component가 아니라, Sprint Boot의 component입니다.
2) HOW?
현재 Actuator가 제공하는 기능은 아래와 같습니다.
주요 기능을 위한 end point는 아래와 같습니다. http://{app host}:{app port}/actuator/{end point}로 호출합니다.
| ID | 기능 | ID | 기능 |
| beans | Spring Bean리스트 리턴 | env | 환경변수 리스트 리턴 |
| health | health 상태 정보 리턴 | loggers | log설정 Get/Set |
| metrics | Metrics list 리턴 | threaddump | thread상태 정보 리턴 |
전체 Actuator의 end points는 아래 링크를 참조하세요.
이 중에 제일 많이 사용되는 기능은 역시 Metrics입니다.
Spring Boot Actuator는 아래 유명한 모니터링 제품들을 위한 Metric을 제공합니다.
AppOptics
Atlas
Datadog
Dynatrace
Elastic
Ganglia
Graphite
Humio
Influx
JMX
KairosDB
New Relic
Prometheus
SignalFx
Simple (in-memory)
Stackdriver
StatsD
Wavefront
Actuator의 Metric기능은 Micrometer라는 오픈소스를 사용합니다. (http://micrometer.io)
Micrometer는 각 모니터링 제품별로 메트릭을 수집하는 클라이언트(에이젼트)를 위한 표준 Facade(인터페이스)를 제공하는 제품입니다.
Micrometer가 표준형식으로 Metric을 제공하면, 각 모니터링 제품 클라이언트가 자기 format대로 metric형식을 변화하면 됩니다.
따라서 특정 벤더에 종속되지 않고, 필요에 따라 적절한 모니터링 제품으로 쉽게 바꿀 수 있습니다.
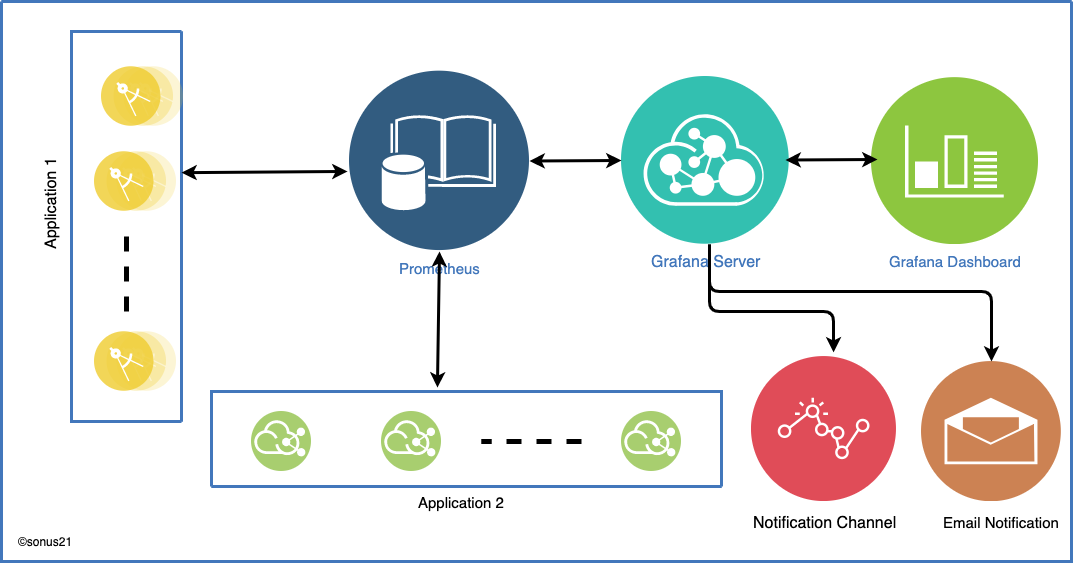
우리는 아래와 같이 Prometheus와 Grafana를 이용하여 어플리케이션에 대한 모니터링을 실습해 보고자 합니다.
각 어플리케이션에는 Micrometer툴이 사용된 Actuator metric과 Prometheus client를 적용합니다.
Prometheus서버는 Prometheus client를 통하여 Metrics정보를 형 변환하여 주기적으로 pulling합니다.
Grafana서버는 Prometheus에 수집된 데이터를 주기적으로 읽어 대시보드로 제공합니다.
또한, 정해진 Alert규칙에 따라 여러 채널로 통보합니다.
2. Actuator와 Prometheus 연동
Sleuth와 Zipkin편에서 사용했던 zuul, consumer, hystrix-consumer, hystrix-producer의 메트릭 정보를 Prometheus로 수집하여, Grafana에서 대시보드를 만들어 보겠습니다.
http://{zuul ingress host}/consumer/hystrix/{param}을 실행하면 위 순서대로 호출되어, 주문 가능한 커피목록을 리턴합니다.

1) Prometheus 서버 설치
4개 마이크로서비스의 Metric정보를 수집할 별도의 Prometheus서버를 현재 namespace에 배포합니다.
- helm chart repository 추가
helm repo add prometheus-community https://prometheus-community.github.io/helm-charts
helm repo add kube-state-metrics https://kubernetes.github.io/kube-state-metrics
helm repo add grafana https://grafana.github.io/helm-charts
helm repo update
- 작업 디렉터리 작성
mkdir -p ~/install/monitoring- config파일 작성
$ cd ~/install/monitoring
$ vi config-sc.yaml
Metric수집 주기인 scrape_interval, ingress host, 각 어플리케이션의 주소(k8s service 또는 ingress)를 적절히 변경합니다.
어플리케이션 주소에는 프로토콜(http://, https://)은 붙이지 마십시오.
Label 'application'과 'instance'는 지정해 주는것이 좋습니다. grafana 대시보드에서 사용하는 변수이기 때문입니다.
serviceAccounts:
  alertmanager:
    create: false
  nodeExporter:
    create: false
  pushgateway:
    create: false
  server:
    create: true

alertmanager:
  enabled: false

configmapReload:
  prometheus:
    enabled: false

kubeStateMetrics:
  enabled: false

nodeExporter:
  enabled: false

server:
  enabled: true

  global:
    ## Path to a configuration file on prometheus server container FS
    configPath: /etc/config/prometheus.yml
    ## How frequently to scrape targets by default
    scrape_interval: 10s
    ## How long until a scrape request times out
    scrape_timeout: 10s
    ## How frequently to evaluate rules
    evaluation_interval: 10s

  ingress:
    enabled: true

    annotations:
      kubernetes.io/ingress.class: nginx

    hosts:
    - hklee.prometheus-sc.169.56.84.37.nip.io

  persistentVolume:
    enabled: true

    accessModes:
      - ReadWriteOnce

    mountPath: /data

    size: 8Gi

pushgateway:
  enabled: false

## Prometheus server ConfigMap entries
##
serverFiles:
  prometheus.yml:
    rule_files:
      - /etc/config/recording_rules.yml
      - /etc/config/alerting_rules.yml

    scrape_configs:
      - job_name: prometheus
        static_configs:
          - targets:
            - localhost:9090
      - job_name: 'springcloud-apps'
        metrics_path: '/actuator/prometheus'
        static_configs:
          # don't use protocol(http:// or https://). you can use service name or ingress host.
          - targets: [ 'hklee.zuul.169.56.84.37.nip.io' ]
            labels:
              application: cafeservice
              instance: 'zuul'
          - targets: [ 'hklee.consumer.169.56.84.37.nip.io' ]
            labels:
              application: cafeservice
              instance: 'consumer'
          - targets: [ 'hystrix-consumer:8003' ]
            labels:
              application: cafeservice
              instance: 'hystrix-consumer'
          - targets: [ 'hklee.hystrix-producer.169.56.84.37.nip.io' ]
            labels:
              application: cafeservice
              instance: 'hystrix-producer'
- 설치
먼저 yaml에 문제가 없는지 검증합니다. 현재 namespace를 대상 어플리케이션이 설치된 namespace와 동일하게 변경한 후 수행합니다.
kubens hklee

helm install prometheus-sc -f config-sc.yaml prometheus-community/prometheus --dry-run
문제 없으면, 설치 합니다.
helm install prometheus-sc -f config-sc.yaml prometheus-community/prometheus
- 확인
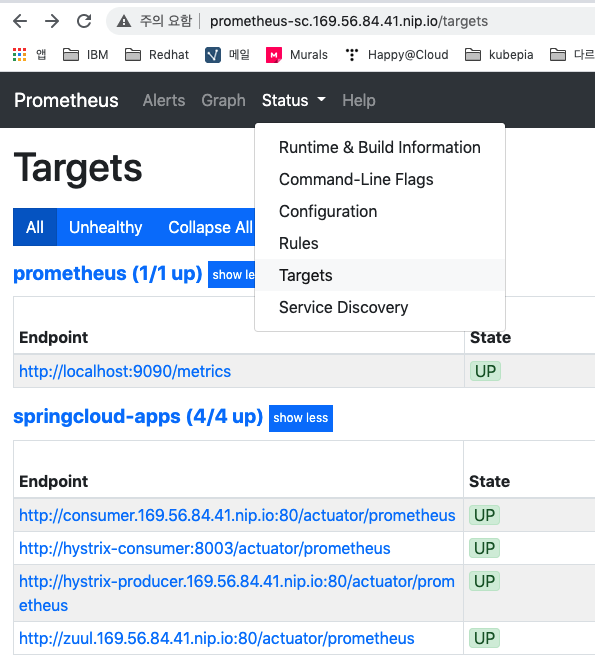
prometheus-sc의 ingress주소를 열고, Status > Targets를 클릭하여 대상 어플리케이션의 상태가 모두 'UP'인지 확인합니다.
2) dependency 추가
zuul, consumer, hystrix-consumer, hystrix-producer의 pom.xml에 prometheus client를 추가합니다.
spring-boot-starter-actuator는 이미 있을것이므로 확인만 합니다.
		<dependency>
			<groupId>io.micrometer</groupId>
			<artifactId>micrometer-registry-prometheus</artifactId>
			<scope>runtime</scope>
		</dependency>
git repository에 push합니다.
3) configmng에 prometheus client 설정 추가
configmng의 zuul-common.yaml, consumer-common.yaml, hystrix-consumer-common.yaml, hystrix-producer-common.yaml에 아래 설정을 추가합니다.
management.endpoints.web.exposure.include: prometheusgit repository에 push합니다.
위 설정을 추가하면 안됩니다.
configmng의 application.yaml에 설정된 'management.endpoints.web.exposure.include: *'을 덮어 써서,
노출되는 Actuator endpoint가 prometheus만 남게 됩니다.
management.endpoints.web.exposure.include가 '*'로 되어 있으면, 노출 가능한 모든 end point를 추가하게 되므로,
prometheus endpoint도 자동 생성됩니다.
4) 어플리케이션 재배포
[root@nfs ~]# su - hklee
...
[hklee@nfs ~]$ cd work/{application}
[hklee@nfs work]$ git pull
[hklee@nfs consumer]$ run-cicd hklee passw0rd . dev . java config
3. Grafana에 대시보드 작성
Grafana는 Prometheus에 저장된 Metric정보를 주기적으로 읽어 대시보드를 제공합니다.
1) Grafana 설치
Grafana를 설치하는 방법은 아래 링크를 참조하십시오.
happycloud-lee.tistory.com/203
prometheus와 grafana를 이용한 통합모니터링 체계 구축
1. 개요 1.1 가이드 목표 prometheus와 grafana를 이용하여 모니터링 체계를 구축하는 방법에 대해 이해 1.2 아키텍처 kubernetes 리소스의 metric(사용현황) 정보를 수집(prometheus)하여 대시보드로 제공 (grafa.
happycloud-lee.tistory.com
2) Datasource 추가하기
Prometheus를 데이터소스로 추가하는 작업입니다.

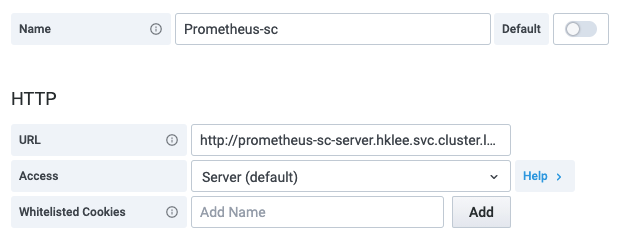
URL은 prometheus의 ingress주소 또는 k8s service주소를 입력합니다.
ingress 주소는 k get ing 로 확인하고, k8s service주소는 k get svc로 확인합니다.
k8s service주소는 grafana와 다른 namespace에 있으므로, full url을 입력해야 합니다.포트가 80이 아니면 포트까지 지정해야 합니다.
예) http://prometheus-sc-server.hklee.svc.cluster.local:8888
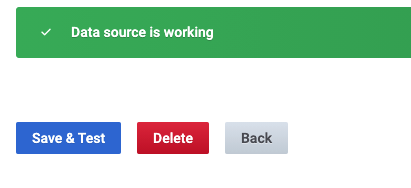
다른 필드값은 그대로 놔두고, 맨 아래 [Save & Test]를 눌러 연결이 되면 성공입니다.
3) 대시보드 만들기
빈 상태에서 대시보드를 만들어도 되지만, 상당한 학습이 되어 있지 않으면 힘듭니다.
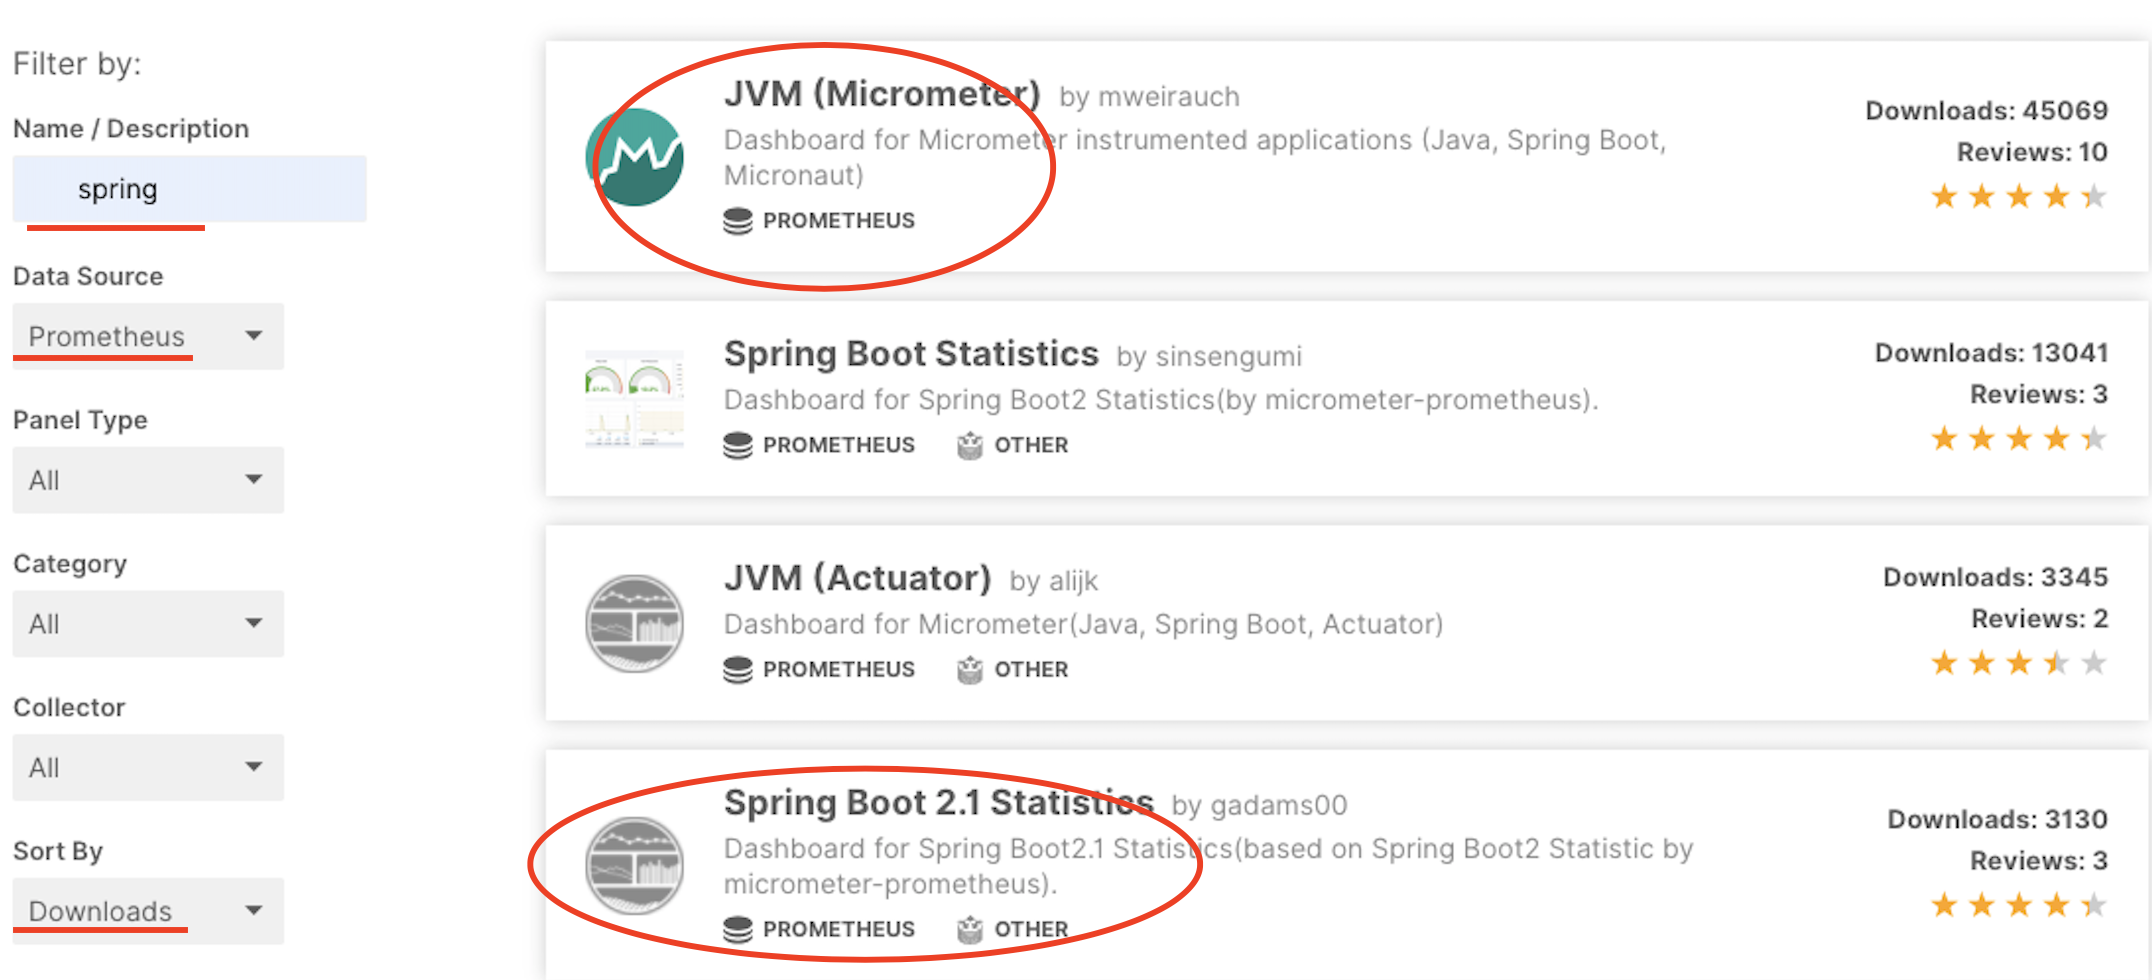
grafana.com 사이트에서 아래와 같이 검색하여 import할 대시보드를 선택합니다.
대시보드를 클릭하고 우측에 보면 'Get this dashboard'밑에 dashboard id가 있습니다. 그 값을 복사하십시오.
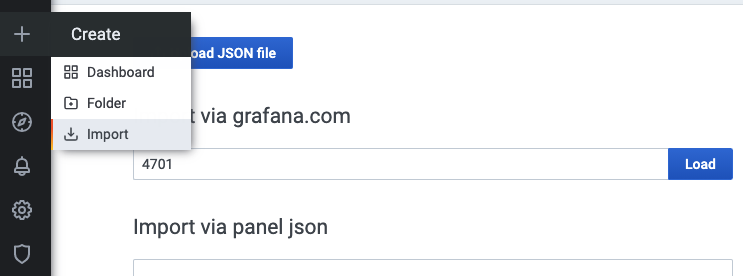
Create > Import를 누른 후, import할 dashboard id를 붙여넣습니다.
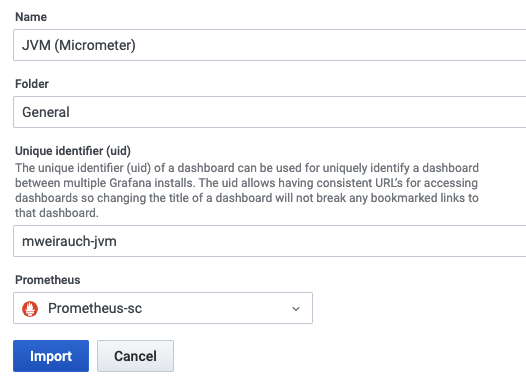
[Load]를 클릭하면 정보 입력 화면으로 바뀝니다.
Name, Folder, uid를 적절히 입력합니다.
uid는 원 제작자가 지정한 값이 나타납니다. 지정하지 않았으면 바꿔도 되고, 입력하지 않아도 됩니다.
Prometheus항목은 반드시 위에서 추가한 데이터 소스로 바꿔야 합니다.
[Import]를 누르면 아래 예와 같이 멋진 대시보드가 만들어집니다.
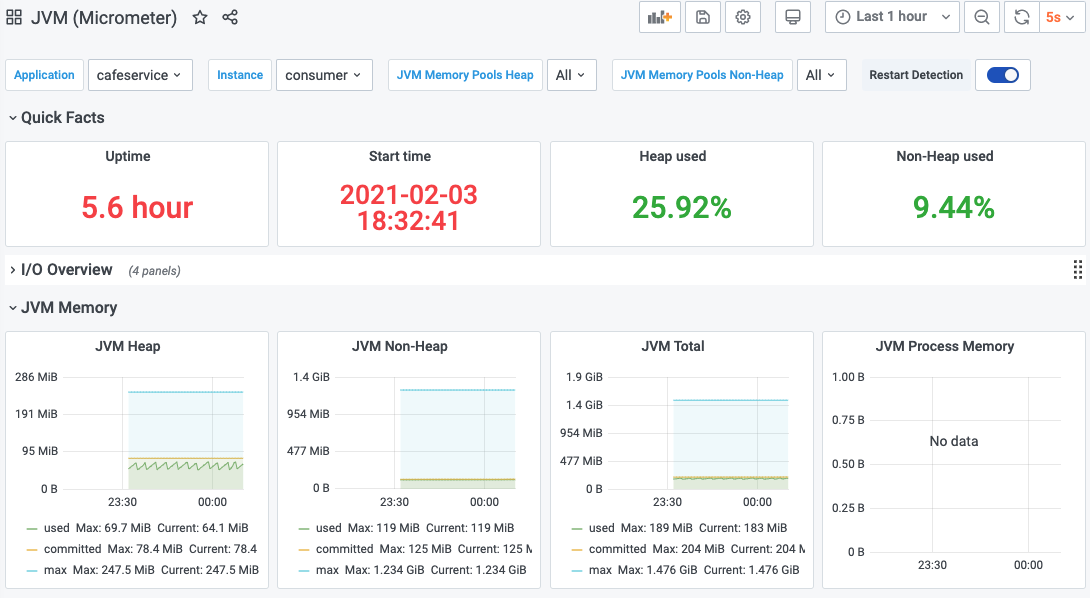
우측 상단에서 새로운 판넬 추가, 대시보드 저장, 대시보드 환경설정, view모드 변경, 시간 지정, 자동 갱신주기 조정을 할 수 있습니다.

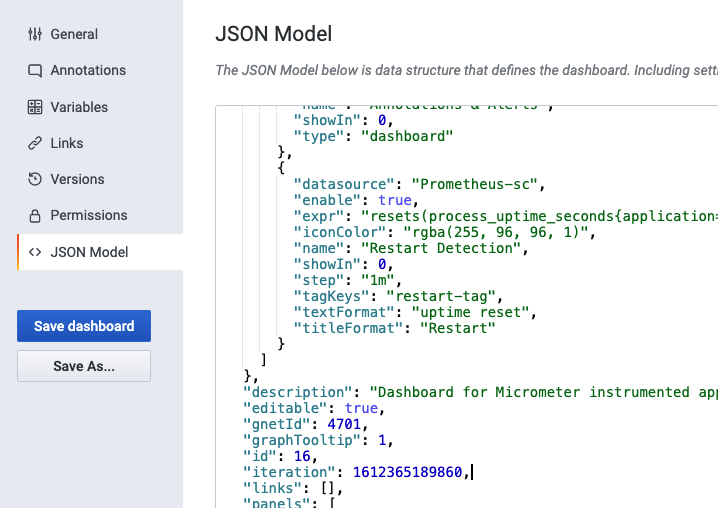
특히 환경설정에서 [JSON Model]을 클릭하면, json으로 대시보드의 소스를 볼 수 있습니다.
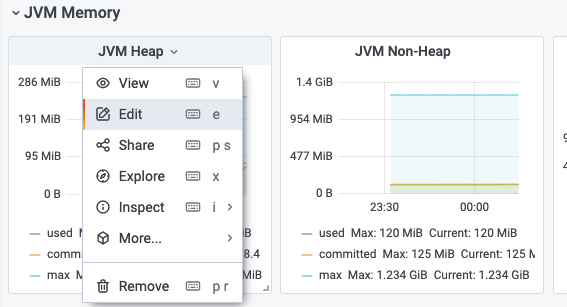
각 판넬을 수정하려면 Title을 클릭하고 [Edit]를 누르면 됩니다.
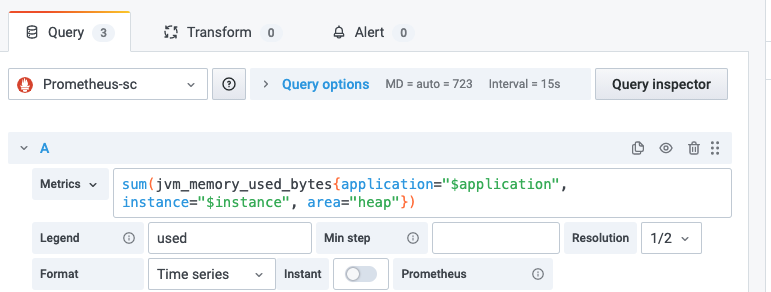
기존에 잘 짜여진 대시보드를 통해 학습하시면 나만의 대시보드를 만드실 수 있을겁니다.
'Micro Service > mSVC개발' 카테고리의 다른 글
| [SC13] Spring Cloud Circuit Breaker & Resilience4J 란 ? (4) | 2021.02.14 |
|---|---|
| [SC12] Spring Cloud Gateway 란 ? (6) | 2021.02.14 |
| [SC10] Spring Cloud Sleuth와 Zipkin 이란 ? (0) | 2021.02.14 |
| [SC09] Spring Cloud Hystrix 란 ? (0) | 2021.02.14 |
| [SC08] Spring Cloud Ribbon 이란 ? (0) | 2021.02.14 |
- Total
- Today
- Yesterday
- 요즘남편 없던아빠
- 마이크로서비스
- 리퀴드폴리탄
- 분초사회
- 육각형인간
- SAGA
- 디토소비
- 호모프롬프트
- micro service
- Event Sourcing
- 마이크로서비스 패턴
- 스핀프로젝트
- 돌봄경제
- spotify
- CQRS
- 버라이어티가격
- AXON
- 애자일
- agile
- API Composition
- 스포티파이
- 도파밍
| 일 | 월 | 화 | 수 | 목 | 금 | 토 |
|---|---|---|---|---|---|---|
| 1 | 2 | 3 | ||||
| 4 | 5 | 6 | 7 | 8 | 9 | 10 |
| 11 | 12 | 13 | 14 | 15 | 16 | 17 |
| 18 | 19 | 20 | 21 | 22 | 23 | 24 |
| 25 | 26 | 27 | 28 | 29 | 30 | 31 |
