티스토리 뷰
1. 개요
1.1 가이드 목표
EFK스택을 이용하여 통합로깅체계를 구축하는 방법에 대해 이해
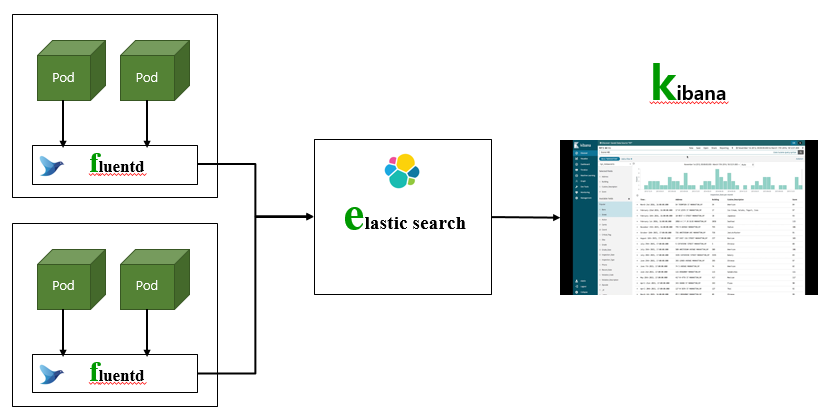
1.2 EFK아키텍처
elastic search는 로그가 저장되는 Database입니다.
fluentd는 각 Pod의 로그를 수집하는 데몬 프로그램입니다.
kibana는 elastic search의 로그를 통합 조회 및 검색할 수 있는 web UI를 제공합니다.
1.3 사전 작업
1) helm 설치
happycloud-lee.tistory.com/3?category=832245
2) helm chart repository 추가
helm repo add elastic https://helm.elastic.co
helm repo update
3) namespace 작성
$ kubectl create ns efk
4) NFS Server 설치
happycloud-lee.tistory.com/46?category=832247
5) NSF Dynamic provisioning설정
kubepia.github.io/cloudpak/cp4app/install/ocp04.html
6) 작업디렉토리 작성
$ mkdir -p ~/install/efk
7) kubens 설치
kubens는 namespace변경을 쉽게 해주는 툴입니다.
happycloud-lee.tistory.com/95?category=832243
2. EFK설치
2.1 elastic search 설치
elastic search는 로그가 저장되는 Database입니다.
2.1.1 PV 생성
원하는 volume directory를 사용하고 싶을 때만 필요합니다.
자동으로 PV를 만들고 싶으면 NFS Dynamic Provisioning 설정을 먼저 하시고, 이 단계는 skip합니다.
1) volume directory 작성
nfs서버의 volume디렉토리가 '/data'라고 가정하면 아래와 같이 만듭니다.
$ sudo mkdir /data/elasticsearch-master
$ sudo chmod 777 /data/elasticsearch-master
2) PV 생성
$ kubens efk
$ cd ~/install/efk
$ vi pv-elasticsearch.yaml
nfs.path와 nfs.server는 본인의 NFS서버로 변경하십시오.
apiVersion: v1
kind: PersistentVolume
metadata:
  annotations:
    pv.kubernetes.io/provisioned-by: standard
  name: elasticsearch-master
spec:
  accessModes:
  - ReadWriteOnce
  capacity:
    storage: 30Gi
  nfs:
    path: /data/elasticsearch-master
    server: 10.178.32.140
  persistentVolumeReclaimPolicy: Retain
  #storageClassName: nfs-standard
  volumeMode: Filesystem
$ kubectl apply -f pv-elasticsearch.yaml
$ kubectl get pv | grep elastic

2.1.2 elastic search 설치
1) values-elasticsearch.yaml 수정
pod수, 자원, storage용량, ingress를 적절하게 수정합니다.
replicas: 1
minimumMasterNodes: 2

image: "docker.elastic.co/elasticsearch/elasticsearch"
imageTag: "7.10.0"
imagePullPolicy: "IfNotPresent"

resources:
  requests:
    cpu: "1000m"
    memory: "2Gi"
  limits:
    cpu: "2000m"
    memory: "4Gi"

volumeClaimTemplate:
  accessModes: [ "ReadWriteOnce" ]
  resources:
    requests:
      storage: 10Gi

rbac:
  create: false

podSecurityPolicy:
  create: false

persistence:
  enabled: true
  labels:
    # Add default labels for the volumeClaimTemplate of the StatefulSet
    enabled: false
  annotations: {}

readinessProbe:
  failureThreshold: 3
  initialDelaySeconds: 10
  periodSeconds: 10
  successThreshold: 3
  timeoutSeconds: 5


# Enabling this will publically expose your Elasticsearch instance.
# Only enable this if you have security enabled on your cluster
ingress:
  enabled: true
  annotations:
    kubernetes.io/ingress.class: nginx
    # kubernetes.io/tls-acme: "true"
  path: /
  hosts:
    - elasticsearch.169.56.84.41.nip.io
  tls: []

# https://github.com/elastic/helm-charts/issues/63
masterTerminationFix: false
2) helm으로 설치
--dry-run옵션으로 미리 검증을 하고, 설치합니다.
$ kubens efk
$ helm install elasticsearch -f values-elasticsearch.yaml elastic/elasticsearch --dry-run
$ helm install elasticsearch -f values-elasticsearch.yaml elastic/elasticsearch
$ kubectl get pvc
PV와 PVC의 바인딩이 잘되어 있는지 확인합니다.

pod가 정상적으로 running될때까지 기다립니다.
$ kubectl get po

참고) elastic 재설치
재설치가 필요하면 아래와 같이 작업 후 '2.1.2 elastic search설치'를 참고하여 설치하십시오.
- volume directory파일 삭제
$ sudo rm -rf /data/elasticsearch-master/*
- 리소스 삭제
$ helm delete elasticsearch
- PVC수동 삭제
$ kubectl get pvc
위 명령으로 확인 후 아래 명령으로 삭제
$ kubectl delete pvc <pvc name>
* PV는 자동으로 삭제됩니다. (PV의 persistentVolumeReclaimPilicy가 'Delete'이므로)
2.2 Fluentd 설치
fluentd는 각 Pod의 로그를 수집하는 데몬 프로그램입니다.
2.2.1 설치 yaml 작성
fluentd-deploy.yaml 파일에서 replicas와 resource를 적절하게 수정합니다.
apiVersion: v1
kind: ServiceAccount
metadata:
  name: fluentd
  namespace: kube-system
---
apiVersion: rbac.authorization.k8s.io/v1
kind: ClusterRole
metadata:
  name: fluentd
  namespace: kube-system
rules:
- apiGroups:
  - ""
  resources:
  - pods
  - namespaces
  verbs:
  - get
  - list
  - watch
---
apiVersion: rbac.authorization.k8s.io/v1
kind: ClusterRoleBinding
metadata:
  name: fluentd
  namespace: kube-system
roleRef:
  kind: ClusterRole
  name: fluentd
  apiGroup: rbac.authorization.k8s.io
subjects:
- kind: ServiceAccount
  name: fluentd
  namespace: kube-system
---
apiVersion: apps/v1
kind: DaemonSet
metadata:
  name: fluentd
  namespace: kube-system
  labels:
    k8s-app: fluentd-logging
    versiion: v1
spec:
  selector:
    matchLabels:
      k8s-app: fluentd-logging
      version: v1
  template:
    metadata:
      labels:
        k8s-app: fluentd-logging
        version: v1
    spec:
      serviceAccount: fluentd
      serviceAccountName: fluentd
      containers:
      - name: fluentd
        #image: fluent/fluentd-kubernetes-daemonset:v1-debian-elasticsearch
        image: fluent/fluentd-kubernetes-daemonset:v1.11.5-debian-elasticsearch7-1.0
        env:
        - name: FLUENT_ELASTICSEARCH_HOST
          value: elasticsearch-master.efk.svc.cluster.local
        - name: FLUENT_ELASTICSEARCH_PORT
          value: "9200"
        - name: FLUENT_ELASTICSEARCH_SCHEME
          value: http
        - name: FLUENT_ELASTICSEARCH_SSL_VERIFY
          value: "false"
        - name: FLUENT_SYSTEMD_CONF
          value: disable
        resources:
          requests:
            cpu: 100m
            memory: 200Mi
          limits:
            cpu: 1024m
            memory: 1024Mi
        volumeMounts:
        - name: varlog
          mountPath: /var/log
        - name: varlibdockercontainers
          mountPath: /var/lib/docker/containers
          readOnly: true
        - name: varlogjournal
          mountPath: /var/log/journal
      terminationGracePeriodSeconds: 30
      volumes:
      - name: varlog
        hostPath:
          path: /var/log
      - name: varlibdockercontainers
        hostPath:
          path: /var/lib/docker/containers
      - name: varlogjournal
        hostPath:
          path: /var/log/journal
2.2.2 fluentd 설치
$ kubectl apply -f fluentd-deploy.yaml
$ kubectl get po -n kube-system

2.3 Kibana 설치
kibana는 elastic search의 로그를 통합 조회 및 검색할 수 있는 web UI를 제공합니다.
2.3.1 values-kibana.yaml 수정
Pod수, 리소스, ingress정보를 적절하게 수정합니다.
elasticsearchHosts: "http://elasticsearch-master:9200"
replicas: 1

image: "docker.elastic.co/kibana/kibana"
imageTag: "7.10.0"
imagePullPolicy: "IfNotPresent"

resources:
  requests:
    cpu: "1000m"
    memory: "2Gi"
  limits:
    cpu: "1000m"
    memory: "2Gi"

protocol: http

serverHost: "0.0.0.0"

healthCheckPath: "/app/kibana"

podSecurityContext:
  fsGroup: 1000

securityContext:
  capabilities:
    drop:
    - ALL
  # readOnlyRootFilesystem: true
  runAsNonRoot: true
  runAsUser: 1000

serviceAccount: ""

# This is the PriorityClass settings as defined in
# https://kubernetes.io/docs/concepts/configuration/pod-priority-preemption/#priorityclass
priorityClassName: ""

httpPort: 5601

updateStrategy:
  type: "Recreate"

service:
  type: ClusterIP
  loadBalancerIP: ""
  port: 5601
  nodePort: ""
  labels: {}
  annotations: {}
  loadBalancerSourceRanges: []
    # 0.0.0.0/0

ingress:
  enabled: true
  annotations:
    kubernetes.io/ingress.class: nginx
    # kubernetes.io/tls-acme: "true"
  path: /
  hosts:
    - kibana.169.56.84.41.nip.io
  tls: []

readinessProbe:
  failureThreshold: 3
  initialDelaySeconds: 10
  periodSeconds: 10
  successThreshold: 3
  timeoutSeconds: 5
2.3.2 kibana 설치
helm으로 설치합니다. --dry-run으로 사전 검증 후 설치합니다.
$ kubens efk
$ helm install kibana -f values-kibana.yaml elastic/kibana --dry-run
$ helm install kibana -f values-kibana.yaml elastic/kibana
$ kubectl get po

3. EFK 설정
설치된 EFK스택을 구성합니다.
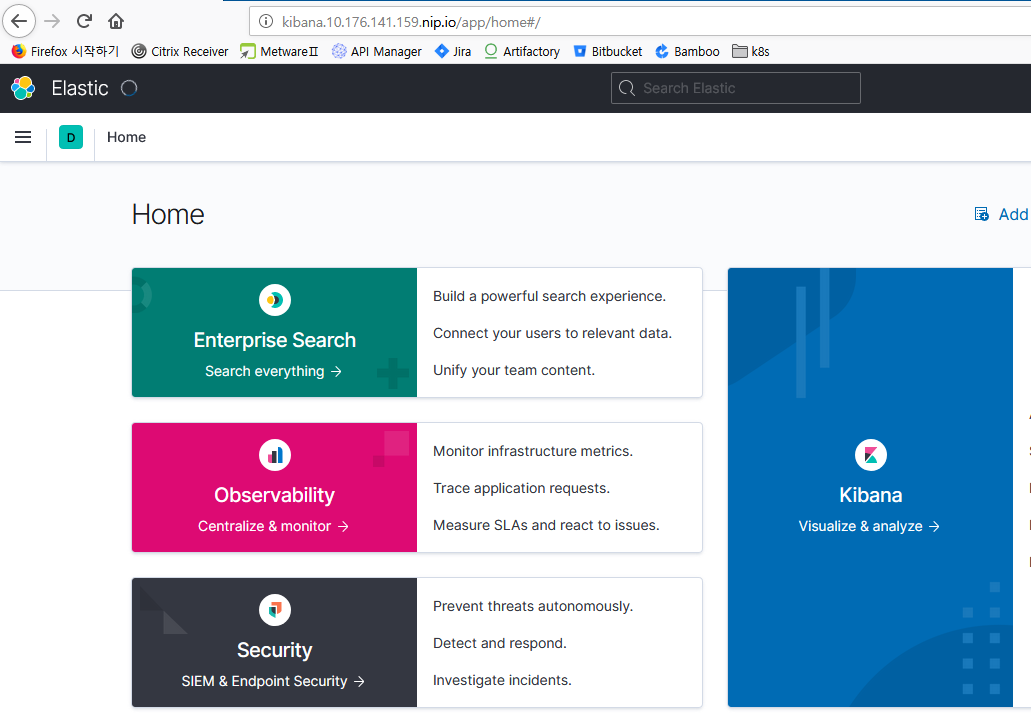
3.1 kibana 접속
http://<kibana ingress host>
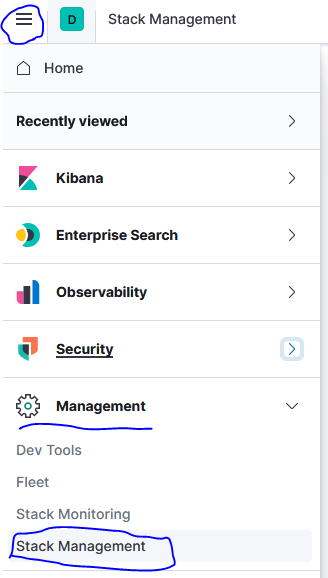
3.2 Index Pattern생성
elasticsearch에서 index라는 용어는 RDB의 Database와 유사한 의미입니다.
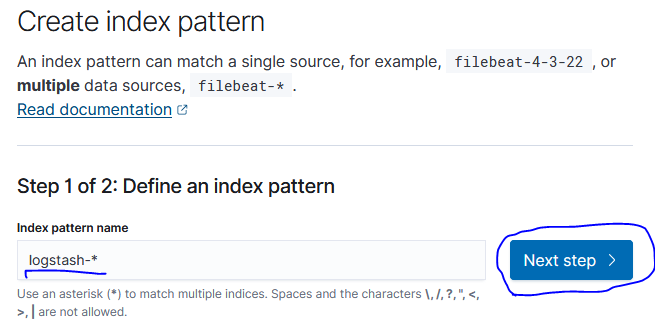
각 index를 만드는 naming 규칙을 만드는 작업입니다.

'logstash-*'라고 입력합니다.

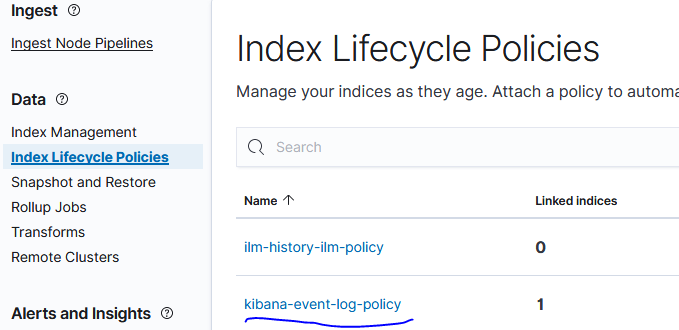
3.3 Index Lifecycle 설정
index의 보관 정책 및 기간을 설정합니다.
elasticsearch의 index Lifecycle은 아래와 같이 4단계로 나눌 수 있으며, Hot과 Delete단계는 필수로 지정해야 합니다.
- Hot: 빈번하게 검색 해야할 최신 Log
- Warm: Hot보다 덜 찾는 Log
- Cool: 간헐적으로 찾는 Log
- Delete: 더 이상 필요 없어 삭제할 Log
주의) Index 보관 주기를 바꾸지 않으면 기본 설정대로 90일 후에나 로그가 삭제되므로, Disk가 모자랄 수 있습니다. 이 가이드에서는 최대 2일만 보관하도록 설정합니다.


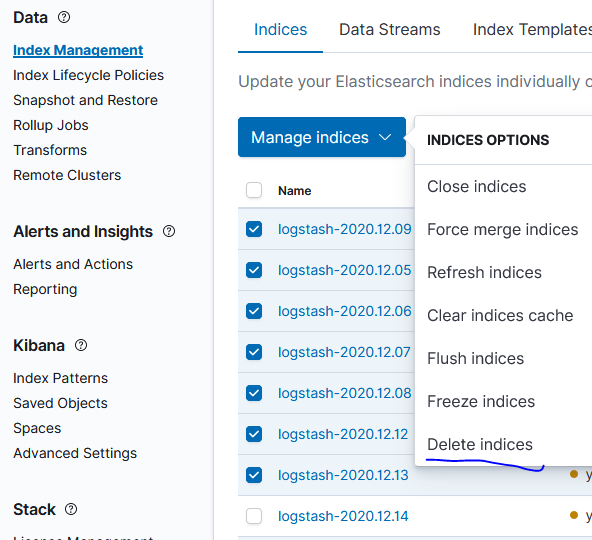
기존에 생성된 index는 오늘 날짜만 빼고 삭제합니다.
4. 로그 조회 실습
Container 로그를 kibana를 통해 검색하는 방법을 실습합니다.
4.1 kibana에서 조회
kibana의 Discover메뉴를 클릭합니다.

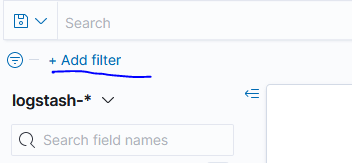
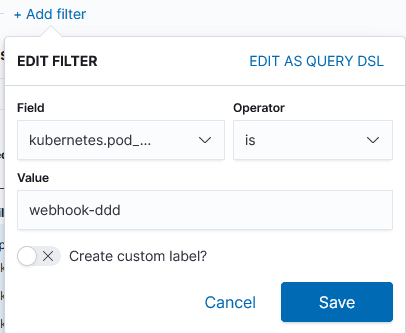
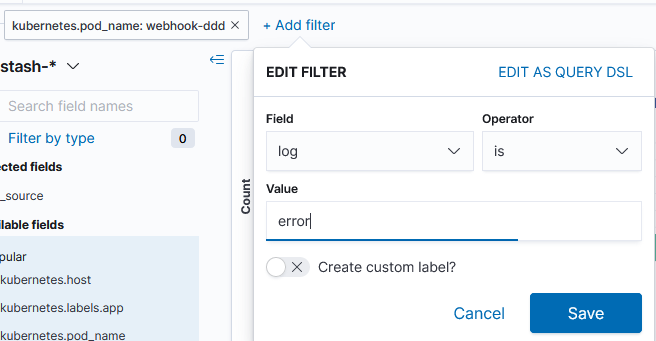
Field 'kubernetes.pod_name'을 선택하고, 검색할 어플리케이션 이름을 지정 합니다.
'is' operator는 똑같거나 포함하는 값을 지정할 때 사용합니다.
log에 error라는 단어가 포함된 것을 추가 필터로 만듭니다.
아래 예와 같이 log메시지를 볼 수 있습니다.

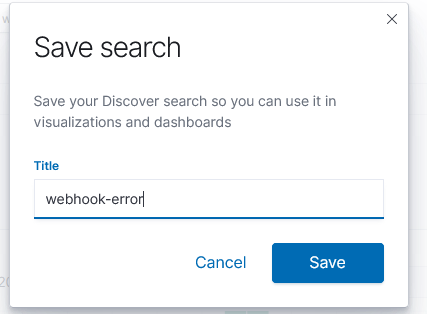
참고로, 필터 조건을 저장하여 나중에 불러서 사용할 수 있습니다.

'Cloud > Kubernetes' 카테고리의 다른 글
| OS user생성과 Kubernetes config 자동화 shell (0) | 2021.03.23 |
|---|---|
| prometheus와 grafana를 이용한 통합모니터링 체계 구축 (2) | 2021.02.03 |
| kubeconfig 셋팅 shell (0) | 2020.10.28 |
| NFS서버 설치와 NFS Dynamic Provisioning 설정 (0) | 2020.10.11 |
| pv,pvc,namespace 강제 삭제 (0) | 2020.09.10 |
- Total
- Today
- Yesterday
- 호모프롬프트
- 마이크로서비스
- 스핀프로젝트
- 디토소비
- 리퀴드폴리탄
- agile
- 마이크로서비스 패턴
- CQRS
- AI
- micro service
- 플러그인
- AXON
- API Composition
- Event Sourcing
- 도파밍
- agentic ai
- 돌봄경제
- SAGA
- 분초사회
- 애자일
- 육각형인간
- 버라이어티가격
- 스포티파이
- 요즘남편 없던아빠
- #MAS
- spotify
| 일 | 월 | 화 | 수 | 목 | 금 | 토 |
|---|---|---|---|---|---|---|
| 1 | 2 | 3 | 4 | 5 | 6 | 7 |
| 8 | 9 | 10 | 11 | 12 | 13 | 14 |
| 15 | 16 | 17 | 18 | 19 | 20 | 21 |
| 22 | 23 | 24 | 25 | 26 | 27 | 28 |
