
티스토리 뷰
이전 장에서는 기존에 미리 만들어진 chart를 설치/업그레이드/배포하는 방법을 설명했습니다.
이제 직접 helm chart를 만들어 Repository에 배포까지 하는 방법을 배워 보겠습니다.
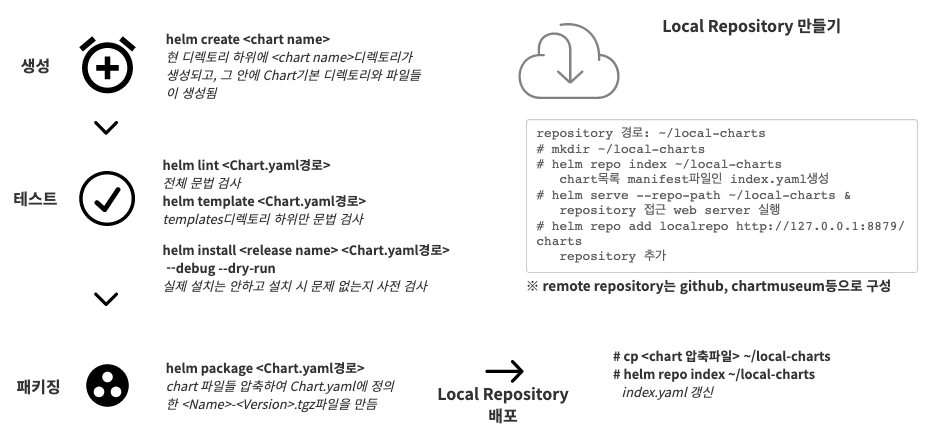
각 단계별 사용하는 명령은 아래와 같습니다.
그럼 순서대로 실습해 보겠습니다.
사전준비
helm chart로 배포할 프로그램을 작성하고, docker image로 build한 후 docker registry에 push합니다.
1) 프로그램 작성
# mkdir -p ~/work/hello-helm && cd ~/work/hello-helm
아래 내용으로 node.js 프로그램을 작성합니다.
var http = require('http');
var os = require('os');
var port = 8080;

http.createServer( (req, res) => {
  console.log('Requested: ' + req.url);
  res.writeHead(200, { 'Content-Type':'text/html' });
  res.write('<h1>Hello, Happy helm !</h1>');
  res.end();
}).listen(port, () => {
  console.log('Listen ... ' + os.hostname()+':'+port);
});
2) build
- Dockerfile 작성
FROM node:carbon
COPY hello-helm.js .
EXPOSE 8080
CMD node hello-helm
- docker image build
'ondalk8s'는 본인의 docker hub registry의 계정명으로 바꾸셔야 합니다. docker hub에 접속하셔서 확인하십시오.
# sudo docker build -t ondalk8s/hello-helm $PWD
3) Push image
# sudo docker login -u <username> -p <password>
# sudo docker push ondalk8s/hello-helm
이제 ondalk8s/hello-helm이라는 image를 배포하는 helm chart를 만들어 보겠습니다.
1. Chart 생성하기
1) Chart 기본 구조 만들기
helm은 편의를 위해 아래 명령으로 chart의 기본 구조를 만들어 줍니다.
# mkdir ~/charts && cd ~/charts
# helm create hello-helm
# cd hello-helm
# ls -al


차트 구조
| 디렉토리 | 파일 | 설명 |
| <chart명> | Chart.yaml | Chart에 대한 이름, 버전, 설명 등이 정의된 파일 |
| LICENSE | OPTIONAL: 라이센스 문구를 담고있는 파일. 아래 링크를 참조하여 적절한 라이센스 문구를 등록 https://choosealicense.com/licenses/ |
|
| README.md | OPTIONAL: Chart 설치, 사용법등을 기술한 파일 | |
| requirements.yaml | OPTIONAL: Chart에서 사용하는 종속 Chart(사전에 설치되어야 하는 다른 Chart)의 Chart명,버전,repository주소를 정의한 파일 | |
| values.yaml | Chart설치 시 사용할 환경 변수 지정. templates디렉토리 밑의 manifest(yaml파일)파일에서 참조함 | |
| charts/ | chart 압축파일 | Chart에서 사용하는 종속 Chart들이 압축파일(tgz)로 존재함. helm dep up 명령 수행하면 requirements.yaml 참조하여 repository에서 다운받아 생성함 |
| templates/ | NOTES.txt | OPTIONAL: 설치 후 사용 가이드를 기술한 파일로서 Chart설치 완료 후 콘솔에 표시됨 |
| _helpers.tpl | template manifest파일들에서 공유하는 항목 정의 | |
| deployment.yaml | POD 배포 정의 manifest | |
| service.yaml | Service 배포 정의 manifest | |
| ingress.yaml | Ingress 배포 정의 manifest | |
| {k8s resource}.yaml | 그 외 필요한 배포 정의 manifest파일들 (필요한 리소스로 생성) | |
| tests | test script 정의 manifest |
2) Chart.yaml 작성
각 항목의 설명은 아래를 참조하십시오.
| 항목 | 설명 |
| apiVersion | Helm자체의 api version으로 항상 "v1"임 (required) |
| name | Chart명 (required) |
| version | Chart버전으로 SemVer(Semantic versioning)규칙을 준수해야함. 쉽게말해 숫자로 된 X.X.X형식이면 됨. (required) SemVer 규칙은 아래 링크 참조 https://semver.org/lang/ko/ |
| kubeVersion | Chart설치와 실행을 보장하는 최소 k8s버전으로 SemVer형식 범위로 정의. ex) ">=1.15.3" (optional) |
| description | Chart에 대한 요약 설명 (optional) |
| keywords | Chart에 대한 keyword이며, 여러개면 대시(-)로 구분된 새로운 라인으로 정의함. helm search 시 keyword도 같이 검색됨 (optional) |
| home | Chart프로젝트의 홈페이지 URL임 (optional) |
| sources | Chart소스를 볼 수 있는 URL임. 대시로 구분된 새로운 라인으로 여러개 등록 가능함. Chart repository주소는 아님. (optional) |
| maintainers | - name: 저작자 이름 (required for each maintainer) email: 저작자 email (optional for each maintainer) url: 저작자의 개인 페이지 URL (optional for each maintainer) |
| engine | gotpl # yaml파일을 생성하는 template엔진명이며 기본값은 gotpl임. (optional, defaults to gotpl) |
| icon | SVG 또는 PNG 포맷의 아이콘 URL이며, 카탈로그에서 차트 표시시 사용됨.(optional) |
| appVersion | Chart를 이용해 서비스되는 앱의 버전이며 SemVer형식을 따르지 않아도 됨. (optional) |
| deprecated | deprecated된 차트인지 여부를 true/false로 명시. (optional, boolean) |
| tillerVersion | 보장하는 tiller버전의 SemVer범위. ex) ">2.0.0" (optional) |
아래 예제를 참고하여 적절히 변경하십시오.
apiVersion: v1
name: hello-helm
version: 0.1.0
kubeVersion: ">=1.15.3"
description: Sample helm chart for study
keywords:
  - hello
  - sample
home: "https://github.com/happycloudpak/helm-charts"
sources:
  - https://github.com/happycloudpak/helm-charts/tree/master/stable
maintainers: # (optional)
  - name: HaeKyung Lee
    email: hiondal@gmail.com
  - name: HappyCloudPak
    email: happycloudpak@gmail.com
engine: gotpl
icon: https://d36jcksde1wxzq.cloudfront.net/saas-mega/blueFingerprint.png
appVersion: latest
deprecated: false
tillerVersion: ">2.0.0"
3) README.md 작성
README는 markdown 문법을 준용하여 작성합니다.
아래는 sample입니다.
# hello-helm

[hello-helm](https://github.com/happycloudpak/helm-charts/tree/master/stable)
helm chart study를 위한 sample chart입니다.

## Introduction

웹페이지상에 'Hello, Happy Helm !'을 표시합니다.

## Prerequisites

- Kubernetes 1.8+

## Installing the Chart

To install the chart with the release name `my-release`:

```bash
$ $ helm install <git repository>/hello-helm --name my-release

```

The command deploys hello-helm on the Kubernetes cluster in the default configuration. The [configuration](#configuration) section lists the parameters that can be configured during installation.

> **Tip**: List all releases using `helm list`

## Uninstalling the Chart

To uninstall/delete the `my-release` deployment:

```bash
$ helm delete my-release
```

The command removes all the Kubernetes components associated with the chart and deletes the release.

## Configuration

The following table lists the configurable parameters of the chart and their default values.

| Parameter                                     | Description                                                                                                                                         | Default                                                 |
|-----------------------------------------------|-----------------------------------------------------------------------------------------------------------------------------------------------------|---------------------------------------------------------|
| `image.registry`                              | Image registry                                                                                                                                | `docker.io`                                             |
| `image.repository`                            | Image name                                                                                                                                    | `ondalk8s/hello-helm`                                         |
| `image.tag`                                   | Image tag                                                                                                                                     | `{TAG_NAME}`                                            |
| `image.pullPolicy`                            | Image pull policy                                                                                                                                   | `Always`                                          |
| `image.pullSecrets`                           | Specify docker-registry secret names as an array                                                                                                    | `nil`                                                   |
| `nameOverride`                                | String to partially override hello-helm.fullname template with a string (will prepend the release name)                                                  | `nil`                                                   |
| `fullnameOverride`                            | String to fully override hello-helm.fullname template with a string                                                                                      | `nil`                                                   |

Specify each parameter using the `--set key=value[,key=value]` argument to `helm install`. For example,

```bash
$ helm install --name my-release \
  --set password=secretpassword \
    <repo>/hello-helm
```

The above command sets the hello-helm server password to `secretpassword`.

Alternatively, a YAML file that specifies the values for the parameters can be provided while installing the chart. For example,

```bash
$ helm install --name my-release -f values.yaml <repo>/hello-helm
```

```

> **Tip**: You can use the default [values.yaml](values.yaml)
3) LICENSE 작성
https://choosealicense.com/licenses/ 사이트의 문구를 참조하여 작성합니다.
MIT License

Copyright (c) 2019 hello-helm

Permission is hereby granted, free of charge, to any person obtaining a copy
of this software and associated documentation files (the "Software"), to deal
in the Software without restriction, including without limitation the rights
to use, copy, modify, merge, publish, distribute, sublicense, and/or sell
copies of the Software, and to permit persons to whom the Software is
furnished to do so, subject to the following conditions:

The above copyright notice and this permission notice shall be included in all
copies or substantial portions of the Software.

THE SOFTWARE IS PROVIDED "AS IS", WITHOUT WARRANTY OF ANY KIND, EXPRESS OR
IMPLIED, INCLUDING BUT NOT LIMITED TO THE WARRANTIES OF MERCHANTABILITY,
FITNESS FOR A PARTICULAR PURPOSE AND NONINFRINGEMENT. IN NO EVENT SHALL THE
AUTHORS OR COPYRIGHT HOLDERS BE LIABLE FOR ANY CLAIM, DAMAGES OR OTHER
LIABILITY, WHETHER IN AN ACTION OF CONTRACT, TORT OR OTHERWISE, ARISING FROM,
OUT OF OR IN CONNECTION WITH THE SOFTWARE OR THE USE OR OTHER DEALINGS IN THE
SOFTWARE.
4) requirements.yaml : 종속 chart가 없으므로 작성하지 않습니다. 종속chart 사용에 대해선 별도의 장에서 설명합니다.
5) values.yaml
기본으로 제공되는 값을 참조하여 변경합니다.
아래 부분은 변경하셔야 합니다.
- image.repository : 본인 docker registry에 맞게 변경
- ingress.hosts[0].host : 본인 k8s master VM의 IP로 변경
# This is a YAML-formatted file.
# Declare variables to be passed into your templates.

replicaCount: 1

image:
  repository: ondalk8s/hello-helm
  tag: latest
  pullPolicy: Always

imagePullSecrets: []
nameOverride: ""
fullnameOverride: ""

service:
  type: NodePort
  port: 80
  targetPort: 8080

ingress:
  enabled: true
  annotations:
    kubernetes.io/ingress.class: nginx
    # kubernetes.io/tls-acme: "true"
  hosts:
    - host: 169.56.164.246.nip.io
      paths: [ "/", "/hello" ]

  tls: []
  #  - secretName: chart-example-tls
  #    hosts:
  #      - chart-example.local

resources:
  # We usually recommend not to specify default resources and to leave this as a conscious
  # choice for the user. This also increases chances charts run on environments with little
  # resources, such as Minikube. If you do want to specify resources, uncomment the following
  # lines, adjust them as necessary, and remove the curly braces after 'resources:'.
  limits:
    cpu: 100m
    memory: 128Mi
  requests:
    cpu: 100m
    memory: 128Mi

nodeSelector: {}

tolerations: []

affinity: {}
6) templates/_helpers.tpl
manifest파일들에서 공통으로 참고하는 변수들을 정의합니다.
{{/* vim: set filetype=mustache: */}}
{{/*
Expand the name of the chart.
*/}}
{{- define "hello-helm.name" -}}
{{- default .Chart.Name .Values.nameOverride | trunc 63 | trimSuffix "-" -}}
{{- end -}}

{{/*
Create a default fully qualified app name.
We truncate at 63 chars because some Kubernetes name fields are limited to this (by the DNS naming spec).
If release name contains chart name it will be used as a full name.
*/}}
{{- define "hello-helm.fullname" -}}
{{- if .Values.fullnameOverride -}}
{{- .Values.fullnameOverride | trunc 63 | trimSuffix "-" -}}
{{- else -}}
{{- $name := default .Chart.Name .Values.nameOverride -}}
{{- if contains $name .Release.Name -}}
{{- .Release.Name | trunc 63 | trimSuffix "-" -}}
{{- else -}}
{{- printf "%s-%s" .Release.Name $name | trunc 63 | trimSuffix "-" -}}
{{- end -}}
{{- end -}}
{{- end -}}

{{/*
Create chart name and version as used by the chart label.
*/}}
{{- define "hello-helm.chart" -}}
{{- printf "%s-%s" .Chart.Name .Chart.Version | replace "+" "_" | trunc 63 | trimSuffix "-" -}}
{{- end -}}

{{/*
Common labels
*/}}
{{- define "hello-helm.labels" -}}
app.kubernetes.io/name: {{ include "hello-helm.name" . }}
helm.sh/chart: {{ include "hello-helm.chart" . }}
app.kubernetes.io/instance: {{ .Release.Name }}
{{- if .Chart.AppVersion }}
app.kubernetes.io/version: {{ .Chart.AppVersion | quote }}
{{- end }}
app.kubernetes.io/managed-by: {{ .Release.Service }}
{{- end -}}
7) templates/deployment.yaml
아래 항목만 변경합니다.
containerPort: http --> containerPort: {{ .Values.service.targetPort }}
전체 내용은 아래와 같습니다.
apiVersion: apps/v1
kind: Deployment
metadata:
  name: {{ include "hello-helm.fullname" . }}
  labels:
{{ include "hello-helm.labels" . | indent 4 }}
spec:
  replicas: {{ .Values.replicaCount }}
  selector:
    matchLabels:
      app.kubernetes.io/name: {{ include "hello-helm.name" . }}
      app.kubernetes.io/instance: {{ .Release.Name }}
  template:
    metadata:
      labels:
        app.kubernetes.io/name: {{ include "hello-helm.name" . }}
        app.kubernetes.io/instance: {{ .Release.Name }}
    spec:
    {{- with .Values.imagePullSecrets }}
      imagePullSecrets:
        {{- toYaml . | nindent 8 }}
    {{- end }}
      containers:
        - name: {{ .Chart.Name }}
          image: "{{ .Values.image.repository }}:{{ .Values.image.tag }}"
          imagePullPolicy: {{ .Values.image.pullPolicy }}
          ports:
            - name: http
              containerPort: {{ .Values.service.targetPort }}
              protocol: TCP
          livenessProbe:
            httpGet:
              path: /
              port: http
          readinessProbe:
            httpGet:
              path: /
              port: http
          resources:
            {{- toYaml .Values.resources | nindent 12 }}
      {{- with .Values.nodeSelector }}
      nodeSelector:
        {{- toYaml . | nindent 8 }}
      {{- end }}
    {{- with .Values.affinity }}
      affinity:
        {{- toYaml . | nindent 8 }}
    {{- end }}
    {{- with .Values.tolerations }}
      tolerations:
        {{- toYaml . | nindent 8 }}
    {{- end }}
나머지 파일들은 그대로 두셔도 됩니다.
2. Chart 검사 하기
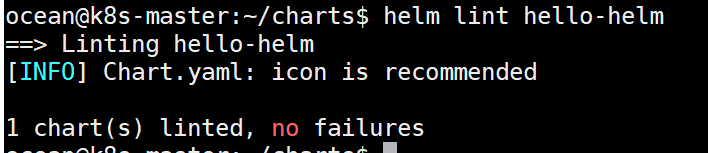
1) helm lint <Chart.yaml 경로>
전체적으로 문법에 문제가 없는지 검사합니다.
# cd ~/charts
# helm lint hello-helm
* lint는 보푸라기라는 뜻인데 원 뜻과 상관없이 '유닉스에서 C언어의 오류검사'하는 프로그램 이름에서 유래함
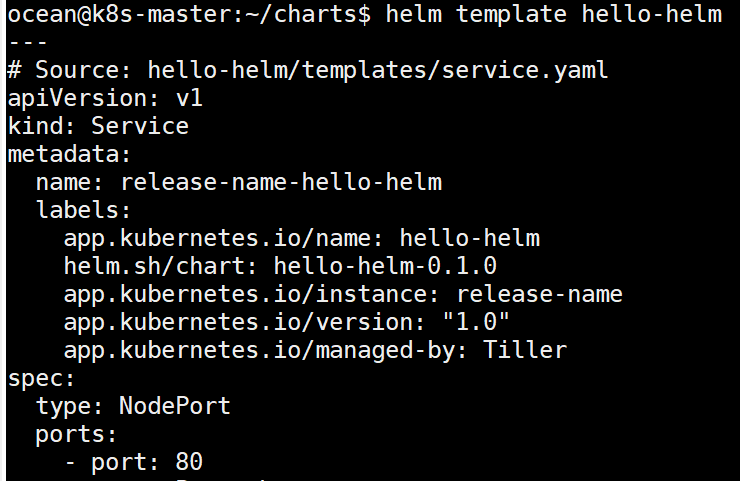
2) helm template <Chart.yaml 경로>
templates 디렉토리에 있는 template파일(deployment.yaml, service.yaml, ingress.yaml)들은 values.yaml과 templates/_helpers.tpl의 값을 참조하여 배포 manifest파일을 만듭니다. 그 결과를 미리 보기 합니다.
3) helm install <release name> <Chart.yaml경로> --debug --dry-run
--dry-run : 실제 클러스터에 설치 하지 않고 chart를 시험 설치하는 옵션
--debug: 배포를 위한 manifest 파일 내용을 보여줌
# helm install test1 hello-helm --dry-run
# helm install test1 hello-helm --dry-run --debug
3. Chart 패키징 하기
helm package <Chart.yaml 경로>
Chart를 압축화일로 packaging 합니다.
# cd ~/charts
# helm package hello-helm
Chart.yaml에 정의한 <name항목값>-<version항목값>.tgz 로 압축파일이 생성됩니다.

4. Repository에 등록하기
repository에 helm chart를 등록합니다.
Repository는 크게 Local, Public, Private의 3가지 유형이 있습니다.
Local repository는 테스트 용도 외에는 권장하지 않습니다.
Public repository는 대표적으로 github를 이용하는 방법이 있습니다.
Private repository는 대표적으로 chartmuseum이라는 오픈소스를 사용합니다.
본 장에서는 Local과 Public repository에 등록하는 방법을 해 보겠습니다.
ChartMuseum을 이용하는 방법은 별도의 장에서 설명합니다.
1) Local repository에 등록하기
- Local repository 만들기
Local repository로 사용할 디렉토리를 만들고 index.yaml을 만듭니다.
$ mkdir -p ~/local-charts
$ helm repo index ~/local-charts

- chart 등록
helm serve로 repository 서버를 실행합니다.
$ helm serve --repo-path ~/local-charts &
repository를 추가합니다. 맨 끝에 charts를 붙여줘야 제대로 등록됩니다.
$ helm repo add localrepo http://127.0.0.1:8879/charts
chart를 복사하고 index.yaml을 갱신합니다.
$ cp ~/charts/hello-helm-0.1.0.tgz ~/local-charts
$ helm repo index ~/local-charts

이제 local repository에서 chart를 가져와 설치를 합니다.
$ helm repo update
$ helm install localrepo/hello-helm --name hello-helm
$ watch kubectl get pod
POD가 실행 되면 웹 브라우저에서 ingress주소로 접근합니다.
아래와 같이 나오면 됩니다.

다음 실습을 위해 배포한 chart를 삭제합니다.
$ helm delete hello-helm --purge
2) github repository에 등록하기
- github repository 만들기
아래 글을 참조하여 github에 repository를 만듭니다.
https://happycloud-lee.tistory.com/6
0. 사전준비: github에 helm repository 만들기
helm chart repository로 github를 이용하는 방법을 설명하겠습니다. 사전에 https://github.com/ 으로 접근하여 계정을 하나 만듭니다. 본 글에서는 'happycloudpak'이라는 계정을 이용하여 설명합니다. 예제를..
happycloud-lee.tistory.com
- chart 등록하기
$ helm repo list
위에서 github repository를 만들고, github-stable이라는 이름으로 repository를 등록했을것입니다.

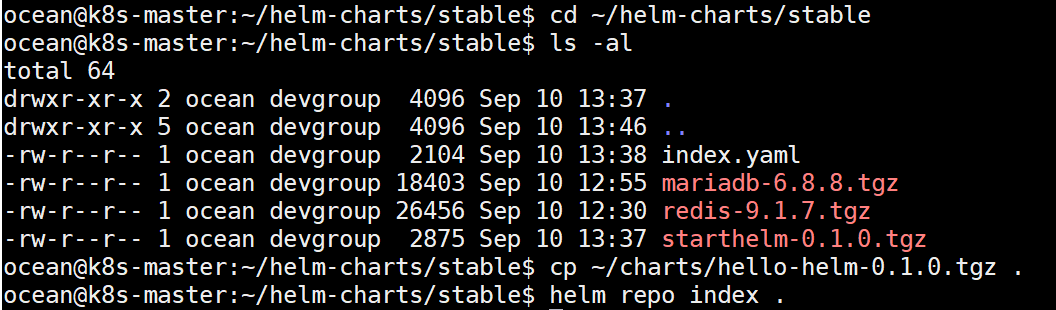
github의 Local repository인 ~/helm-charts/stable에 chart압축파일을 복사합니다.
$ cd ~/helm-charts/stable
$ cp ~/charts/hello-helm-0.1.0.tgz .
index.yaml을 갱신합니다.
$ helm repo index .
github repository로 push합니다.
$ git add ~/helm-charts && git commit -m "add hello-helm chart" && git push origin master

- github repository를 이용하여 chart 배포
$ helm repo update
$ helm install hello-helm github-stable/hello-helm
$ watch kubectl get pod
POD실행 후, 웹페이지에서 접근하여 정상적으로 표시되는지 확인합니다.
'Agile&DevOps > helm' 카테고리의 다른 글
| 4. Helm chart 이용 Jenkins CI/CD Pipeline: 기본 (0) | 2019.09.11 |
|---|---|
| 3. chartmuseum으로 private helm registry 만들기 (0) | 2019.09.11 |
| 0. 사전준비: github에 helm repository 만들기 (0) | 2019.09.10 |
| 1. 기존 Helm chart 설치, 업그레이드, 삭제 (0) | 2019.09.10 |
| 0. helm 정의 및 설치 (0) | 2019.09.07 |
- Total
- Today
- Yesterday
- 애자일
- spotify
- 도파밍
- 리퀴드폴리탄
- AI
- #MAS
- SAGA
- 호모프롬프트
- 버라이어티가격
- 디토소비
- agile
- Event Sourcing
- API Composition
- 돌봄경제
- 마이크로서비스
- 요즘남편 없던아빠
- 마이크로서비스 패턴
- 분초사회
- 스핀프로젝트
- micro service
- CQRS
- agentic ai
- AXON
- 육각형인간
- 스포티파이
- 플러그인
| 일 | 월 | 화 | 수 | 목 | 금 | 토 |
|---|---|---|---|---|---|---|
| 1 | 2 | 3 | 4 | 5 | 6 | 7 |
| 8 | 9 | 10 | 11 | 12 | 13 | 14 |
| 15 | 16 | 17 | 18 | 19 | 20 | 21 |
| 22 | 23 | 24 | 25 | 26 | 27 | 28 |