
티스토리 뷰
helm chart registry로 github를 이용할 수도 있으나, internet 사용이 원할하지 않거나 보안을 강화하기 위해 private registry를 구축할 필요가 있습니다.
이번장에서는 chartmuseum이라는 오픈소스를 이용하여 private helm registry를 만들어 보겠습니다.
작업 순서는 아래와 같습니다.
1. 환경설정값 재정의 : chartmuseum의 환경변수값(values.yaml에 정의)을 분석하여 재정의 환경설정 파일 생성
2. NFS volume 생성
3. 배포할 namespace 생성, System Account 생성 및 Cluster Role Binding
4. TLS위한 cert 파일 생성 및 Secret 리소스 생성
5. chartmuseum 설치
6. chartmuseum registry 등록
7. 테스트
1. 환경설정값 재정의
helm chart는 저마다의 환경설정값(예: 배포할 POD갯수, 배포 image, DB ID/PW, PV/PVC, CPU/Memory Quota 등)이 정의 되어 있습니다. 따라서, 그 환경설정값을 분석하여 재정의해야 제대로 설치되는 경우가 대다수입니다.
아래와 같이 chart museum의 registry를 확인한 후, 기존 환경설정값을 읽습니다.
$ helm search chartmuseum

$ mkdir -p ~/charts/chartmuseum && cd ~/charts/chartmuseum
$ helm inspect values stable/chartmuseum > values.yaml
내용을 분석하여 아래와 같이 환경설정을 재정의할 config.yaml파일을 만듭니다.
기존의 설정값과 동일한 값은 중복해서 config.yaml에 기술할 필요 없습니다. 달라지는 값만 정의하면 됩니다.
config.yaml 내용
주의 깊게 봐야할 항목은 아래와 같습니다.
- env
. open.DISABLE_API : registry 접근시 /api/charts형식의 REST API를 지원하기 위해 'false'로 변경
. open.CONTEXT_PATH: 접근할 root context로서 항상 /charts로 지정해야 함
- secret : 인증을 위한 id / pw를 지정
- persistent.pv : PV와 PVC를 모두 설정할 수 있음. AWS, Azure, Google, Oracle, Alibaba 등 public cloud의 storage를 사용할 수 있음. 이 예제에서는 NFS서버를 Storage로 사용하도록 설정함. NFS서버의 ip와 디렉토리는 본인에 맞게 변경 필요함
- ingress.enabled: true
- ingress.annotations: remark 해제
- ingress.hosts.secret : TLS 지원을 위해 domain(chartrepo.169.56.164.245.nip.io)을 위한 Secret 지정. domain의 IP는 본인 k8s master VM IP로 바꿔줘야 함.
replicaCount: 1
env:
  open:
    DISABLE_API: false
    CONTEXT_PATH: /charts
  secret:
    # username for basic http authentication
    BASIC_AUTH_USER: helm-admin
    # password for basic http authentication
    BASIC_AUTH_PASS: happy@cloud
    ## Secret리소스가 <release name>-<chart name>의 이름(ex:chartrepo-chartmuseum)으로 자동 생성됨
resources:
  limits:
    cpu: 100m
    memory: 128Mi
  requests:
    cpu: 80m
    memory: 64Mi

persistence:
  enabled: true
  accessMode: ReadWriteOnce
  size: 8Gi
  labels:
    name: chartmuseum
  pv:
    enabled: true
    pvname: pv-chartmuseum
    capacity:
      storage: 8Gi
    accessMode: ReadWriteOnce
    nfs:
      server: 169.56.164.245
      path: /data/nfs/chartmuseum
ingress:
  enabled: true
  annotations:
    kubernetes.io/ingress.class: nginx
    kubernetes.io/tls-acme: "true"
  hosts:
    - name: chartrepo.169.56.164.245.nip.io
      path: /
      tls: false
    - name: chartrepo.169.56.164.245.nip.io
      path: /
      ## Set this to true in order to enable TLS on the ingress record
      tls: true
      ## If TLS is set to true, you must declare what secret will store the key/certificate for TLS
      ## Secrets must be added manually to the namespace
      ## ex) kubectl create secret tls tls-secret --key tls.key --cert tls.crt -n=helm
      tlsSecret: tls-secret
2. NFS Volume 생성
config.yaml에 지정한 NFS서버에 volume 디렉토리를 생성합니다.
아래 작업을 NFS서버에서 수행하십시오.
$ cd /data/nfs
$ mkdir chartmuseum
권한을 변경합니다. chartmuseum은 root계정이 아닌 다른 계정으로 volume을 write해야 하므로 777로 변경합니다.
$ chmod 777 chartmuseum
3. 배포할 namespace 생성, Service Account 생성 및 Cluster Role Binding
- namespace를 생성합니다. 이름은 적절하게 부여하면 됩니다. 여기서는 helm이라는 namespace를 만들겠습니다.
$ kubectl create namespace helm
Service Account는 namespace생성 시 기본으로 생성되는 default를 그대로 사용합니다.
cluster-admin role을 'default' SA에 부여합니다.
$ kubectl create clusterrolebinding rb_helm_default --clusterrole cluster-admin --serviceaccount=helm:default
※ OCP에서는 아래와 같이 SCC(Security Context Contrained)도 수정하셔야 제대로 helm chart가 설치됩니다.
$ oc project helm
$ oc adm policy add-scc-to-user anyuid -z default
4. TLS위한 cert 파일 생성 및 Secret 리소스 생성
$ cd ~/charts/chartmuseum
$ mkdir cert && cd cert
$ openssl genrsa -out tls.key 2048
$ openssl req -new -key tls.key -out tls.csr
위 명령 수행 후 Common Name에 ingress domain(위 예에서는 chartrepo.169.56.164.245.nip.io)을 넣고, 암호는 아무거나 넣으십시오.
$ openssl x509 -req -in tls.csr -signkey tls.key -out tls.crt
Secret 리소스를 만듭니다.
$ kubectl create secret tls tls-secret --key tls.key --cert tls.crt -n=helm
5. chartmuseum chart 설치
아래와 같이 chartmuseum을 설치합니다.
$ helm install -f config.yaml stable/chartmuseum --name chartrepo --namespace helm
설치 완료 후 웹브라우저를 열고 ingress에서 지정한 주소로 접근합니다.
사용자 이름과 비밀번호는 config.yaml에 지정한 값을 입력합니다.
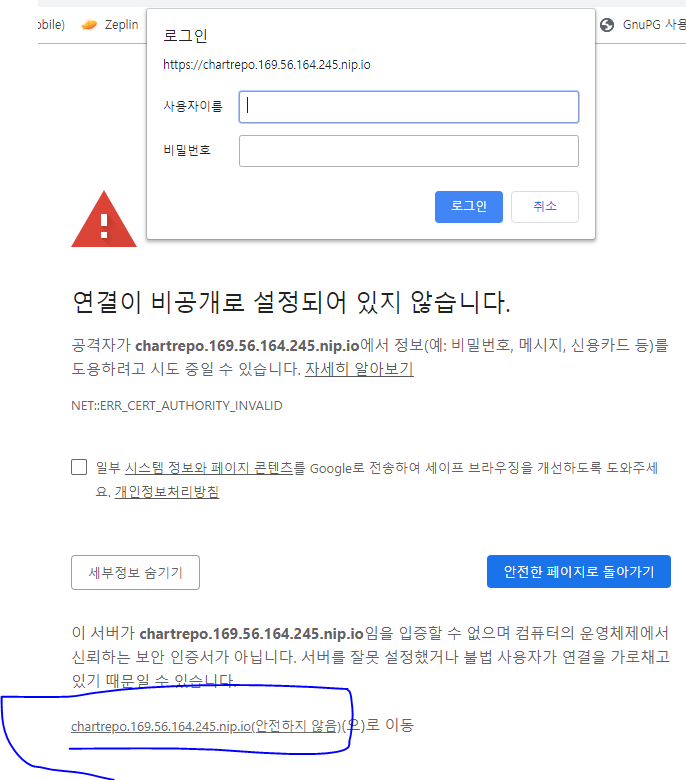
아래와 같은 페이지가 나오면 설치가 잘 된 겁니다.

6. chartmuseum registry 등록
이제 인증서 파일(tls.crt)과 ID/암호(helm-admin / happy@clouse : config.yaml에서 지정함)를 이용하여 chartmuseum registry를 등록합니다. chart registry의 주소 끝에는 /charts를 꼭 붙여야 합니다.
$ cd ~/charts/chartmuseum
인증서 파일은 계속 사용해야 하므로 특정 디렉토리로 복사해 놓고 사용합니다.
$ mkdir -p ~/cert/chartmuseum
$ cp ~/charts/chartmuseum/cert/tls.crt ~/cert/chartmuseum
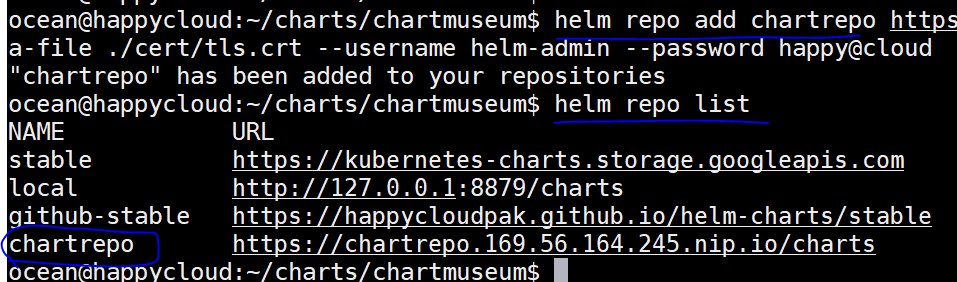
$ helm repo add chartrepo https://chartrepo.169.56.164.245.nip.io/charts --ca-file ~/cert/chartmuseum/tls.crt --username helm-admin --password happy@cloud
TIP) helm repo update 수행 시 registry 등록 시 지정한 인증서 파일 경로에서 tls.crt
$ helm repo list
7. 테스트
chartmuseum이 잘 설치되었고 registry 목록에도 등록했습니다.
이제 chartmuseum registry에 새로 만든 chart를 등록하고, 그 chart를 읽어 설치가 잘 되는지 테스트 하겠습니다.
테스트용 차트는 github에 등록한 hello-helm 차트를 사용하겠습니다.
1) hello-helm 차트를 압축을 풀면서 내려 받습니다.
$ cd ~/charts
$ helm repo add github-stable https://happycloudpak.github.io/helm-charts/stable
$ helm fetch github-stable/hello-helm --untar
2) chart명과 ingress 주소를 바꿉니다.
- Chart.yaml

- values.yaml

3) hi-helm 차트로 package합니다.
$ cd ~/charts
$ mv hello-helm hi-helm
$ helm package hi-helm

4) chartmuseum registry에 등록합니다.
helm-push 플러그인을 이용해 chartmuseum에 chart를 쉽게 등록할 수 있습니다. 플러그인을 먼저 설치합니다.
$ helm plugin install https://github.com/chartmuseum/helm-push
보안을 위해 인증서 파일이 있는 경우에만 등록을 허용합니다. 맨 끝의 -f는 이미 있어도 강제로 push하는 옵션입니다.
$ helm push hi-helm-0.1.0.tgz chartrepo --ca-file ~/cert/chartmuseum/tls.crt -f
$ helm repo update
$ helm search hi-helm
5) hi-helm 차트를 설치 합니다.
$ helm install chartrepo/hi-helm --name hi-helm --namespace helm

웹브라우저에서 위 주소로 접근하여 정상적으로 표시되는지 확인합니다.

테스트가 잘 되었으면 차트를 삭제합니다.
$ helm delete hi-helm --purge
이상으로 "chartmuseum으로 private helm registry"만들기를 마치겠습니다.
private image registry이면서 helm registry까지 제공하는 harbor도 배워보시기 바랍니다.
happycloud-lee.tistory.com/165?category=832250
harbor 설치 및 구성
harbor는 private container image registry입니다. Addon으로 private helm chart registry인 Chartmuseum도 같이 제공합니다. LINE에서 harbor를 도입한 후기도 참조하십시오. harbor 설치 설치는 아래 글에 잘..
happycloud-lee.tistory.com
다음 장에서는 Jenkins CI/CD Pipeline에서 helm chart를 배포하는 방법을 설명하겠습니다.
수고하셨습니다.
'Agile&DevOps > helm' 카테고리의 다른 글
| 4. Helm chart 이용 Jenkins CI/CD Pipeline: 무중단 배포 (2) | 2019.09.14 |
|---|---|
| 4. Helm chart 이용 Jenkins CI/CD Pipeline: 기본 (0) | 2019.09.11 |
| 0. 사전준비: github에 helm repository 만들기 (0) | 2019.09.10 |
| 2. Helm chart 생성, 테스트, 패키징, Helm Repository에 배포하기 (2) | 2019.09.10 |
| 1. 기존 Helm chart 설치, 업그레이드, 삭제 (0) | 2019.09.10 |
- Total
- Today
- Yesterday
- 플러그인
- agile
- 스핀프로젝트
- SAGA
- CQRS
- API Composition
- 돌봄경제
- 요즘남편 없던아빠
- 분초사회
- micro service
- 도파밍
- 리퀴드폴리탄
- agentic ai
- AI
- 육각형인간
- 마이크로서비스 패턴
- 디토소비
- AXON
- Event Sourcing
- 스포티파이
- #MAS
- 버라이어티가격
- 마이크로서비스
- 호모프롬프트
- 애자일
- spotify
| 일 | 월 | 화 | 수 | 목 | 금 | 토 |
|---|---|---|---|---|---|---|
| 1 | 2 | 3 | 4 | 5 | 6 | 7 |
| 8 | 9 | 10 | 11 | 12 | 13 | 14 |
| 15 | 16 | 17 | 18 | 19 | 20 | 21 |
| 22 | 23 | 24 | 25 | 26 | 27 | 28 |
| 29 | 30 | 31 |